shadowsocks














这是 shadowsocks 的移植版本。
shadowsocks 是一个快速的隧道代理,可帮助你绕过防火墙。
| 库 | 描述 |
|---|---|
| shadowsocks |   shadowsocks 核心协议 shadowsocks 核心协议 |
| shadowsocks-service |   用于提供 shadowsocks 服务的组件 用于提供 shadowsocks 服务的组件 |
| shadowsocks-rust | 运行常见 shadowsocks 服务的二进制文件 |
相关项目:
- spyophobia/shadowsocks-gtk-rs 使用 GTK 为
sslocal在 Linux 上提供的 GUI,讨论 - honwen/openwrt-shadowsocks-rust 针对
sslocal的 OpenWRT 解决方案,讨论 - cg31/shadowsocks-windows-gui-rust Windows GUI 客户端,讨论
构建与安装
可选功能
-
hickory-dns- 使用hickory-resolver作为 DNS 解析器,而非tokio的内置解析器。 -
local-http- 允许对sslocal使用 HTTP 协议-
local-http-native-tls- 支持使用native-tls的 HTTPS -
local-http-rustls- 支持使用rustls的 HTTPS
-
-
local-tunnel- 允许对sslocal使用隧道协议 -
local-socks4- 允许对sslocal使用 SOCKS4/4a 协议 -
local-redir- 允许对sslocal使用 redir(透明代理)协议 -
local-dns- 允许对sslocal使用 dns 协议,作为 DNS 服务器,根据 ACL 规则将查询代理到本地或远程 DNS 服务器 -
local-fake-dns- FakeDNS,从特定的 IP 池中为每个单独的查询分配一个 IP 地址 -
local-tun- 对sslocal的 TUN 接口支持 -
local-online-config- SIP008 在线配置下发 -
stream-cipher- 启用已弃用的流密码。警告:流密码是不安全的! -
aead-cipher-extra- 启用非标准 AEAD 密码 -
aead-cipher-2022- 启用 AEAD-2022 密码(SIP022) -
aead-cipher-2022-extra- 启用 AEAD-2022 额外密码(非标准密码)
内存分配器
本项目使用系统(libc)内存分配器(Rust 的默认设置)。但它也允许你通过 features 使用其他著名的分配器:
jemalloc- 使用 jemalloc 作为全局内存分配器mimalloc- 使用 mi-malloc 作为全局内存分配器tcmalloc- 使用 TCMalloc 作为全局内存分配器。默认情况下,它尝试链接系统范围的 tcmalloc,使用tcmalloc-vendored从源码使用 vendored 版本。snmalloc- 使用 snmalloc 作为全局内存分配器rpmalloc- 使用 rpmalloc 作为全局内存分配器
crates.io
从 crates.io 安装:
# Install from crates.io
cargo install shadowsocks-rust
然后你可以在 $CARGO_HOME/bin 中找到 sslocal 和 ssserver。
使用 Homebrew 安装
对于 macOS 和 Linux,你可以使用 Homebrew 进行安装:
brew install shadowsocks-rust使用 snap 安装
# Install from snapstore
snap install shadowsocks-rust

# List services
snap services shadowsocks-rust

# Enable and start shadowsocks-rust.sslocal-daemon snap service
snap start --enable shadowsocks-rust.sslocal-daemon

# Show generated systemd service status
systemctl status snap.shadowsocks-rust.sslocal-daemon.service

# Override generated systemd service (configure startup options)
systemctl edit snap.shadowsocks-rust.sslocal-daemon.service

## NOTE: you can pass args to sslocal:
##  [Service]
##  ExecStart=
##  ExecStart=/usr/bin/snap run shadowsocks-rust.sslocal-daemon -b "127.0.0.1:1080" --server-url "ss://...."

# Restart generated systemd service to apply changes
systemctl restart snap.shadowsocks-rust.sslocal-daemon.service

# ... and show service status
systemctl status snap.shadowsocks-rust.sslocal-daemon.service
默认配置文件路径可能是 /var/snap/shadowsocks-rust/common/etc/shadowsocks-rust/config.json。
下载发行版
下载静态链接构建 此处。
- 其中大多数使用 cross 构建。构建环境详情可在其 README 中找到,例如 glibc 的版本。
x86_64-apple-darwin、aarch64-apple-darwin在 github 的macos-latest镜像中构建。相关信息可在 此处 找到。x86_64-pc-windows-msvc在 github 的windows-latest镜像中构建。相关信息可在 此处 找到。
Docker
本项目为 linux/i386 和 linux/amd64 以及 linux/arm64/v8 架构提供了 Docker 镜像。
:warning: Docker 容器默认无法访问 IPv6:请确保在客户端禁用 IPv6 路由,或 启用对 docker 容器的 IPv6 访问。
从 GitHub Container Registry 拉取
Docker 将从我们的 GitHub Packages 拉取相应架构的镜像。
docker pull ghcr.io/shadowsocks/sslocal-rust:latest
docker pull ghcr.io/shadowsocks/ssserver-rust:latest
在本地机器上构建(可选)
如果您想自行构建 Docker 镜像,您需要使用 BuildX.
docker buildx build -t shadowsocks/ssserver-rust:latest -t shadowsocks/ssserver-rust:v1.15.2 --target ssserver .
docker buildx build -t shadowsocks/sslocal-rust:latest -t shadowsocks/sslocal-rust:v1.15.2 --target sslocal .
运行容器
你需要将配置文件挂载到容器中,并为容器创建外部端口映射以进行连接。
docker run --name sslocal-rust \
  --restart always \
  -p 1080:1080/tcp \
  -v /path/to/config.json:/etc/shadowsocks-rust/config.json \
  -dit ghcr.io/shadowsocks/sslocal-rust:latest

docker run --name ssserver-rust \
  --restart always \
  -p 8388:8388/tcp \
  -p 8388:8388/udp \
  -v /path/to/config.json:/etc/shadowsocks-rust/config.json \
  -dit ghcr.io/shadowsocks/ssserver-rust:latest
部署到 Kubernetes
本项目提供了用于部署到 Kubernetes 的 yaml 清单文件。
你可以利用 k8s Service 将流量暴露到外部,例如 LoadBalancer 或 NodePort,与固定的 host 或 port 相比,它们能提供更细粒度的控制。
对于一个更有趣的用例,你可以使用 Ingress(Istio、nginx 等),将匹配的流量路由到 shadowsocks,同时保留真实的 web 服务。
使用 kubectl
kubectl apply -f https://github.com/shadowsocks/shadowsocks-rust/raw/master/k8s/shadowsocks-rust.yaml
你可以通过编辑名为 shadowsocks-rust 的 ConfigMap 来更改配置。
如需更细粒度的控制,请使用 helm。
使用 helm
helm install my-release k8s/chart -f my-values.yaml
以下是您可以更改的常见默认值:
# This is the shadowsocks config which will be mount to /etc/shadowocks-rust.
# You can put arbitrary yaml here, and it will be translated to json before mounting.
servers:
- server: "::"
  server_port: 8388
  service_port: 80 # the k8s service port, default to server_port
  password: mypassword
  method: aes-256-gcm
  fast_open: true
  mode: tcp_and_udp
  # plugin: v2ray-plugin
  # plugin_opts: server;tls;host=github.com

# Whether to download v2ray and xray plugin.
downloadPlugins: false

# Name of the ConfigMap with config.json configuration for shadowsocks-rust.
configMapName: ""

service:
  # Change to LoadBalancer if you are behind a cloud provider like aws, gce, or tke.
  type: ClusterIP

# Bind shadowsocks port port to host, i.e., we can use host:port to access shawdowsocks server.
hostPort: false

replicaCount: 1

image:
  repository: ghcr.io/shadowsocks/ssserver-rust
  pullPolicy: IfNotPresent
  # Overrides the image tag whose default is the chart appVersion.
  tag: "latest"
从源码构建
使用 cargo 进行构建。注意:RAM >= 2GiB
cargo build --release然后 sslocal 和 ssserver 将出现在 ./target/(debug|release)/ 中,其工作方式与官方 ShadowSocks 实现中的两个二进制文件类似。
make install TARGET=release然后 sslocal、ssserver、ssmanager 和 ssurl 将被安装到 /usr/local/bin(变量 PREFIX)。
对于 Windows 用户,如果在构建过程中遇到任何问题,请在 #102 中查看和讨论。
target-cpu 优化
如果您正在为当前的 CPU 平台进行构建(例如,在个人计算机上构建并运行),建议设置 target-cpu=native 特性,以便 rustc 为运行编译器的 CPU 生成并优化代码。
export RUSTFLAGS="-C target-cpu=native"构建独立二进制文件
要求:
- Docker
./build/build-release然后 sslocal、ssserver、ssmanager、ssservice 和 ssurl 将被打包
./build/shadowsocks-${VERSION}-stable.x86_64-unknown-linux-musl.tar.xz./build/shadowsocks-${VERSION}-stable.x86_64-pc-windows-gnu.zip
有关更多详细信息,请参阅 Cargo.toml。
对于低版本 GLIBC 的 Linux,请将 CROSS_CONFIG 设置为基于 CentOS 的镜像:
export CROSS_CONFIG=Cross-centos.toml入门
使用以下命令为特定的加密方法(示例中为 aes-128-gcm)生成一个安全且受保护的密码:
ssservice genkey -m "aes-128-gcm"创建一个 ShadowSocks 的配置文件。示例
{
    "server": "my_server_ip",
    "server_port": 8388,
    "password": "rwQc8qPXVsRpGx3uW+Y3Lj4Y42yF9Bs0xg1pmx8/+bo=",
    "method": "aes-256-gcm",
    // ONLY FOR `sslocal`
    // Delete these lines if you are running `ssserver` or `ssmanager`
    "local_address": "127.0.0.1",
    "local_port": 1080
}
配置文件的详细说明可在 shadowsocks 的文档 中找到。(链接指向原始项目,该项目已不再维护!)
:warning: 对于 snap 安装,配置文件最可能位于
/var/snap/shadowsocks-rust/common/etc/shadowsocks-rust/config.json(参见 https://github.com/shadowsocks/shadowsocks-rust/issues/621 / https://github.com/shadowsocks/shadowsocks-rust/issues/1146)
在 shadowsocks-rust 中,我们还有一种扩展配置文件格式,它可以定义多个服务器。你还可以禁用单个服务器。
{
    "servers": [
        {
            "server": "127.0.0.1",
            "server_port": 8388,
            "password": "rwQc8qPXVsRpGx3uW+Y3Lj4Y42yF9Bs0xg1pmx8/+bo=",
            "method": "aes-256-gcm",
            "timeout": 7200
        },
        {
            "server": "127.0.0.1",
            "server_port": 8389,
            "password": "/dliNXn5V4jg6vBW4MnC1I8Jljg9x7vSihmk6UZpRBM=",
            "method": "chacha20-ietf-poly1305"
        },
        {
            "disabled": true,
            "server": "eg.disable.me",
            "server_port": 8390,
            "password": "mGvbWWay8ueP9IHnV5F1uWGN2BRToiVCAWJmWOTLU24=",
            "method": "chacha20-ietf-poly1305"
        }
    ],
    // ONLY FOR `sslocal`
    // Delete these lines if you are running `ssserver` or `ssmanager`
    "local_port": 1080,
    "local_address": "127.0.0.1"
}
sslocal 自动选择延迟最低且可用性最高的最佳服务器。
使用以下命令启动 Shadowsocks 客户端和服务器:
sslocal -c config.json
ssserver -c config.json
如果你使用 Cargo 构建它:
cargo run --bin sslocal -- -c config.json
cargo run --bin ssserver -- -c config.json
使用 -h 列出所有可用参数。
用法
使用配置文件启动本地客户端
# Read local client configuration from file
sslocal -c /path/to/shadowsocks.json
sslocal 还支持通过 outbound_proxy 配置键,将其出站 TCP 连接经由代理或代理链路由至 Shadowsocks 服务器。支持的跳板类型为 socks5://、http:// 和 https://,并可选使用 user:pass@ 凭据。此选项目前可通过 sslocal 的配置文件使用;ssserver 同时支持配置文件和重复的 --outbound-proxy 命令行标志。
{
    "server": "server.example.com",
    "server_port": 8388,
    "password": "hello-kitty",
    "method": "aes-256-gcm",
    "local_address": "127.0.0.1",
    "local_port": 1080,
    "outbound_proxy": [
        "socks5://user:pass@127.0.0.1:1080",
        "https://proxy.example.com:443",
        "http://127.0.0.1:1081"
    ]
}
Socks5 本地客户端
# Pass all parameters via command line
sslocal -b "127.0.0.1:1080" -s "[::1]:8388" -m "aes-256-gcm" -k "hello-kitty" --plugin "v2ray-plugin" --plugin-opts "server;tls;host=github.com"

# Pass server with SIP002 URL
sslocal -b "127.0.0.1:1080" --server-url "ss://YWVzLTI1Ni1nY206cGFzc3dvcmQ@127.0.0.1:8388/?plugin=v2ray-plugin%3Bserver%3Btls%3Bhost%3Dgithub.com"
HTTP 本地客户端
sslocal -b "127.0.0.1:3128" --protocol http -s "[::1]:8388" -m "aes-256-gcm" -k "hello-kitty"所有参数与 Socks5 客户端相同,除了 --protocol http。
Tunnel Local 客户端
# Set 127.0.0.1:8080 as the target for forwarding to
sslocal --protocol tunnel -b "127.0.0.1:3128" -f "127.0.0.1:8080" -s "[::1]:8388" -m "aes-256-gcm" -k "hello-kitty"
--protocol tunnel启用本地客户端 Tunnel 模式-f "127.0.0.1:8080设置隧道目标地址
透明代理本地客户端
注意:目前仅支持
- Linux(使用
iptables目标为REDIRECT和TPROXY) - BSD 系统(使用
pf),例如 OS X 10.10+、FreeBSD 等
sslocal -b "127.0.0.1:60080" --protocol redir -s "[::1]:8388" -m "aes-256-gcm" -k "hello-kitty" --tcp-redir "redirect" --udp-redir "tproxy"将具有 iptables 配置的连接重定向到 sslocal 正在监听的端口。
--protocol redir启用本地客户端 Redir 模式- (可选)
--tcp-redir将 TCP 模式设置为REDIRECT(Linux) - (可选)
--udp-redir将 UDP 模式设置为TPROXY(Linux)
Linux iptables 示例
iptables 透明重定向必须指向一个 redir 监听器。请勿将流量重定向到 socks 或 http
监听器,因为 REDIRECT/TPROXY 会发送原始的 TCP/UDP 流,而不进行 SOCKS 握手或 HTTP CONNECT
请求。仅对能够直接通信这些代理协议的应用程序使用 --protocol socks 或 --protocol http。
对于本地机器上仅支持 TCP 的最小化配置:
# Start sslocal in redir mode. The fwmark lets iptables skip sslocal's own
# outbound connection to the Shadowsocks server and avoid a proxy loop.
sudo sslocal -b "127.0.0.1:60080" --protocol redir \
    -s "server.example.com:8388" -m "aes-256-gcm" -k "hello-kitty" \
    --tcp-redir "redirect" --outbound-fwmark 255

# Redirect locally generated TCP connections to sslocal.
sudo iptables -t nat -N shadowsocks-redir
for addr in 0/8 10/8 100.64/10 127/8 169.254/16 172.16/12 192.168/16 224/4 240/4; do
    sudo iptables -t nat -A shadowsocks-redir -d "$addr" -j RETURN
done
sudo iptables -t nat -A shadowsocks-redir -m mark --mark 0xff/0xff -j RETURN
sudo iptables -t nat -A shadowsocks-redir -p tcp -j REDIRECT --to-ports 60080
sudo iptables -t nat -A OUTPUT -p tcp -j shadowsocks-redir
对于 TCP+UDP、LAN 网关、IPv6 或基于 ipset 的路由,请调整
configs/iptables_mixed.sh 或 configs/iptables_tproxy.sh 中的示例
并使用 --tcp-redir "tproxy" --udp-redir "tproxy" 运行 sslocal。
如果 Shadowsocks 服务器本身必须通过 HTTP 或 SOCKS 代理访问,请将 redir 模式与
outbound_proxy 配置选项结合使用。这会将 sslocal 的出站 TCP 连接通过该代理路由;UDP 流量
不会被 outbound_proxy 代理。
Tun 接口客户端
注意:目前仅支持
- Linux, Android
- macOS, iOS
- Windows
Linux
创建一个名为 tun0 的 Tun 接口
ip tuntap add mode tun tun0
ifconfig tun0 inet 10.255.0.1 netmask 255.255.255.0 up
从 sslocal 开始,使用 --protocol tun 并绑定到 tun0
sslocal --protocol tun -s "[::1]:8388" -m "aes-256-gcm" -k "hello-kitty" --outbound-bind-interface lo0 --tun-interface-name tun0macOS
sslocal --protocol tun -s "[::1]:8388" -m "aes-256-gcm" -k "hello-kitty" --outbound-bind-interface lo0 --tun-interface-address 10.255.0.1/24它将创建一个地址为 10.255.0.1、子网掩码为 255.255.255.0 的 Tun 接口。
Windows
从 Wintun 下载 wintun.dll,并将其放置在 shadowsocks 可执行文件所在的文件夹中,或放置在系统 PATH 中。
sslocal --protocol tun -s "[::1]:8388" -m "aes-256-gcm" -k "hello-kitty" --outbound-bind-interface "Ethernet 0" --tun-interface-name "shadowsocks"Windows 服务的本地客户端
通过启用 --features "winservice" 进行编译(默认构建中不包含):
cargo build --release --bin "sswinservice" --features "winservice"将其安装为 Windows 服务(PowerShell):
New-Service -Name "shadowsocks-local-service" `
            -DisplayName "Shadowsocks Local Service" `
            -BinaryPathName "<Path\to>\sswinservice.exe local -c <Path\to>\local_config.json"
还有其他方法可以将 sswinservice 安装为 Windows 服务,例如使用 sc 命令。
您可能已经注意到,-BinaryPathName 不仅包含 sswinservice.exe,还包含 local -c local_config.json。这些命令行参数将在 Windows 服务启动时作为默认参数使用。您也可以使用自定义参数启动服务。
更多信息请参阅 Microsoft 的文档。
sswinservice 的参数与 ssservice 完全相同。它支持 local、server 和 manager 子命令。
服务器
# Read server configuration from file
ssserver -c /path/to/shadowsocks.json

# Pass all parameters via command line
ssserver -s "[::]:8388" -m "aes-256-gcm" -k "hello-kitty" --plugin "v2ray-plugin" --plugin-opts "server;tls;host=github.com"

# Route outbound TCP traffic through a proxy chain
ssserver -s "[::]:8388" -m "aes-256-gcm" -k "hello-kitty" \
  --outbound-proxy socks5://user:pass@127.0.0.1:1080 \
  --outbound-proxy https://proxy.example.com:443 \
  --outbound-proxy http://127.0.0.1:1081
按跳数顺序重复 --outbound-proxy。单次出现时保持原有的单跳行为。
支持的跳数类型为 socks5://、http:// 和 https://。相同的 outbound_proxy 设置也可用于 sslocal 和 ssserver 的配置文件,但 UDP 流量不会被代理。
Server Manager
支持的 Manage Multiple Users API:
add- 启动一个服务器实例remove- 删除一个现有的服务器实例list- 列出所有当前正在运行的服务器ping- 列出所有服务器的统计数据
注意:不支持 stat 命令。因为服务器与管理器本身运行在同一进程中。
# Start it just with --manager-address command line parameter
ssmanager --manager-address "127.0.0.1:6100"

# For *nix system, manager can bind to unix socket address
ssmanager --manager-address "/tmp/shadowsocks-manager.sock"

# You can also provide a configuration file
#
# `manager_address` key must be provided in the configuration file
ssmanager -c /path/to/shadowsocks.json

# Create one server by UDP
echo 'add: {"server_port":8388,"password":"hello-kitty"}' | nc -u '127.0.0.1' '6100'

# Close one server by unix socket
echo 'remove: {"server_port":8388}' | nc -Uu '/tmp/shadowsocks-manager.sock'
对于 manager UI,更多详情请参阅 shadowsocks-manager 项目。
示例配置:
{
    // Required option
    // Address that ssmanager is listening on
    "manager_address": "127.0.0.1",
    "manager_port": 6100,

    // Or bind to a Unix Domain Socket
    "manager_address": "/tmp/shadowsocks-manager.sock",

    "servers": [
        // These servers will be started automatically when ssmanager is started
    ],

    // Outbound socket binds to this IP address
    // For choosing different network interface on the same machine
    "local_address": "xxx.xxx.xxx.xxx",

    // Other options that may be passed directly to new servers
}
配置
{
    // LOCAL: Listen address. This is exactly the same as `locals[0]`
    // SERVER: Bind address for remote sockets, mostly used for choosing interface
    //         Don't set it if you don't know what's this for.
    "local_address": "127.0.0.1",
    "local_port": 1080,

    // Extended multiple local configuration
    "locals": [
        {
            // Basic configuration, a SOCKS5 local server
            "local_address": "127.0.0.1",
            "local_port": 1080,
            // OPTIONAL. Setting the `mode` for this specific local server instance.
            // If not set, it will derive from the outer `mode`
            "mode": "tcp_and_udp",
            // OPTIONAL. Authentication configuration file
            // Configuration file document could be found in the next section.
            "socks5_auth_config_path": "/path/to/auth.json",
            // OPTIONAL. Instance specific ACL
            "acl": "/path/to/acl/file.acl",
            // OPTIONAL. macOS launchd activate socket
            "launchd_tcp_socket_name": "TCPListener",
            "launchd_udp_socket_name": "UDPListener"
        },
        {
            // SOCKS5, SOCKS4/4a local server
            "protocol": "socks",
            // Listen address
            "local_address": "127.0.0.1",
            "local_port": 1081,
            // OPTIONAL. Enables UDP relay
            "mode": "tcp_and_udp",
            // OPTIONAL. Customizing the UDP's binding address. Depending on `mode`, if
            // - TCP is enabled, then SOCKS5's UDP Association command will return this address
            // - UDP is enabled, then SOCKS5's UDP server will listen to this address.
            "local_udp_address": "127.0.0.1",
            "local_udp_port": 2081,
            // OPTIONAL. macOS launchd activate socket
            "launchd_tcp_socket_name": "TCPListener",
            "launchd_udp_socket_name": "UDPListener"
        },
        {
            // Tunnel local server (feature = "local-tunnel")
            "protocol": "tunnel",
            // Listen address
            "local_address": "127.0.0.1",
            "local_port": 5353,
            // Forward address, the target of this tunnel
            // In this example, this will build a `127.0.0.1:5353` -> `8.8.8.8:53` tunnel
            "forward_address": "8.8.8.8",
            "forward_port": 53,
            // OPTIONAL. Customizing whether to start TCP and UDP tunnel
            "mode": "tcp_only",
            // OPTIONAL. macOS launchd activate socket
            "launchd_tcp_socket_name": "TCPListener",
            "launchd_udp_socket_name": "UDPListener"
        },
        {
            // HTTP local server (feature = "local-http")
            "protocol": "http",
            // Listen address
            "local_address": "127.0.0.1",
            "local_port": 3128,
            // OPTIONAL. macOS launchd activate socket
            "launchd_tcp_socket_name": "TCPListener",
            // OPTIONAL. Authentication configuration file
            // Configuration file document could be found in the next section.
            "http_auth_config_path": "/path/to/auth.json",
        },
        {
            // DNS local server (feature = "local-dns")
            // This DNS works like China-DNS, it will send requests to `local_dns` and `remote_dns` and choose by ACL rules
            "protocol": "dns",
            // Listen address
            "local_address": "127.0.0.1",
            "local_port": 53,
            // OPTIONAL. DNS local server uses `tcp_and_udp` mode by default
            "mode": "udp_only",
            // Local DNS address, DNS queries will be sent directly to this address
            "local_dns_address": "114.114.114.114",
            // OPTIONAL. Local DNS's port, 53 by default
            "local_dns_port": 53,
            // Remote DNS address, DNS queries will be sent through ssserver to this address
            "remote_dns_address": "8.8.8.8",
            // OPTIONAL. Remote DNS's port, 53 by default
            "remote_dns_port": 53,
            // OPTIONAL. dns client cache size for fetching dns queries.
            "client_cache_size": 5,
            // OPTIONAL. macOS launchd activate socket
            "launchd_tcp_socket_name": "TCPListener",
            "launchd_udp_socket_name": "UDPListener"
        },
        {
            // Tun local server (feature = "local-tun")
            "protocol": "tun",
            // Tun interface name
            "tun_interface_name": "tun0",
            // Tun interface address
            //
            // It has to be a host address in CIDR form
            "tun_interface_address": "10.255.0.1/24"
        },
        {
            // Transparent Proxy (redir) local server (feature = "local-redir")
            "protocol": "redir",
            // OPTIONAL: TCP type, may be different between platforms
            // Linux/Android: redirect (default), tproxy
            // FreeBSD/OpenBSD: pf (default), ipfw
            // NetBSD/macOS/Solaris: pf (default), ipfw
            "tcp_redir": "tproxy",
            // OPTIONAL: UDP type, may be different between platforms
            // Linux/Android: tproxy (default)
            // FreeBSD/OpenBSD: pf (default)
            "udp_redir": "tproxy"
        },
        {
            // FakeDNS local server (feature = "local-fake-dns")
            // FakeDNS is a DNS server that allocates an IPv4 / IPv6 address in a specific pool for each queries.
            // Subsequence requests from the other local interfaces that the target addresses includes those allocated IP addresses,
            // will be substituted back to their original domain name addresses.
            // This feature is useful mostly for transparent proxy, which will allow the proxied domain names to be resolved remotely.
            "protocol": "fake-dns",
            // Listen address
            "local_address": "127.0.0.1",
            "local_port": 10053,
            // IPv4 address pool (for A records)
            "fake_dns_ipv4_network": "10.255.0.0/16",
            // IPv6 address pool (for AAAA records)
            "fake_dns_ipv6_network": "fdf2:e786:ab40:9d2f::/64",
            // Persistent storage for all allocated DNS records
            "fake_dns_database_path": "/var/shadowsocks/fakedns.db",
            // OPTIONAL: Record expire duration in seconds, 10s by default
            "fake_dns_record_expire_duration": 10
        }
    ],

    // Server configuration
    // listen on :: for dual stack support, no need add [] around.
    "server": "::",
    // Change to use your custom port number
    "server_port": 8388,
    "method": "aes-256-gcm",
    "password": "your-password",
    "plugin": "v2ray-plugin",
    "plugin_opts": "mode=quic;host=github.com",
    "plugin_args": [
        // Each line is an argument passed to "plugin"
        "--verbose"
    ],
    "plugin_mode": "tcp_and_udp", // SIP003u, default is "tcp_only"
    // Server: TCP socket timeout in seconds.
    // Client: TCP connection timeout in seconds.
    // Omit this field if you don't have specific needs.
    "timeout": 7200,

    // Extended multiple server configuration
    // LOCAL: Choosing the best server to connect dynamically
    // SERVER: Creating multiple servers in one process
    "servers": [
        {
            // Fields are the same as the single server's configuration

            // Individual servers can be disabled
            // "disabled": true,
            "address": "0.0.0.0",
            "port": 8389,
            "method": "aes-256-gcm",
            "password": "your-password",
            "plugin": "...",
            "plugin_opts": "...",
            "plugin_args": [],
            "plugin_mode": "...",
            "timeout": 7200,

            // Customized weight for local server's balancer
            //
            // Weight must be in [0, 1], default is 1.0.
            // The higher weight, the server may rank higher.
            "tcp_weight": 1.0,
            "udp_weight": 1.0,

            // OPTIONAL. Instance specific ACL
            "acl": "/path/to/acl/file.acl",
        },
        {
            // Same key as basic format "server" and "server_port"
            "server": "0.0.0.0",
            "server_port": 8388,
            "method": "chacha20-ietf-poly1305",
            // Read the actual password from environment variable PASSWORD_FROM_ENV
            "password": "${PASSWORD_FROM_ENV}"
        },
        {
            // AEAD-2022
            "server": "::",
            "server_port": 8390,
            "method": "2022-blake3-aes-256-gcm",
            "password": "3SYJ/f8nmVuzKvKglykRQDSgg10e/ADilkdRWrrY9HU=",
            // For Server (OPTIONAL)
            // Support multiple users with Extensible Identity Header
            // https://github.com/Shadowsocks-NET/shadowsocks-specs/blob/main/2022-2-shadowsocks-2022-extensible-identity-headers.md
            "users": [
                {
                    "name": "username",
                    // User's password must have the same length as server's password
                    "password": "4w0GKJ9U3Ox7CIXGU4A3LDQAqP6qrp/tUi/ilpOR9p4="
                }
            ],
            // For Client (OPTIONAL)
            // If EIH enabled, then "password" should have the following format: iPSK:iPSK:iPSK:uPSK
            // - iPSK is one of the middle relay servers' PSK, for the last `ssserver`, it must be server's PSK ("password")
            // - uPSK is the user's PSK ("password")
            // Example:
            // "password": "3SYJ/f8nmVuzKvKglykRQDSgg10e/ADilkdRWrrY9HU=:4w0GKJ9U3Ox7CIXGU4A3LDQAqP6qrp/tUi/ilpOR9p4="
        },
        {
            "...": "Any other fields",

            // Some optional fields for this specific server

            // Outbound socket options
            // Linux Only (SO_MARK)
            "outbound_fwmark": 255,
            // FreeBSD only (SO_USER_COOKIE)
            "outbound_user_cookie": 255,
            // `SO_BINDTODEVICE` (Linux), `IP_BOUND_IF` (BSD), `IP_UNICAST_IF` (Windows) socket option for outbound sockets
            "outbound_bind_interface": "eth1",
            // Outbound socket bind() to this IP (choose a specific interface)
            "outbound_bind_addr": "11.22.33.44",
            // Outbound UDP socket allows IP fragmentation (default false)
            "outbound_udp_allow_fragmentation": false,
            // Route outbound TCP connections through a proxy or proxy chain
            // (TCP only; UDP is not proxied)
            // Works for both sslocal and ssserver
            // sslocal: configure in JSON; ssserver: JSON or repeated --outbound-proxy
            // Single hop:
            "outbound_proxy": "socks5://127.0.0.1:1080",
            // Single hop with username/password:
            // "outbound_proxy": "socks5://user:pass@127.0.0.1:1080",
            // Multi-hop:
            // "outbound_proxy": [
            //     "socks5://user:pass@127.0.0.1:1080",
            //     "https://proxy.example.com:443",
            //     "http://127.0.0.1:1081"
            // ],
        }
    ],

    // Global configurations for UDP associations
    "udp_timeout": 300, // Timeout for UDP associations (in seconds), 5 minutes by default
    "udp_max_associations": 512, // Maximum UDP associations to be kept in one server, unlimited by default

    // Options for Manager
    "manager_address": "127.0.0.1", // Could be a path to UNIX socket, /tmp/shadowsocks-manager.sock
    "manager_port": 5300, // Not needed for UNIX socket

    // DNS server's address for resolving domain names
    // For *NIX and Windows, it uses system's configuration by default
    //
    // Value could be IP address of DNS server, for example, "8.8.8.8".
    // DNS client will automatically request port 53 with both TCP and UDP protocol.
    //
    // - system, uses system provided API (`getaddrinfo` on *NIX)
    //
    // It also allows some pre-defined well-known public DNS servers:
    // - google (TCP, UDP)
    // - cloudflare (TCP, UDP)
    // - cloudflare_tls (TLS), enable by feature "dns-over-tls"
    // - cloudflare_https (HTTPS), enable by feature "dns-over-https"
    // - quad9 (TCP, UDP)
    // - quad9_tls (TLS), enable by feature "dns-over-tls"
    //
    // The field is only effective if feature "hickory-dns" is enabled.
    "dns": "google",
    // Configure `cache_size` for "hickory-dns" ResolverOpts. Set to "0" to disable DNS cache.
    "dns_cache_size": 0,

    // Mode, could be one of the
    // - tcp_only
    // - tcp_and_udp
    // - udp_only
    "mode": "tcp_only",

    // TCP_NODELAY
    "no_delay": false,

    // Enables `SO_KEEPALIVE` and set `TCP_KEEPIDLE`, `TCP_KEEPINTVL` to the specified seconds
    "keep_alive": 15,

    // Soft and Hard limit of file descriptors on *NIX systems
    "nofile": 10240,

    // Try to resolve domain name to IPv6 (AAAA) addresses first
    "ipv6_first": false,
    // Set IPV6_V6ONLY for all IPv6 listener sockets
    // Only valid for locals and servers listening on `::`
    "ipv6_only": false,

    // Outbound socket options
    // Linux Only (SO_MARK)
    "outbound_fwmark": 255,
    // FreeBSD only (SO_USER_COOKIE)
    "outbound_user_cookie": 255,
    // `SO_BINDTODEVICE` (Linux), `IP_BOUND_IF` (BSD), `IP_UNICAST_IF` (Windows) socket option for outbound sockets
    "outbound_bind_interface": "eth1",
    // Outbound socket bind() to this IP (choose a specific interface)
    "outbound_bind_addr": "11.22.33.44",
    // Outbound UDP socket allows IP fragmentation (default false)
    "outbound_udp_allow_fragmentation": false,
    // Route outbound TCP connections through a proxy or proxy chain
    // (TCP only; UDP is not proxied)
    // Works for both sslocal and ssserver
    // sslocal: configure in JSON; ssserver: JSON or repeated --outbound-proxy
    // Single hop:
    "outbound_proxy": "socks5://127.0.0.1:1080",
    // Single hop with username/password:
    // "outbound_proxy": "socks5://user:pass@127.0.0.1:1080",
    // Multi-hop:
    // "outbound_proxy": [
    //     "socks5://user:pass@127.0.0.1:1080",
    //     "https://proxy.example.com:443",
    //     "http://127.0.0.1:1081"
    // ],

    // Balancer customization
    "balancer": {
        // MAX Round-Trip-Time (RTT) of servers
        // The timeout seconds of each individual checks
        "max_server_rtt": 5,
        // Interval seconds between each check
        "check_interval": 10,
        // Interval seconds between each check for the best server
        // Optional. Specify to enable shorter checking interval for the best server only.
        "check_best_interval": 5
    },

    // SIP008 Online Configuration Delivery
    // https://shadowsocks.org/doc/sip008.html
    "online_config": {
        "config_url": "https://path-to-online-sip008-configuration",
        // Optional. Seconds between each update to config_url. Default to 3600s
        "update_interval": 3600,
        // Optional. Whitelist of plugins (RECOMMENDED for all users)
        // SECURITY: To avoid executing untrusted commands loaded from config_url
        "allowed_plugins": [
            "v2ray-plugin"
        ]
    },

    // Service configurations
    // Logger configuration
    "log": {
        // Default log level to use, if not overridden by `writers`, default is `0`
        // Equivalent to `-v` command line option
        "level": 1,
        // Default log format to use, if not overridden by `writers`
        "format": {
            // Euiqvalent to `--log-without-time`, default is `false`
            "without_time": false,
        },
        // Advanced logging configuration for configuring multiple writers
        // A console writer will be configured by default.
        // Set this to empty array `[]` to disable logging completely
        "writers": [
            {
                // Configure a console writer
                // The inner fields are optional, if not set, it will use the default values
                // To minimally configure a console writer, simply write `"console": {}`.
                "console": {
                    "level": 2,
                    "format": {
                        "without_time": false,
                    }
                }
            },
            {
                // Configure a file writer, useful when running as a Windows Service
                "file": {
                    // `level` and `format` can also be set here, if not set, it will use the default values

                    // Required. Directory to store log files
                    "directory": "/var/log/shadowsocks-rust",
                    // Optional. Log rotation frequency, must be one of the following:
                    // - never (default): This will result in log file located at `directory/prefix.suffix`
                    // - daily: A new log file in the format of `directory/prefix.yyyy-MM-dd.suffix` will be created daily
                    // - hourly: A new log file in the format of `directory/prefix.yyyy-MM-dd-HH.suffix` will be created hourly
                    "rotation": "never",
                    // Optional. Prefix of log file, default is one of `sslocal`, `ssserver`, `ssmanager` depending on the service being run.
                    "prefix": "shadowsocks-rust",
                    // Optional. Suffix of log file, default is `log`
                    "suffix": "log",
                    // Optional. If set, keeps the last N log files
                    "max_files": 5
                }
            },
            {
                // Configure a syslog writer, only supported on *nix system
                "syslog": {
                    // `level` and `format` can also be set here, if not set, it will use the default values

                    // Optional. Set the "identity" when calling openlog(). Use current service name by default.
                    "identity": "identity_name",
                    // Optional. Set the "facility" when calling openlog(). 1 (user-level messages) by default. See RFC5424.
                    "facility": 1
                }
            }
        ]
    },
    // Runtime configuration
    "runtime": {
        // `single_thread` or `multi_thread`
        "mode": "multi_thread",
        // Worker threads that are used in multi-thread runtime
        "worker_count": 10
    }
}
SOCKS5 身份验证配置
配置文件由 socks5_auth_config_path 在 locals 中设置。
{
    // Password/Username Authentication (RFC1929)
    "password": {
        "users": [
            {
                "user_name": "USERNAME in UTF-8",
                "password": "PASSWORD in UTF-8"
            }
        ]
    }
}
HTTP 身份验证配置
配置文件由 http_auth_config_path 在 locals 中设置。
{
    // Basic Authentication (RFC9110)
    "basic": {
        "users": [
            {
                "user_name": "USERNAME in UTF-8",
                "password": "PASSWORD in UTF-8"
            }
        ]
    }
}
环境变量
SS_SERVER_PASSWORD: 通过命令行参数(--server-addr)创建的服务器使用的默认密码SS_SYSTEM_DNS_RESOLVER_FORCE_BUILTIN:"system"DNS 解析器强制使用系统内置的(*NIX 中的getaddrinfo)
支持的密码
AEAD 2022 密码
2022-blake3-aes-128-gcm,2022-blake3-aes-256-gcm2022-blake3-chacha20-poly1305,2022-blake3-chacha8-poly1305
这些密码要求 "password" 为密钥的 Base64 字符串,且其长度必须与密码的密钥长度完全相同。建议使用 ssservice genkey -m "METHOD_NAME" 生成安全且可靠的密钥。
AEAD 密码
chacha20-ietf-poly1305aes-128-gcm,aes-256-gcm
流密码
plain或none(无加密,仅用于调试或配合确保传输安全的插件使用)
已弃用
tableaes-128-cfb,aes-128-cfb1,aes-128-cfb8,aes-128-cfb128aes-192-cfb,aes-192-cfb1,aes-192-cfb8,aes-192-cfb128aes-256-cfb,aes-256-cfb1,aes-256-cfb8,aes-256-cfb128aes-128-ctraes-192-ctraes-256-ctrcamellia-128-cfb,camellia-128-cfb1,camellia-128-cfb8,camellia-128-cfb128camellia-192-cfb,camellia-192-cfb1,camellia-192-cfb8,camellia-192-cfb128camellia-256-cfb,camellia-256-cfb1,camellia-256-cfb8,camellia-256-cfb128rc4-md5chacha20-ietf
ACL
sslocal、ssserver 和 ssmanager 支持语法类似于 shadowsocks-libev 的 ACL 文件。一些示例可以在 这里 找到。
可用部分
- 对于本地服务器(
sslocal、ssredir、...)- 模式:
[bypass_all]- ACL 以WhiteList模式运行。绕过所有地址,除非它们匹配任何规则。[proxy_all]- ACL 以BlackList模式运行。代理所有地址,除非它们匹配任何规则。(默认)
- 规则:
[bypass_list]- 用于直接连接的规则[proxy_list]- 用于通过代理连接的规则
- 模式:
- 对于远程服务器(
ssserver)- 模式:
[reject_all]- ACL 以WhiteList模式运行。拒绝所有客户端,除非它们匹配任何规则。[accept_all]- ACL 以BlackList模式运行。接受所有客户端,除非它们匹配任何规则。(默认)[outbound_block_all]- 出站 ACL 以WhiteList模式运行。阻止所有出站地址,除非它们匹配任何规则。[outbound_allow_all]- 出站 ACL 以BlackList模式运行。允许所有出站地址,除非它们匹配任何规则。(默认)
- 规则:
[white_list]- 用于接受客户端的规则[black_list]- 用于拒绝客户端的规则[outbound_block_list]- 用于阻止出站地址的规则。[outbound_allow_list]- 用于允许出站地址的规则。
- 模式:
示例
# SERVERS
# For ssserver, accepts requests from all clients by default
[accept_all]

# Blocks these clients
[black_list]
1.2.3.4
127.0.0.1/8

# Disallow these outbound addresses
[outbound_block_list]
127.0.0.1/8
::1
# Using regular expression
^[a-z]{5}\.baidu\.com
# Match exactly
|baidu.com
# Match with subdomains
||google.com
# An internationalized domain name should be converted to punycode
# |☃-⌘.com - WRONG
|xn----dqo34k.com
# ||джpумлатест.bрфa - WRONG
||xn--p-8sbkgc5ag7bhce.xn--ba-lmcq

# CLIENTS
# For sslocal, ..., bypasses all targets by default
[bypass_all]

# Proxy these addresses
[proxy_list]
||google.com
8.8.8.8
实用工具
ssurl用于编码和解码 ShadowSocks URL(SIP002)。示例:
ss://YWVzLTI1Ni1jZmI6cGFzc3dvcmQ@127.0.0.1:8388/?plugin=obfs-local%3Bobfs%3Dhttp%3Bobfs-host%3Dwww.baidu.com
备注
它支持以下功能:
- SOCKS5 CONNECT 命令
- SOCKS5 UDP ASSOCIATE 命令(部分)
- SOCKS4/4a CONNECT 命令
- 各种加密算法
- 负载均衡(多台服务器)和服务器延迟检测
- SIP004 AEAD 密码
- SIP003 插件
- SIP003u 支持 UDP 的插件
- SIP002 扩展 ss URL
- SIP022 AEAD 2022 密码
- HTTP 代理支持(RFC 7230 和 CONNECT)
- 防御重放攻击,shadowsocks/shadowsocks-org#44
- 管理 API,支持管理多个用户
- ACL(访问控制列表)
- 支持 HTTP/HTTPS 代理协议
待办事项
- 文档
- 扩展配置格式
- 改进日志格式(等待新的官方日志 crate)
- 支持更多密码,而不依赖于
libcrypto(等待可接受的 Rust 加密库实现) - Windows 支持。
- 使用稳定版
rustc构建(被。crypto2阻塞) - 支持 HTTP 代理协议
- AEAD 密码。(在 SIP004 中提出,仍在讨论中)
- 基于延迟选择服务器 #152
许可证
版权所有 (c) 2014 Y. T. CHUNG
特此免费授予任何获得本软件及相关文档文件(“软件”)副本的人 无限制地处理软件的权利,包括但不限于使用、复制、修改、合并、发布、分发、再许可和/或销售 软件副本的权利,并允许将软件提供给他人这样做,但须遵守以下条件:
上述版权声明和本许可声明应包含在 软件的所有副本或重要部分中。
软件按“原样”提供,不提供任何形式的明示或 暗示的保证,包括但不限于对适销性、 特定用途适用性和非侵权的保证。在任何情况下, 作者或版权持有人均不对因合同、侵权或其他行为引起的、 或与软件或软件的使用或其他交易相关的任何索赔、损害或其他 责任负责。
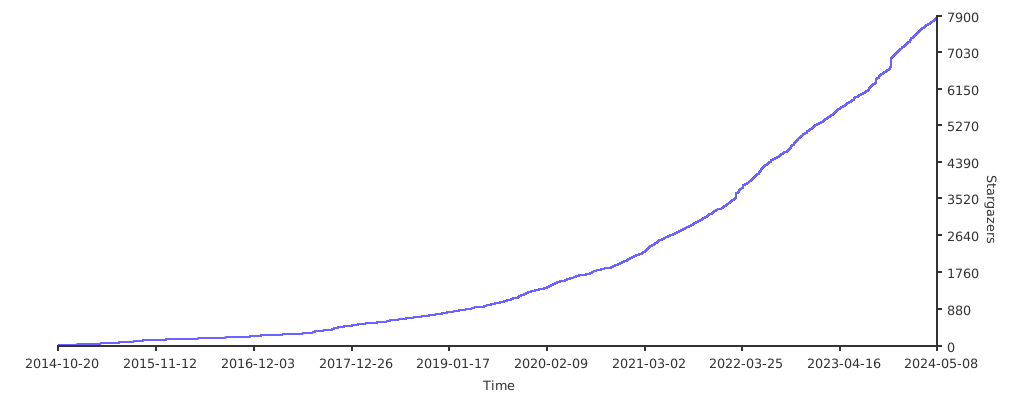
随时间变化的 Star 数