
SwiftLint
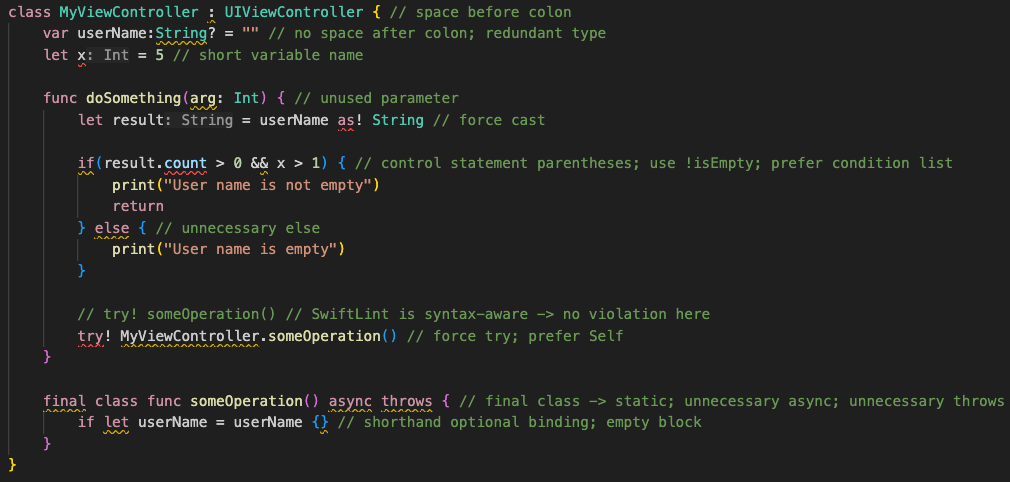
一个用于强制执行 Swift 风格和约定的工具,大致基于现已 归档的 GitHub Swift Style Guide。 SwiftLint 强制执行 Swift 社区普遍接受的风格指南规则。这些规则在诸如 Kodeco's Swift Style Guide 等流行风格指南中有详细描述。
SwiftLint 规则主要基于 SwiftSyntax。 一些规则仍然通过 Clang 和 SourceKit 来访问类型信息。



本项目遵循 贡献者公约行为准则。 参与即表示您同意遵守此准则。
视频介绍
为了对 SwiftLint 有一个高层次的了解,我们建议您观看 由 JP Simard 于 2017 年 1 月 9 日录制的这场演示(提供文字记录):
安装
Swift Package Manager
SwiftLint 可以作为 command plugin 或 build tool plugin 使用。
添加
.package(url: "https://github.com/SimplyDanny/SwiftLintPlugins", from: "<version>")在你的 Package.swift 文件中,以自动使用 SwiftLint 的最新版本,或将依赖项固定到特定版本:
.package(url: "https://github.com/SimplyDanny/SwiftLintPlugins", exact: "<version>")其中,请将 <version> 替换为所需的最低版本或确切版本。
[!NOTE] 直接从 SwiftLint 仓库消费插件会带来 若干缺点。为避免这些问题并减少由此产生的开销,强烈建议 从专用的 SwiftLintPlugins 仓库 消费插件, 尽管来自 SwiftLint 仓库的插件也完全 可用。如果更倾向于使用 SwiftLint 的插件,只需在上述包声明中使用 URL
https://github.com/realm/SwiftLint即可。然而,SwiftLintPlugins 极大地促进了插件的采用。它列举了一些原因, 说明为何 SwiftLint 自身提供的插件使用起来非常麻烦。由于 插件代码和发布版本保持同步,两者在功能上没有区别,但使用专用的插件仓库可以 为你节省大量时间和麻烦。
本文档假设你依赖的是 SwiftLintPlugins。
Xcode 包依赖
使用以下链接将 SwiftLint 作为包依赖添加到 Xcode 项目中:
https://github.com/SimplyDanny/SwiftLintPluginsHomebrew
brew install swiftlintCocoaPods
将以下内容添加到你的 Podfile 中:
pod 'SwiftLint'这将在你下次执行 pod install 时下载 Pods/ 中的 SwiftLint 二进制文件和依赖项,并允许你在 Script Build Phases 中通过
${PODS_ROOT}/SwiftLint/swiftlint 调用它。
通过 Cocoapods 安装还可以将 SwiftLint 固定到特定版本,而不仅仅是最新版本(Homebrew 的情况即如此)。
请注意,这会将 SwiftLint 二进制文件、其依赖项的二进制文件以及 Swift 二进制库分发版添加到 Pods/ 目录中,因此不建议将此目录检入 Git 等 SCM 系统。
Mint
mint install realm/SwiftLintBazel
将此放入你的 MODULE.bazel 中:
bazel_dep(name = "swiftlint", version = "0.52.4", repo_name = "SwiftLint")
或者将此放入你的 WORKSPACE 中:
工作区
load("@bazel_tools//tools/build_defs/repo:http.bzl", "http_archive")

http_archive(
    name = "build_bazel_rules_apple",
    sha256 = "390841dd5f8a85fc25776684f4793d56e21b098dfd7243cd145b9831e6ef8be6",
    url = "https://github.com/bazelbuild/rules_apple/releases/download/2.4.1/rules_apple.2.4.1.tar.gz",
)

load(
    "@build_bazel_rules_apple//apple:repositories.bzl",
    "apple_rules_dependencies",
)

apple_rules_dependencies()

load(
    "@build_bazel_rules_swift//swift:repositories.bzl",
    "swift_rules_dependencies",
)

swift_rules_dependencies()

load(
    "@build_bazel_rules_swift//swift:extras.bzl",
    "swift_rules_extra_dependencies",
)

swift_rules_extra_dependencies()

http_archive(
    name = "SwiftLint",
    sha256 = "c6ea58b9c72082cdc1ada4a2d48273ecc355896ed72204cedcc586b6ccb8aca6",
    url = "https://github.com/realm/SwiftLint/releases/download/0.52.4/bazel.tar.gz",
)

load("@SwiftLint//bazel:repos.bzl", "swiftlint_repos")

swiftlint_repos()

load("@SwiftLint//bazel:deps.bzl", "swiftlint_deps")

swiftlint_deps()
然后你可以使用以下命令在当前目录中运行 SwiftLint:
bazel run -c opt @SwiftLint//:swiftlint预构建包
从
最新 GitHub 发布版本 下载 SwiftLint.pkg 并
运行它。
从源码构建
确保已安装构建工具 Bazel 和较新的
Swift 工具链,并且所有工具均可在您的 PATH 中发现。
要构建 SwiftLint,请克隆此仓库并运行 make install。
设置
[!IMPORTANT] 虽然直觉上可能会认为在编译 Swift 源文件之前运行 SwiftLint,以便在存在 lint 违规时提前退出构建,但重要的是要理解 SwiftLint 旨在分析可编译的有效源代码。无法编译的代码很容易导致意外且 令人困惑的结果,尤其是在使用
--fix/--autocorrect命令行参数执行时。
构建工具插件
SwiftLint 可以作为构建工具插件用于 Swift Package 项目 和 Xcode 项目。
构建工具插件通过定位包/项目目录内的最顶层配置文件来确定 SwiftLint 工作目录。如果未在其中找到配置文件,则使用包/项目目录作为工作 目录。
当插件无法解析 SwiftLint 工作目录时,它会抛出错误。例如,在 Xcode 项目中,如果目标的 Swift 文件未位于项目目录内,就会发生这种情况。
为了最大化与插件的兼容性,请避免使用需要
--config 选项的项目结构。
Swift Package 项目
[!NOTE] 需要通过 Swift Package Manager 进行安装。
构建工具插件在构建每个目标时运行。当项目包含多个 目标时,必须将插件单独添加到所需的目标中。
为此,请按照以下方式将插件添加到要执行 lint 的目标:
.target(
    ...
    plugins: [.plugin(name: "SwiftLintBuildToolPlugin", package: "SwiftLintPlugins")]
),
Swift Package 命令插件
[!NOTE] 需要通过 Swift Package Manager 进行安装。
该命令插件支持按以下方式从命令行运行 SwiftLint:
swift package plugin swiftlintXcode 项目
[!NOTE] 需要通过 Xcode Package Dependency 进行安装。
构建工具插件作为每个目标的构建阶段运行。当项目包含 多个目标时,必须将插件单独添加到所需的目标中。
为此,请将 SwiftLintBuildToolPlugin 添加到要执行 lint 的目标的 Run Build Tool Plug-ins
阶段的 Build Phases 中。
[!TIP] 首次使用该插件时,请务必在提示时信任并启用 它。如果存在宏构建警告,请选择它以信任并启用宏。
对于无人值守的使用(例如在 CI 上),可以通过以下任一方式禁用 包插件和宏验证:
-
使用
xcodebuild选项:-skipPackagePluginValidation -skipMacroValidation -
设置 Xcode 默认值:
defaults write com.apple.dt.Xcode IDESkipPackagePluginFingerprintValidatation -bool YES
defaults write com.apple.dt.Xcode IDESkipMacroFingerprintValidation -bool YES
[!IMPORTANT] 无人值守使用选项会绕过 Xcode 的验证对话框, 并隐式信任所有插件和宏,这具有安全影响。
意外的 Xcode 项目结构
SwiftLint 配置文件位于包/项目目录之外的项目结构 不受构建工具插件的直接支持。这是因为无法向 构建工具插件传递参数(例如,传递配置文件路径)。
如果你的项目结构无法直接与构建工具 插件配合使用,请考虑以下选项之一:
- 若要使用位于包/项目目录之外的配置文件,可以在该目录中添加一个配置文件,
指定指向其他配置文件的父配置路径,例如,
parent_config: path/to/.swiftlint.yml。 - 你也可以考虑使用 Run Script Build Phase 来替代构建 工具插件。
Xcode Run Script Build Phase
[!NOTE] 根据所使用的安装方法,Run Script Build Phase 中的 shell 命令语法可能不同, 或者可能需要额外的配置。请参阅 installation 说明以 获取更多信息。
如果构建工具插件不适用于你的项目配置,或者需要额外的自定义设置,
可以将 SwiftLint 添加为 Run Script
Build Phase。当项目配置依赖于 --config
SwiftLint 选项时,或者需要在单次 swiftlint
调用中一起检查所有目标时,这非常有用。文件的包含和排除可以在
.swiftlint.yml 配置 中进行配置。
为此,请在主应用目标的 Build Phases
的 Run Script 阶段中添加一个自定义脚本,位于 Compile Sources 阶段之后。使用
以下脚本实现:
if command -v swiftlint >/dev/null 2>&1
then
    swiftlint
else
    echo "warning: `swiftlint` command not found - See https://github.com/realm/SwiftLint#installation for installation instructions."
fi
如果你正在 Swift 包中使用 SwiftLintPlugin,
你可以以如下方式引用 swiftlint 可执行文件:
SWIFT_PACKAGE_DIR="${SWIFT_PACKAGE_DIR:-${BUILD_DIR%Build/*}SourcePackages}"
SWIFTLINT_CMD="$SWIFT_PACKAGE_DIR/artifacts/swiftlintplugins/SwiftLintBinary/SwiftLintBinary.artifactbundle/macos/swiftlint"

if test -f "$SWIFTLINT_CMD" 2>&1
then
    "$SWIFTLINT_CMD"
else
    echo "warning: `swiftlint` command not found - See https://github.com/realm/SwiftLint#xcode-run-script-build-phase for installation instructions."
fi
[!NOTE]
SWIFTLINT_CMD路径使用默认的 Xcode 配置,并已在 Xcode 15/16 上 进行测试。如果是其他配置(例如自定义 Swift 包路径),请相应地调整这些值。 如果你使用-clonedSourcePackagesDirPath运行xcodebuild,请在 运行脚本之前将SWIFT_PACKAGE_DIR设置为<that path>。
[!TIP] 取消勾选
Based on dependency analysis以在所有增量 构建上运行swiftlint,从而抑制未指定输出的警告。
针对 Xcode 15.0 的注意事项
Xcode 15 进行了一项重大更改,将
ENABLE_USER_SCRIPT_SANDBOXING 构建设置的默认值从 NO 更改为 YES。
因此,SwiftLint 会遇到与文件权限缺失相关的错误,
通常表现为
error: Sandbox: swiftlint(19427) deny(1) file-read-data.
要解决此问题,需要手动将
ENABLE_USER_SCRIPT_SANDBOXING 设置设置为 NO,针对
正在配置 SwiftLint 的特定目标。
针对 Apple Silicon 的注意事项
如果你通过 Homebrew 在 Apple Silicon 上安装了 SwiftLint,你可能会遇到 此警告:
warning: SwiftLint not installed, download from https://github.com/realm/SwiftLint这是因为 Homebrew 在 Apple Silicon 上默认将二进制文件安装到
/opt/homebrew/bin 文件夹中。要指示 Xcode 在哪里找到
SwiftLint,您可以在构建阶段中将 /opt/homebrew/bin 添加到 PATH 环境变量:
if [[ "$(uname -m)" == arm64 ]]
then
    export PATH="/opt/homebrew/bin:$PATH"
fi

if command -v swiftlint >/dev/null 2>&1
then
    swiftlint
else
    echo "warning: `swiftlint` command not found - See https://github.com/realm/SwiftLint#installation for installation instructions."
fi
或者你可以在 /usr/local/bin 中创建一个指向实际
二进制的符号链接:
ln -s /opt/homebrew/bin/swiftlint /usr/local/bin/swiftlint其他注意事项
如果你希望同时修复违规项,你的脚本可以运行
swiftlint --fix && swiftlint 而不仅仅是 swiftlint。这意味着
所有可修复的违规项都将被修复,同时确保剩余违规项的警告
在你的项目中显示出来。
如果你已通过 CocoaPods 安装 SwiftLint,脚本应如下所示:
"${PODS_ROOT}/SwiftLint/swiftlint"Visual Studio Code
要将 SwiftLint 集成到 Visual Studio Code,请从市场安装
vscode-swiftlint
扩展。
Fastlane
你可以使用官方的
swiftlint fastlane action
在 fastlane 流程中运行 SwiftLint。
swiftlint(
    mode: :lint,                            # SwiftLint mode: :lint (default) or :autocorrect
    executable: "Pods/SwiftLint/swiftlint", # The SwiftLint binary path (optional). Important if you've installed it via CocoaPods
    path: "/path/to/lint",                  # Specify path to lint (optional)
    output_file: "swiftlint.result.json",   # The path of the output file (optional)
    reporter: "json",                       # The custom reporter to use (optional)
    config_file: ".swiftlint-ci.yml",       # The path of the configuration file (optional)
    files: [                                # List of files to process (optional)
        "AppDelegate.swift",
        "path/to/project/Model.swift"
    ],
    ignore_exit_status: true,               # Allow fastlane to continue even if SwiftLint returns a non-zero exit status (Default: false)
    quiet: true,                            # Don't print status logs like 'Linting ' & 'Done linting' (Default: false)
    strict: true                            # Fail on warnings? (Default: false)
)
Docker
SwiftLint 也可作为 Docker 镜像使用
Ubuntu。因此,首次使用时需要使用以下命令拉取 Docker 镜像:
docker pull ghcr.io/realm/swiftlint:latest然后,在后续的运行中,你只需在 docker 内部执行 swiftlint,例如:
docker run -it -v `pwd`:`pwd` -w `pwd` ghcr.io/realm/swiftlint:latest这将在你当前所在的文件夹(pwd)中执行 swiftlint,
显示如下输出:
$ docker run -it -v `pwd`:`pwd` -w `pwd` ghcr.io/realm/swiftlint:latest
Linting Swift files in current working directory
Linting 'RuleDocumentation.swift' (1/490)
...
Linting 'YamlSwiftLintTests.swift' (490/490)
Done linting! Found 0 violations, 0 serious in 490 files.
这里有关于使用 Docker Images 的更多文档。
MegaLinter
SwiftLint 也集成在 MegaLinter 中,这是一个 用于 CI 的开源 linter 聚合器。请参阅其 SwiftLint 文档 以获取设置说明。
命令行用法
$ swiftlint help
OVERVIEW: A tool to enforce Swift style and conventions.

USAGE: swiftlint <subcommand>

OPTIONS:
  --version               Show the version.
  -h, --help              Show help information.

SUBCOMMANDS:
  analyze                 Run analysis rules
  docs                    Open SwiftLint documentation website in the default web browser
  generate-docs           Generates markdown documentation for selected group of rules
  lint (default)          Print lint warnings and errors
  baseline                Operations on existing baselines
  reporters               Display the list of reporters and their identifiers
  rules                   Display the list of rules and their identifiers
  version                 Display the current version of SwiftLint

  See 'swiftlint help <subcommand>' for detailed help.
在包含待检查 Swift 文件的目录中运行 swiftlint。目录
将被递归搜索。
若要在使用 lint 或 analyze 时
指定文件列表(例如由
ExtraBuildPhase Xcode
插件指定的 Xcode 修改的文件列表,或基于 git ls-files -m 的工作树中修改的文件),
您可以通过传递选项 --use-script-input-files 并设置
以下实例变量来实现:SCRIPT_INPUT_FILE_COUNT
和 SCRIPT_INPUT_FILE_0,SCRIPT_INPUT_FILE_1,...,
SCRIPT_INPUT_FILE_{SCRIPT_INPUT_FILE_COUNT - 1}。
类似地,可以通过传递
选项 --use-script-input-file-lists 并设置
以下实例变量来从文件列表中读取文件:SCRIPT_INPUT_FILE_LIST_COUNT
和 SCRIPT_INPUT_FILE_LIST_0,SCRIPT_INPUT_FILE_LIST_1,...,
SCRIPT_INPUT_FILE_LIST_{SCRIPT_INPUT_FILE_LIST_COUNT - 1}。
这些是为输入文件设置的相同环境变量,用于 自定义 Xcode 脚本阶段。
处理多个 Swift 版本
SwiftLint 与 SourceKit 集成,因此即使 Swift 不断演进,它也能继续工作!
这也使 SwiftLint 保持轻量,因为它不需要附带完整的 Swift 编译器,只需与您机器上已安装的官方编译器进行通信即可。
您应始终使用与编译代码相同的工具链来运行 SwiftLint。
如果您安装了多个工具链或 Xcode,您可能希望覆盖 SwiftLint 的默认 Swift 工具链。
以下是 SwiftLint 确定使用哪个 Swift 工具链的顺序:
$XCODE_DEFAULT_TOOLCHAIN_OVERRIDE$TOOLCHAIN_DIR或$TOOLCHAINSxcrun -find swift/Applications/Xcode.app/Contents/Developer/Toolchains/XcodeDefault.xctoolchain/Applications/Xcode-beta.app/Contents/Developer/Toolchains/XcodeDefault.xctoolchain~/Applications/Xcode.app/Contents/Developer/Toolchains/XcodeDefault.xctoolchain~/Applications/Xcode-beta.app/Contents/Developer/Toolchains/XcodeDefault.xctoolchain
预期在通过上述路径传递的值的
usr/lib/ 子目录中找到 sourcekitd.framework。
您还可以将 TOOLCHAINS 环境变量设置为标识 Swift 工具链版本的反向 DNS
表示法:
TOOLCHAINS=com.apple.dt.toolchain.Swift_2_3 swiftlint --fix在 Linux 上,SourceKit 预期位于
/usr/lib/libsourcekitdInProc.so 或由 LINUX_SOURCEKIT_LIB_PATH
环境变量指定。
Git pre-commit Hook
SwiftLint 可以作为 pre-commit hook 运行。
一旦 安装,请在仓库根目录的
.pre-commit-config.yaml 中添加以下内容:
repos:
  - repo: https://github.com/realm/SwiftLint
    rev: 0.57.1
    hooks:
      - id: swiftlint
将 rev 调整为您选择的 SwiftLint 版本。 pre-commit autoupdate
可用于更新到当前版本。
SwiftLint 可以使用 entry 进行配置,以应用修复并在出现错误时失败:
- repo: https://github.com/realm/SwiftLint
  rev: 0.57.1
  hooks:
    - id: swiftlint
      entry: swiftlint --fix --strict
规则
SwiftLint 包含超过 200 条规则,并且 Swift 社区(也就是你!) 会随着时间的推移持续贡献更多规则。 Pull requests 是受鼓励的。
你可以在 Rule Directory 中找到更新的规则列表以及关于它们的更多信息。
你还可以查看 Source/SwiftLintBuiltInRules/Rules 目录以查看它们的实现。
Opt-In Rules
opt_in_rules 默认是禁用的(即,你必须在配置文件中显式启用它们)。
关于何时将规则标记为 opt-in 的指南:
- 可能产生许多误报的规则(例如
empty_count) - 速度过慢的规则
- 未达成普遍共识或仅在特定情况下有用的规则
(例如
force_unwrapping)
Disable rules in code
可以通过在源文件内使用以下格式的注释来禁用规则:
// swiftlint:disable <rule1> [<rule2> <rule3>...]
规则将被禁用,直到文件末尾或 linter 看到匹配的启用注释:
// swiftlint:enable <rule1> [<rule2> <rule3>...]
例如:
// swiftlint:disable colon
let noWarning :String = "" // No warning about colons immediately after variable names.
// swiftlint:enable colon
let hasWarning :String = "" // Warning generated about colons immediately after variable names.
包含 all 关键字将禁用所有规则,直到 linter 看到匹配的启用注释:
// swiftlint:disable all
// swiftlint:enable all
例如:
// swiftlint:disable all
let noWarning :String = "" // No warning about colons immediately after variable names.
let i = "" // Also no warning about short identifier names.
// swiftlint:enable all
let hasWarning :String = "" // Warning generated about colons immediately after variable names.
let y = "" // Warning generated about short identifier names.
也可以通过在 disable 或 enable 命令后追加
:previous、:this 或 :next,使该命令仅分别应用于上一行、
当前行或下一行。
例如:
// swiftlint:disable:next force_cast
let noWarning = NSNumber() as! Int
let hasWarning = NSNumber() as! Int
let noWarning2 = NSNumber() as! Int // swiftlint:disable:this force_cast
let noWarning3 = NSNumber() as! Int
// swiftlint:disable:previous force_cast
运行 swiftlint rules 以打印所有可用规则及其
标识符的列表。
配置
通过从运行 SwiftLint 的目录添加 .swiftlint.yml 文件来配置 SwiftLint。可以配置以下参数:
规则包含:
disabled_rules:禁用默认启用集合中的规则。opt_in_rules:启用不属于默认集合的规则。特殊的all标识符将启用所有可选的 linter 规则,但disabled_rules中列出的规则除外。only_rules:仅启用此列表中指定的规则。 不能与disabled_rules或opt_in_rules同时指定。analyzer_rules:这是一个完全独立的规则列表,仅由analyze命令运行。所有分析器规则均为可选,因此这是 唯一可配置的规则列表,没有disabled_rules和only_rules的对应项。特殊的all标识符也可以在此处使用,以启用 所有分析器规则,但disabled_rules中列出的规则除外。
# By default, SwiftLint uses a set of sensible default rules you can adjust. Find all the available rules
# by running `swiftlint rules` or visiting https://realm.github.io/SwiftLint/rule-directory.html.

# Rules turned on by default can be disabled.
disabled_rules:
  - colon
  - comma
  - control_statement

# Rules turned off by default can be enabled.
opt_in_rules:
  - empty_count

# Alternatively, specify all rules explicitly by uncommenting this option and removing the above two.
# only_rules:
#   - empty_parameters
#   - vertical_whitespace

# Rules only run by `swiftlint analyze`. These are all opt-in.
analyzer_rules:
  - explicit_self

# Case-sensitive paths to include during linting. Directory paths supplied on the
# command line will be ignored. Wildcards are supported.
included:
  - Sources

# Case-sensitive paths to ignore during linting. Takes precedence over `included`. Wildcards
# are supported.
excluded:
  - Carthage
  - Pods
  - Sources/ExcludedFolder
  - Sources/ExcludedFile.swift
  - Sources/*/ExcludedFile.swift

# If true, SwiftLint will not fail if no lintable files are found.
allow_zero_lintable_files: false

# If true, SwiftLint will treat all warnings as errors.
strict: false

# If true, SwiftLint will treat all errors as warnings.
lenient: false

# The path to a baseline file, which will be used to filter out detected violations.
baseline: Baseline.json

# The path to save detected violations to as a new baseline.
write_baseline: Baseline.json

# If true, SwiftLint will check for updates after linting or analyzing.
check_for_updates: true

# Configurable rules can be customized. All rules support setting their severity level.
force_cast: warning # implicitly
force_try:
  severity: warning # explicitly

# Rules that have both warning and error levels can set just the warning level implicitly.
line_length: 110

# To set both levels implicitly, use an array.
type_body_length:
  - 300 # warning
  - 400 # error

# To set both levels explicitly, use a dictionary.
file_length:
  warning: 500
  error: 1200

# Naming rules can set warnings/errors for `min_length` and `max_length`. Additionally, they can
# set excluded names and allowed symbols.
type_name:
  min_length: 4 # warning
  max_length: # warning and error
    warning: 40
    error: 50
  excluded: i(Phone|Pad|Pod) # regex pattern
  allowed_symbols: ["_"]
identifier_name:
  min_length:
    error: 4 # only error
  excluded: # excluded via string array
    - id
    - URL
    - GlobalAPIKey

# The default reporter (SwiftLint's output format) can be configured as `checkstyle`, `codeclimate`, `csv`,
# `emoji`, `github-actions-logging`, `gitlab`, `html`, `json`, `junit`, `markdown`, `relative-path`, `sarif`,
# `sonarqube`, `summary`, or `xcode` (default).
reporter: "xcode"
你也可以在配置文件中通过字符串使用 ${SOME_VARIABLE} 来使用环境变量。
定义自定义规则
除了 SwiftLint 主项目自带的规则外,SwiftLint 还可以运行两种你可以在自己的项目中自行定义的自定义规则:
1. Swift 自定义规则
这些规则的编写方式与 SwiftLint 自带的基于 Swift 的规则相同,因此它们速度快、准确,可以利用 SwiftSyntax,可以进行单元测试,等等。
使用这些规则需要按照 此视频 或其相关代码 github.com/jpsim/swiftlint-bazel-example 中所述使用 Bazel 构建 SwiftLint。
2. 正则表达式自定义规则
你可以在配置文件中使用以下语法定义基于正则表达式的自定义规则:
custom_rules:
  # Rule identifier.
  pirates_beat_ninjas:
    # Optional regex that defines paths to include during linting.
    included:
      - ".*\\.swift"
    # Optional regex that defines paths to exclude during linting.
    excluded:
      - ".*Test\\.swift"
    # Optional rule name.
    name: "Pirates Beat Ninjas"
    # Matching pattern.
    regex: "([nN]inja)"
    # Number of regex capture group to highlight the rule violation at. Optional, defaults to 0 (the whole match).
    capture_group: 0
    # SyntaxKinds to match. optional.
    match_kinds:
      - comment
      - identifier
    # Optional violation message.
    message: "Pirates are better than ninjas."
    # Optional violation severity.
    severity: error
  no_hiding_in_strings:
    regex: "([nN]inja)"
    # Syntax kinds to match. optional.
    match_kinds: string
这就是输出的样子:

需要注意的是,正则表达式模式在使用时启用了 s 和 m 标志,即 .
匹配换行符
以及 ^/$
分别匹配行首和行尾。
例如,如果你不希望 . 匹配换行符,可以在
正则表达式前添加 (?-s)。
你可以通过提供一个或多个 match_kinds 来过滤匹配结果,这将
拒绝包含不在该列表中的语法类型的匹配。以下是所有可能的语法类型:
argumentattribute.builtinattribute.idbuildconfig.idbuildconfig.keywordcommentcomment.markcomment.urldoccommentdoccomment.fieldidentifierkeywordnumberobjectliteralparameterplaceholderstringstring_interpolation_anchortypeidentifier
Swift 代码片段中使用的所有语法种类都可以通过询问
SourceKitten 来提取。例如,
sourcekitten syntax --text "struct S {}" 返回
source.lang.swift.syntaxtype.keyword对应struct关键字,以及source.lang.swift.syntaxtype.identifier对应其名称S
它们分别匹配上述列表中的 keyword 和 identifier。
如果将自定义规则与 only_rules 结合使用,则必须在
only_rules 列表中包含字面字符串 custom_rules:
only_rules:
  - custom_rules

custom_rules:
  no_hiding_in_strings:
    regex: "([nN]inja)"
    match_kinds: string
与 Swift 自定义规则不同,你可以使用官方的 SwiftLint 构建版本 (例如来自 Homebrew 的版本)来运行正则表达式自定义规则。
自动更正
SwiftLint 可以自动纠正某些违规。磁盘上的文件 会被覆盖为已纠正的版本。
在运行
swiftlint --fix 之前,请确保已备份这些文件,否则可能会丢失重要数据。
在应用修正时,由于修改文件后违规项(或其偏移量)很可能不正确,因此在修正过程中会禁用标准 linting。
分析
swiftlint analyze 命令可以使用完整的类型检查 AST 对 Swift 文件进行 lint。
必须通过 --compiler-log-path 标志将包含干净 swiftc 构建命令调用的编译器日志路径传递给 analyze
(增量构建将会失败)。
例如 --compiler-log-path /path/to/xcodebuild.log
这可以通过
- Cleaning DerivedData (incremental builds won't work with analyze)
- Running
xcodebuild -workspace {WORKSPACE}.xcworkspace -scheme {SCHEME} > xcodebuild.log - Running
swiftlint analyze --compiler-log-path xcodebuild.log
分析器规则通常比 lint 规则慢得多。
使用多个配置文件
SwiftLint 提供了多种方式来包含多个配置文件。 多个配置文件会被合并为一个单一的配置, 然后像单个配置文件一样被应用。
存在许多使用场景,在这些场景中,使用多个配置文件可能很有帮助:
例如,可以使用团队范围内的共享 SwiftLint 配置,同时允许通过子配置文件在每个项目中覆盖设置。
团队级配置:
disabled_rules:
  - force_cast
项目特定配置:
opt_in_rules:
  - force_cast
子/父配置(本地)
你可以在配置文件中指定 child_config 和/或 parent_config 引用。这些引用应该是相对于其所在配置文件所在文件夹的本地路径。只要没有循环和歧义,这甚至可以递归工作。
子配置被视为细化,因此具有更高的优先级,而父配置在发生冲突时被视为具有较低优先级的基础。
下面是一个示例,假设你有以下文件结构:
ProjectRoot
    |_ .swiftlint.yml
    |_ .swiftlint_refinement.yml
    |_ Base
        |_ .swiftlint_base.yml
要同时包含细化文件和基础文件,您的 .swiftlint.yml 应
如下所示:
child_config: .swiftlint_refinement.yml
parent_config: Base/.swiftlint_base.yml在合并父级和子级配置时,included 和 excluded 配置
会被仔细处理,以考虑包含这些配置文件的目录位置差异。
路径合并遵循以下规则:
- 每个配置中的
included/excluded条目将相对于该 配置文件的目录进行解析。 - 子级条目会覆盖冲突的父级条目。
- 合并后的路径列表计算如下:
merged.included = (parent.included - child.excluded) + child.included
merged.excluded = (parent.excluded - child.included) + child.excluded
这意味着子配置可以重新包含被其父配置排除的路径,并且可以排除被其父配置包含的路径。
子/父配置(远程)
正如你可以提供本地 child_config/parent_config 引用一样,
除了引用本地路径外,你还可以直接放置指向
配置文件的 URL。为了让 SwiftLint 检测到这些远程引用,
它们必须以 http:// 或 https:// 开头。
所引用的远程配置文件甚至可以递归地引用其他 远程配置文件,但不允许包含本地引用。
使用远程引用,你的 .swiftlint.yml 可以如下所示:
parent_config: https://myteamserver.com/our-base-swiftlint-config.yml每次运行 SwiftLint 且拥有互联网连接时,SwiftLint 都会尝试 获取每个被引用的远程配置的新版本。如果此 请求超时,则使用缓存版本(如果可用)。如果没有可用的缓存 版本,SwiftLint 将失败——但请放心,一旦 SwiftLint 成功运行过至少一次,缓存版本 就应该存在。
如有需要,可以通过配置文件手动指定
远程配置获取的超时时间,使用
remote_timeout/remote_timeout_if_cached 说明符。这些值默认
分别为 2 秒或 1 秒。
命令行
在通过命令行运行 SwiftLint 时,除了仅提供一个配置文件外, 你还可以传递一个层级结构,其中第一个配置 被视为父级,而最后一个配置被视为最高优先级的 子级。
一个仅包含两个配置文件的简单示例如下:
swiftlint --config .swiftlint.yml --config .swiftlint_child.yml
嵌套配置
除了主配置(根目录中的 .swiftlint.yml 文件)外,你还可以将其他名为 .swiftlint.yml 的配置文件放入目录结构中。对于给定的文件,SwiftLint 会从该文件所在的目录向上遍历至根配置,并使用找到的第一个嵌套 .swiftlint.yml 作为子配置。
该嵌套配置仅适用于其目录子树中的文件。其他子树中的文件将继续使用主配置(或它们自己最近的嵌套配置)。
由于 SwiftLint 在向上遍历目录树时会在第一个匹配项处停止,每个文件最多合并一个嵌套配置(除了主配置之外)。
只有当 .swiftlint.yml 文件尚未被用于构建主配置时(例如,通过类似 child_config: Folder/.swiftlint.yml 的方式被引用),才会被视为嵌套配置。
此外,嵌套配置的 parent_config/child_config 规范会被忽略,因为这样做没有意义。
如果一个(或多个)SwiftLint 文件通过 --config 参数显式指定,无论目录中是否存在其他 .swiftlint.yml 文件,该配置都将被视为覆盖配置。
因此,如果你想使用嵌套配置,就不能使用 --config 参数。
许可证
关于
SwiftLint 完全由志愿者在其空闲时间贡献以维持其成功。因此,SwiftLint 在任何方面都不是商业产品。
请善待那些以业余爱好维护 SwiftLint 的人们,并接受他们时间有限的事实。通过为项目做贡献、报告问题以及帮助社区中的其他人来支持他们。
特别感谢 MacStadium 提供物理 Mac mini 机器来运行我们的性能测试。

我们也感谢 Realm(现为 MongoDB)对该项目的初始贡献和搭建。