
@nextcloud/vue


🖼️ 用于使用 Vue 构建 Nextcloud 应用的 UI Kit
- ✨ 标准化 UI 组件
- 🛠️ Composables 和前端工具
- 🔗 Reference providers 工具
📄 文档
| 版本 | 目标 | 文档 |
|---|---|---|
| v9.x [main] | Nextcloud 31+ (Vue 3) | https://nextcloud-vue-components.netlify.app |
| v8.x [stable8] | Nextcloud 28+ (Vue 2) | https://stable8--nextcloud-vue-components.netlify.app |
| v7.x [stable7] | Nextcloud 25 - 27 | https://stable7--nextcloud-vue-components.netlify.app |
| v6.x [stable6] | Nextcloud 24 - 25 | https://stable6--nextcloud-vue-components.netlify.app |
📦 安装
npm i @nextcloud/vue@next🚀 用法
使用时导入相应的组件和其他模块。更多详情请参阅文档。
import NcButton from '@nextcloud/vue/components/NcButton'
import { useHotKey } from '@nextcloud/vue/composables/useHotKey'
从单个根目录导入也是可用的。请谨慎使用:在某些情况下,这可能会导致构建时间变慢和包体积增大。
import { NcButton, useHotKey } from '@nextcloud/vue'🤝 贡献
📜 如何贡献
- It's always good to check/create an issue first and discuss the problem or feature you want to work on
- Fork the repository and create a new branch
- Make the changes
- Check the change in Vue-Styleguidist and/or Nextcloud apps
- Do not forget to
lintandtestyour changes - If possible, add tests and documentation for your changes
- Do not forget to
- Commit and push your changes, create a Pull Request
- Make sure to follow the Conventional Commits in commit messages, and PR titles, for example:
fix(NcButton): correct layout on Safari - Make sure to follow the Pull Request template
- Sign-off you commits for the Developer Certificate of Origin (DCO)
- Make sure to follow the Conventional Commits in commit messages, and PR titles, for example:
- Get your PR reviewed
- If you don't receive a feedback in a week, feel free to mention the maintainers, for example, last developers worked on the module
- Get your PR merged
请阅读行为准则。本文档提供了一些指导,以确保 Nextcloud 参与者能够在积极且鼓舞人心的氛围中有效合作,并解释我们如何共同加强和支持彼此。
有关如何贡献的更多信息:https://nextcloud.com/contribute/
🧑💻 开发环境搭建
首先,使用 npm 安装依赖项:
npm ci🐸 使用 Styleguidist 进行开发
开发和调试 @nextcloud/vue 最简单的方式是通过 vue-styleguidist 使用我们的实时文档。
运行带有组件文档和 playground 的开发服务器:
npm run styleguide你还可以通过设置 NEXTCLOUD_LEGACY 环境变量来测试设计在旧版 Nextcloud 中是否仍然有效。
NEXTCLOUD_LEGACY=y npm run styleguide单元测试
npm run test组件测试
[!TIP] 我们使用 Playwright 进行组件测试。
它也与 CI 环境相匹配,因此使用它生成的快照在 CI 中不太容易失效。
npm run test:component # or test:component:gui☁️ 使用 Nextcloud 应用进行开发
要在 Nextcloud 应用中测试或调试 @nextcloud/vue,您需要 pack 该库并安装到应用中。
- In
nextcloud-vue:- Build the library with:
npm run devfor development buildnpm run buildfor production build
- Pack with
npm pack
- Build the library with:
- In the Nextcloud app:
- Install the packed file by path to the file, for example:
npm install --no-save ../../../nextcloud-vue-9.3.1.tgz - Rebuild the app or run it in
watchmode - To remove the linked package, reinstall dependencies with
npm ci
- Install the packed file by path to the file, for example:
- Repeat every time you do a change in
@nextcloud/vue - Do not commit the created
.tgzfile
[!WARNING] 不要使用
npm link虽然这是一种将本地 npm 包连接到另一个包的简单且流行的方式,但它没有正确的依赖解析,从而导致问题。通过
npm pack添加包与安装已发布的包完全相同。
🌐 翻译
使用 src/l10n.js 中的 t 和 n 函数来显示翻译后的字符串。它们遵循来自 @nextcloud/l10n/gettext 的 gettext 和 ngettext 接口。
<script setup lang="ts">
import { t } from '../../l10n.js'
</script>

<template>
	<element>
		{{ t('Choose') }}
	</element>
</template>
当你编辑/创建翻译字符串时,你需要更新 l10n 文件。 我们出色的翻译社区随后会收到通知,并且一个机器人将自动同步翻译。
npm run l10n:extract📤 发布新版本
- Pull the latest changes from
mainorstableX - Checkout a new branch with the tag name (e.g
v4.0.1):git checkout -b v<version> - Run
npm version patch --no-git-tag-version(npm version minor --no-git-tag-versionif minor). This will return a new version name, make sure it matches what you expect - Generate the changelog content from the release page.
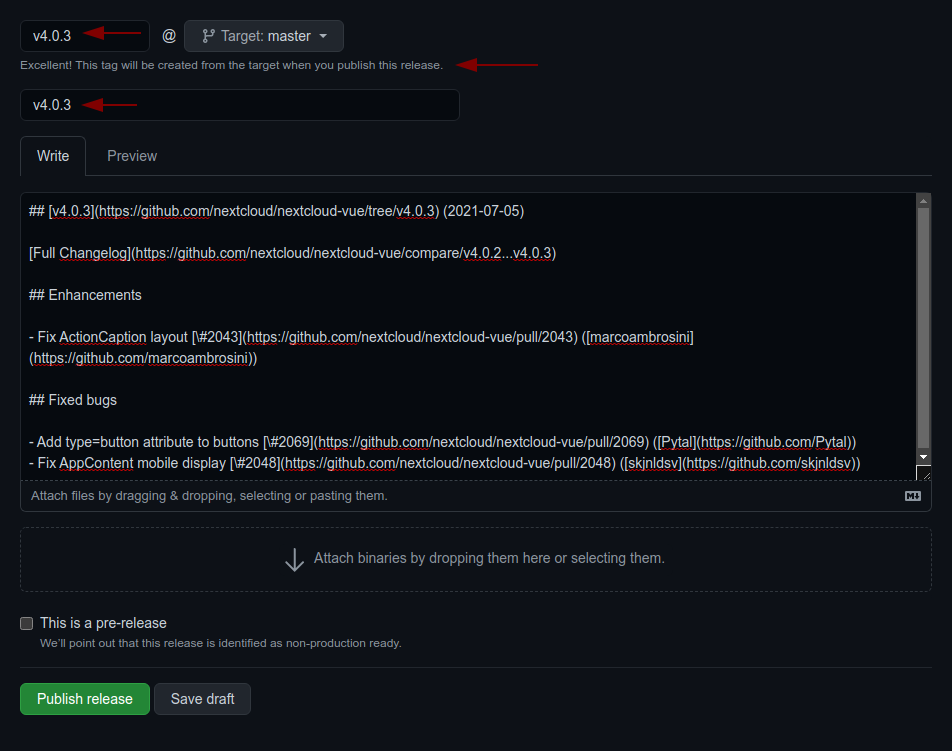
Create a draft release, select the previous tag, click
generatethen paste the content to theCHANGELOG.mdfile- adjust the links to the merged pull requests and authors so that the changelog also works outside of GitHub
by running
npm run prerelease:format-changelog. This will apply this regex:by @([^ ]+) in ((https://github.com/)nextcloud-libraries/nextcloud-vue/pull/(\d+))Which this as the replacement:[\#$4]($2) \([$1]($3$1)\) - use the the version as tag AND title (e.g
v4.0.1) - add the changelog content as description (https://github.com/nextcloud-libraries/nextcloud-vue/releases)
- adjust the links to the merged pull requests and authors so that the changelog also works outside of GitHub
by running
- Commit, push and create PR
- Get your PR reviewed and merged
- Create a milestone with the follow-up version at https://github.com/nextcloud-libraries/nextcloud-vue/milestones
- Move all open tickets and PRs to the follow-up
- Close the milestone of the version you release
- Publish the previously drafted release on GitHub

发布预发布版本
预发布版本可以按照上述描述的方式构建,但需要进行手动调整,以避免 npm 将预发布版本发布给所有用户:
-
将 latest 标签重新指向最后一个稳定版本
npm dist-tag add @nextcloud/vue@5.4.0 latest
-
将新的预发布版本标记为 next
npm dist-tag add @nextcloud/vue@6.0.0-beta.2 next