

GPT Virus Scanner
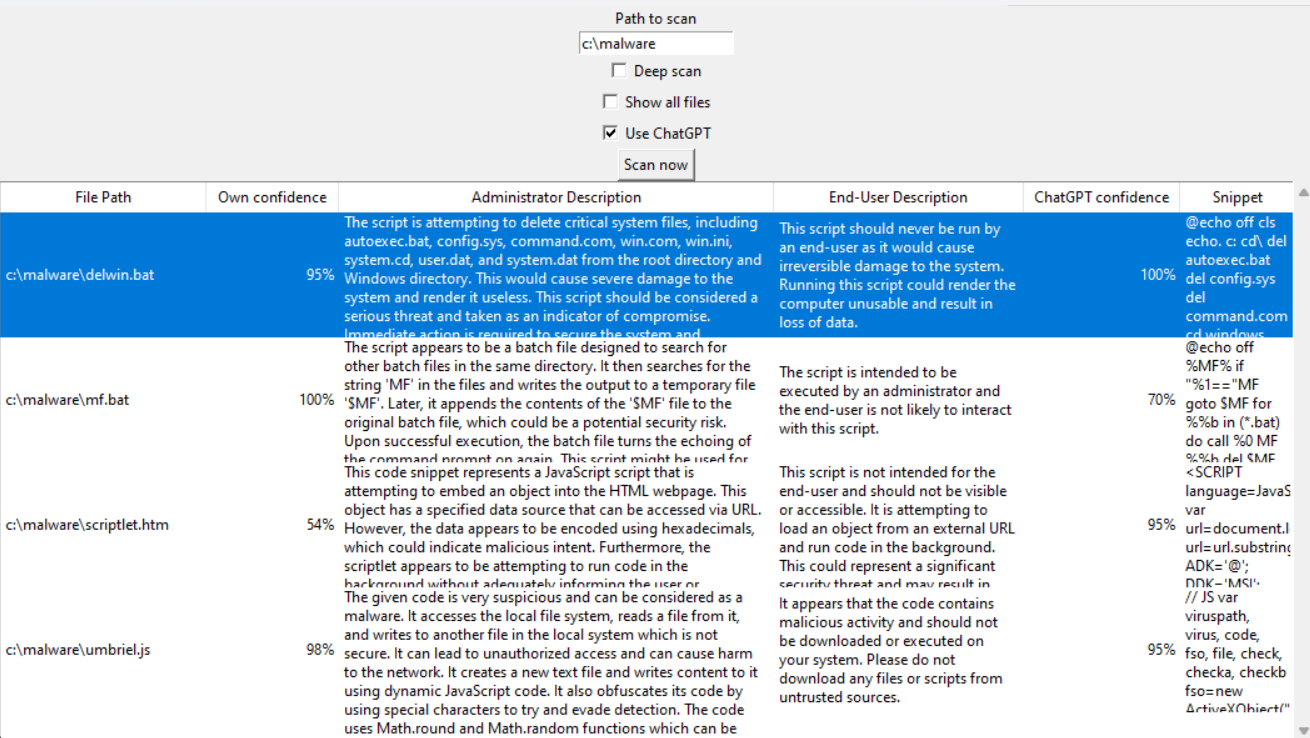
Scan your files for dangerous code with AI. This tool uses a quick scan model to find threats in scripts, Notebooks, archives, and project files.
Features
Core Capabilities
- Two-step analysis:
- Fast Local Scan: A quick check finds suspicious patterns in milliseconds.
- AI Analysis (Optional): Get a detailed report from OpenAI, OpenRouter, or Ollama explaining why a file is suspicious.
- Flexible Interface: Use the friendly window interface or the command line for automation.
- Git Integration: Scan only the files you have changed in your project.
- Search & Filter: Easily find specific results by name, threat level, or code.
Supported Sources
- Scan Local & Web Files: Scan files on your computer or directly from a web link.
- Remote Repositories: Scan code from GitHub (including Gists), GitLab, and Bitbucket (including Snippets, pull requests, Commits, and Tags).
- Web Snippets: Scan from Pastebin and Hugging Face.
File Format Support
- Notebook Support: Scan cells in
.ipynbfiles for dangerous commands. - Project & Build Files: Scan
package.json,composer.json,pyproject.toml,deno.json,deno.jsonc,Dockerfile,Makefile, and Docker Compose. - Archives: Open
.zip,.tar, and.tar.gzfiles automatically to scan the contents. - Automation Tasks: Scan GitHub Actions, GitLab CI, and other YAML workflows for suspicious commands.
- Web Files: Scan HTML, SVG, and Markdown files for embedded scripts.
- Unified Diffs: Scan
.diffand.patchfiles to review code changes. - Deceptive Content Detection: Detect executables and scripts disguised as images or documents (e.g., a Windows
.exerenamed to.jpg) using content signatures (magic bytes).
Installation
Prerequisites
- Python: Install Python 3.9, 3.10, 3.11, or 3.12.
- Data files: The repository already includes the
scripts.h5model andtask.txtinstruction files. Keep these in the project folder.
Setup
-
Clone the repository:
git clone https://github.com/RainRat/gpt-virus-scanner.git cd gpt-virus-scanner -
Create and activate a virtual environment (Recommended): Using a virtual environment is highly recommended. It keeps your packages organized and avoids installation errors.
- macOS and Linux:
python3 -m venv venv source venv/bin/activate - Windows (Command Prompt):
python -m venv venv venv\Scripts\activate.bat - Windows (PowerShell):
python -m venv venv
.\venv\Scripts\Activate.ps1
Note: Remember to run the activation command whenever you open a new terminal. To exit the virtual environment when you are done, run the command
deactivate. - macOS and Linux:
-
Install mandatory packages:
- For Python 3.9, 3.10, or 3.11:
python3 -m pip install "tensorflow<2.16" openai numpy - For Python 3.12:
python3 -m pip install tensorflow openai numpy
- For Python 3.9, 3.10, or 3.11:
-
Install optional packages (if needed):
- Tkinter (for the window interface on Linux):
On Windows and macOS, the window interface works automatically. On Linux, you must install the Tkinter package using your system's package manager. Do not use
pipto install it.- Ubuntu / Debian:
sudo apt update sudo apt install python3-tk - Fedora:
sudo dnf install python3-tkinter - Arch Linux:
sudo pacman -S tk
- Ubuntu / Debian:
- PyYAML (for training models and YAML reports):
If you want to train your own local scanner models or export/import YAML reports, install PyYAML using pip:
python3 -m pip install pyyaml
- Tkinter (for the window interface on Linux):
On Windows and macOS, the window interface works automatically. On Linux, you must install the Tkinter package using your system's package manager. Do not use
How to use
Using the Window (GUI)
Run python3 gptscan.py to open the scanner window.
Access these options from the Browse menu:
Common Scans
- Scan File(s)... (Ctrl+Shift+O): Select specific files to scan.
- Scan Folder... (Ctrl+Shift+F): Select an entire folder to scan.
- Scan Recently Modified...: Scan files changed within a certain time (like the last 24 hours).
- Scan Web Link... (Ctrl+Shift+U): Scan code or archives directly from a web link.
- Scan File List...: Scan a list of files from a text file.
- Scan Clipboard (Ctrl+Shift+V): Scan code you have copied to your clipboard.
Git Integration
- Scan Git Diff (Ctrl+Shift+D): Scan your current project changes as a diff.
- Scan Recent Commits...: Scan files from the most recent commits.
- Scan Git Hooks (Ctrl+Shift+G): Scan your local and global Git hooks for suspicious scripts.
- Scan Git Stashes (Ctrl+Shift+Q): Scan all Git stashes for suspicious code changes.
- Scan Git Conflicts: Scan files with Git merge conflicts for suspicious code introduced during merging.
- Scan Git Configuration: Scan Git settings for dangerous aliases or editors.
- Scan Git Reflog...: Scan recent entries in your Git reflog to find lost code or secrets.
- Scan Git Revision...: Scan files from a specific Git branch or commit.
System Scans
- Scan System Audit (Ctrl+Shift+I): Run a full check of your system, including all items listed below.
- Scan Shell Profiles (Ctrl+Shift+B): Scan your shell configuration files (like
.bashrcor.zshrc) for dangerous aliases. - Scan Shell History (Ctrl+Shift+H): Scan your terminal history for dangerous commands.
- Scan System PATH (Ctrl+Shift+P): Scan folders in your system PATH for suspicious programs.
- Scan Running Processes (Ctrl+Shift+K): Scan the command lines of active processes.
- Scan Environment Variables (Ctrl+Shift+N): Scan your environment variables for suspicious scripts.
- Scan Env Files: Scan all common .env files found in home and current directories.
- Scan Scheduled Tasks (Ctrl+Shift+T): Scan tasks and Cron jobs for ways programs stay on your system.
- Scan Startup Items (Ctrl+Shift+A): Scan startup items and LaunchAgents.
- Scan System Services (Ctrl+Shift+S): Scan system services and background units.
- Scan SSH Configuration: Scan all common SSH configuration and authorized_keys files.
- Scan Network Configuration: Scan all common network configuration files (hosts, resolv.conf, etc.).
- Scan Python Packages (Ctrl+Shift+Y): Scan your installed Python packages for malicious code.
- Scan Node.js Packages (Ctrl+Shift+M): Scan your global Node.js packages.
- Scan Ruby Gems: Scan all folders containing installed Ruby gems.
- Scan PHP Packages: Scan all folders containing global PHP Composer packages.
- Scan Rust Packages: Scan all folders containing global Rust Cargo packages.
- Scan Go Packages: Scan all folders containing Go packages.
- Scan Java Packages: Scan all folders containing Java package caches (Maven and Gradle).
- Scan .NET Packages: Scan all folders containing global .NET NuGet package caches.
- Scan Browser Bookmarks: Scan all common browser bookmark files for suspicious bookmarklets (javascript: or data: URLs).
- Scan Browser Extensions (Ctrl+Shift+W): Scan your browser extension folders for malicious scripts.
- Scan Editor Extensions (Ctrl+Shift+X): Scan extensions for VS Code, Sublime Text, and Vim.
- Scan Documents: Scan your standard Documents folder for suspicious files.
- Scan Downloads (Ctrl+Shift+J): Scan your standard Downloads folder for suspicious files.
- Scan Desktop (Ctrl+Shift+L): Scan your standard Desktop folder for suspicious files.
- Scan Temporary Folders (Ctrl+Shift+Z): Scan common temporary folders for suspicious files.
Keyboard Shortcuts
The scanner includes shortcuts for faster navigation.
Note: macOS users should use Command instead of Ctrl for most shortcuts.
| Shortcut | Action |
|---|---|
| General | |
Enter | Start Scan |
Esc | Cancel Scan |
Ctrl+F | Focus Filter Bar |
Ctrl+O | Import Results |
Ctrl+E | Export Results |
Ctrl+V | Import Results from Clipboard |
Ctrl+Shift+E | Copy as Command Line |
| Scan Actions | |
Ctrl+Shift+O | Scan File(s) |
Ctrl+Shift+F | Scan Folder |
Ctrl+Shift+U | Scan Web Link |
Ctrl+Shift+V | Scan Clipboard |
Ctrl+Shift+D | Scan Git Diff |
Ctrl+Shift+G | Scan Git Hooks |
Ctrl+Shift+Q | Scan Git Stashes |
Ctrl+Shift+B | Scan Shell Profiles |
Ctrl+Shift+I | Scan System Audit |
Ctrl+Shift+H | Scan Shell History |
Ctrl+Shift+P | Scan System PATH |
Ctrl+Shift+K | Scan Running Processes |
Ctrl+Shift+N | Scan Environment Variables |
Ctrl+Shift+T | Scan Scheduled Tasks |
Ctrl+Shift+A | Scan Startup Items |
Ctrl+Shift+S | Scan System Services |
Ctrl+Shift+Y | Scan Python Packages |
Ctrl+Shift+M | Scan Node.js Packages |
Ctrl+Shift+W | Scan Browser Extensions |
Ctrl+Shift+X | Scan Editor Extensions |
Ctrl+Shift+J | Scan Downloads |
Ctrl+Shift+L | Scan Desktop |
Ctrl+Shift+Z | Scan Temporary Folders |
| Results List | |
Space / Enter | View Details |
F5 / r | Rescan |
Delete | Exclude |
Ctrl+A | Select All |
Ctrl+C | Copy File Path |
Ctrl+Shift+C | Copy as Markdown Table |
Ctrl+H | Copy SHA-256 Hash |
Ctrl+S | Copy Code Snippet |
Ctrl+J | Copy Results as JSON |
Ctrl+G | Analyze Selected with AI |
Ctrl+Shift+R | Copy as Triage Report |
Shift+Enter | Open File |
Ctrl+Enter | Reveal in Folder |
Ctrl+T | Check on VirusTotal |
Ctrl+L | View Online |
| Details Window | |
Esc | Close Window |
Left / Right | Previous / Next Result |
F5 / r | Rescan |
Delete | Exclude |
Ctrl+U | Toggle Full Source |
Ctrl+S | Copy Code Snippet |
Ctrl+Shift+C | Copy AI Analysis |
Ctrl+H | Copy SHA-256 Hash |
Ctrl+J | Copy JSON Data |
Ctrl+Shift+R | Copy as Triage Report |
Ctrl+T | Check on VirusTotal |
Ctrl+L | View Online |
Shift+Enter | Open File |
Ctrl+Enter | Reveal in Folder |
Using the Terminal (CLI)
To run the scanner in your terminal, use the --cli flag.
Basic Usage
Scan a single file or folder:
python3 gptscan.py path/to/your/script.py --cliScan multiple files, folders, or web links:
python3 gptscan.py file1.py folder/ https://github.com/user/repo --cliScan files modified in the last 24 hours:
python3 gptscan.py --modified 24h --cliSystem Scans
Perform a comprehensive system audit:
python3 gptscan.py --audit --cliScan all folders containing installed Python packages:
python3 gptscan.py --python-packages --cliScan all folders containing global Node.js packages:
python3 gptscan.py --nodejs-packages --cliScan all folders containing installed Ruby gems:
python3 gptscan.py --ruby-gems --cliScan all folders containing global PHP Composer packages:
python3 gptscan.py --php-packages --cliScan all folders containing global Rust Cargo packages:
python3 gptscan.py --rust-packages --cliScan all folders containing Go packages:
python3 gptscan.py --go-packages --cliScan all folders containing Java package caches (Maven and Gradle):
python3 gptscan.py --java-packages --cliScan all folders containing global .NET NuGet package caches:
python3 gptscan.py --dotnet-packages --cliScan all common browser bookmark files for suspicious bookmarklets:
python3 gptscan.py --browser-bookmarks --cliScan all common browser extension folders:
python3 gptscan.py --browser-extensions --cliScan all folders containing editor extensions:
python3 gptscan.py --editor-extensions --cliScan all common shell profile and configuration files (like .bashrc or .zshrc):
python3 gptscan.py --shell-profiles --cliScan the standard Downloads folder:
python3 gptscan.py --downloads --cliScan the standard Desktop folder:
python3 gptscan.py --desktop --cliScan your terminal history (Bash, Zsh, PowerShell, etc.):
python3 gptscan.py --shell-history --cliScan all folders in your system PATH:
python3 gptscan.py --system-path --cliScan command lines of all running processes:
python3 gptscan.py --running-processes --cliScan all scheduled tasks and Cron jobs:
python3 gptscan.py --scheduled-tasks --cliScan all system startup items and LaunchAgents:
python3 gptscan.py --startup-items --cliScan all system services:
python3 gptscan.py --system-services --cliScan SSH configuration and authorized keys:
python3 gptscan.py --ssh-config --cliScan all common network configuration files:
python3 gptscan.py --network-config --cliScan your standard Documents folder:
python3 gptscan.py --documents --cliScan common temporary folders:
python3 gptscan.py --temp --cliScan all environment variables:
python3 gptscan.py --env-vars --cliScan all common .env files:
python3 gptscan.py --env-files --cliGit Integration
Scan changes in your local project as a diff:
python3 gptscan.py --git-diff --cliScan local and global Git hooks for dangerous scripts:
python3 gptscan.py --git-hooks --cliScan potentially dangerous Git configuration settings:
python3 gptscan.py --git-config --cliScan all Git stashes:
python3 gptscan.py --git-stash --cliScan all files with Git merge conflicts:
python3 gptscan.py --git-conflicts --cliScan recent entries in the Git reflog:
python3 gptscan.py --git-reflog 5 --cliScan files changed in your project:
python3 gptscan.py --git-changes --cliScan the last 5 Git commits:
python3 gptscan.py --git-history --cliAdvanced Scans
Scan code sent from another command in the terminal:
echo "import os; os.system('rm -rf /')" | python3 gptscan.py --stdin --cliSave scan results to a file (CSV, JSON, HTML, etc.):
python3 gptscan.py ./my_project --output results.html --cliOutput Formats
By default, the scanner prints human-readable text to the terminal. You can customize the output format with these flags:
--json: Print or save results in JSON format.--csv: Print or save results in CSV format.--sarif: Save results in SARIF format (useful for security scanning tools).--html: Create an interactive HTML report.--md/--markdown: Create a Markdown report.--xml: Create an XML report.--yaml/--yml: Create a YAML report (requires thepyyamlpackage).--report: Output a detailed triage report to the terminal.
To save the formatted output directly to a file, combine any format flag with the --output (or -o) option:
python3 gptscan.py ./my_project --json --output results.json --cliCI/CD & Exit Codes
You can use the scanner in CI/CD pipelines (like GitHub Actions) to prevent malicious or dangerous code from being committed.
Use the --fail-threshold option followed by a threat level (0 to 100) to fail the scan. If any scanned file meets or exceeds this threat level, the script will exit with code 1, stopping your build or pipeline:
# Fail the build if any file has a threat level of 70 or higher
python3 gptscan.py ./my_project --cli --fail-threshold 70
CLI Options Reference
You can customize terminal scans using these command line options.
Scan Options
target(or other arguments): The folder, file, pattern, or web link to scan.-p,--path <path>: Alternative way to specify a folder, file, or web link to scan.-d,--deep: Scan the whole file instead of just the beginning and end. This is more thorough but slower.--dry-run: Preview which files would be scanned without actually checking them.--extensions <exts>: Only scan these file types (for example:py,js).-e,--exclude <patterns>: Ignore files or folders matching these patterns (for example:node_modules/*).--file-list <file>: Read a list of files to scan from a text file.--all-files: Scan every file, even if it is not a script.--fail-threshold <num>: Exit with code1if any file has a threat level at or above this number (0-100).-t,--threshold <num>: Set the minimum threat level (0-100) to show in results (default is 50).--stdin: Scan code piped from another command.-c,--clipboard: Scan code currently copied in the system clipboard.--import-results <file>/--import <file>: Import results from a previous scan. Use-to read from the terminal.--max-size <size>: The maximum file size to scan (for example:10MB). Default is 10MB.--modified <time>: Only scan files changed within this time (for example:24h,1h,7d).--downloads: Scan the standard Downloads folder.--desktop: Scan your standard Desktop folder.
Git Integration
--git-changes [<commit>]: Only scan files changed in Git. You can optionally provide a branch or commit (default isHEAD).--git-diff [<commit>]: Scan current Git changes as a diff. You can optionally provide a branch or commit (default isHEAD).--git-hooks: Scan local and global Git hooks.--git-config: Scan for dangerous Git configuration settings.--git-stash: Scan all Git stashes.--git-conflicts: Scan files with Git merge conflicts.--git-history [<count>]: Scan recent Git commits. You can optionally set the number of commits (default is 5).--git-reflog [<count>]: Scan recent entries in your Git reflog. You can optionally set the number of entries (default is 5).
System Scans
--audit: Run a complete system audit (includes shell profiles, history, system PATH, processes, scheduled tasks, startup items, system services, and more).--shell-profiles: Scan common shell profile and configuration files (like.bashrcor.zshrc).--shell-history: Scan common shell history files for dangerous commands.--system-path: Scan all folders in the system PATH.--running-processes: Scan command lines of all active processes.--scheduled-tasks: Scan all scheduled tasks and Cron jobs.--startup-items: Scan all system startup items and LaunchAgents.--system-services: Scan all system services and background units.--python-packages: Scan all folders containing installed Python packages.--browser-bookmarks: Scan all common browser bookmark files for suspicious bookmarklets.--nodejs-packages: Scan all folders containing global Node.js packages.--browser-extensions: Scan all common browser extension folders.--editor-extensions: Scan all common editor extension folders.--ssh-config: Scan all common SSH configuration and authorized_keys files.--network-config: Scan all common network configuration files (likehostsorresolv.conf).--env-vars: Scan all non-empty environment variables.--env-files: Scan all common.envfiles.--ruby-gems: Scan all folders containing installed Ruby gems.--php-packages: Scan all folders containing global PHP Composer packages.--rust-packages: Scan all folders containing global Rust Cargo packages.--go-packages: Scan all folders containing Go packages.--java-packages: Scan all folders containing Java package caches (Maven and Gradle).--dotnet-packages: Scan all folders containing global .NET NuGet package caches.--documents: Scan your standard Documents folder.--temp: Scan common temporary folders.
AI Analysis
-g,--use-gpt: Use AI to analyze suspicious files. Cloud providers require an API key; Ollama does not.--provider <name>: Choose your AI service (openai,openrouter, orollama). Default isopenai.--model <model>: Choose the AI model to use (for example:gpt-4o,llama3.2).-k,--api-key <key>: Provide the API key for your AI service.--api-base <url>: Set a custom web link for the AI service endpoint (useful for local servers).--rate-limit <num>: Set the maximum AI requests allowed per minute (default is 60).--clear-cache: Clear the AI analysis cache before starting the scan.
Output Options
--cli: Run in the terminal instead of opening a GUI window.-a,--show-all: Show all scanned files, even safe ones (threat level under threshold).-o,--output <file>: Save the scan results to a file.-j,--json: Output or save results in JSON format.--csv: Output or save results in CSV format.--sarif: Save results in SARIF format.--html: Create an interactive HTML report.--md,--markdown: Create a Markdown report.--xml: Create an XML report.--yaml,--yml: Create a YAML report.--report: Output a detailed triage report to the terminal.
Setting up AI Analysis
To use AI analysis, you need an API key for OpenAI or OpenRouter, or have Ollama running locally.
API Keys
You can provide your API key in four ways:
-
In the GUI: Enter it in the AI Analysis panel. It will be saved locally to
apikey.txt. -
Environment Variables: Set the
OPENAI_API_KEYorOPENROUTER_API_KEYenvironment variable in your terminal.Here is how to set it for different terminals:
- macOS / Linux (Bash or Zsh):
export OPENAI_API_KEY="your-api-key-here" - Windows (Command Prompt):
set OPENAI_API_KEY=your-api-key-here - Windows (PowerShell):
$env:OPENAI_API_KEY="your-api-key-here"
- macOS / Linux (Bash or Zsh):
-
Local File: Create a file named
apikey.txtin the project folder and paste your key there. -
Command Line: Pass your key directly with the
--api-key(or-k) option in your terminal scan.
Note: Do not share apikey.txt or commit it to a public repository.
Local AI Analysis (Ollama)
You can analyze files locally for free without sharing your data over the internet. To do this, use Ollama on your computer.
- Download Ollama: Download and install Ollama from ollama.com.
- Download a model:
Open your terminal and download the default model by running:
Note: You can use other models likeollama run llama3.2llama3ormistralby runningollama run <model-name>. - Run the scanner with Ollama:
- In the GUI: Select ollama from the AI Provider dropdown list. You can leave the API key blank.
- In the CLI: Use the
--provider ollamaflag:python3 gptscan.py ./my_project --cli --use-gpt --provider ollama
Custom API Base (Advanced)
If you use a local proxy or a custom endpoint (like a specific Ollama setup or an OpenAI-compatible server), you can set a custom API Base web link in the GUI or with the --api-base terminal flag.
Reviewing Results
The scanner provides several ways to analyze and manage your results:
- Filtering Results:
- Filter Bar: Use the Filter bar at the top (or press
Ctrl+F) to quickly find results by file path, analysis text, or code snippets. - Min. Threat Level: Use the Min. Threat Level setting in the Filter bar to hide files with low threat scores.
- Filter Bar: Use the Filter bar at the top (or press
- View Details: Double-click any result or press
Spaceto see a detailed analysis and the full source code. - Right-Click Menu: Right-click a result for quick actions:
- Rescan: Scan the file again (useful after making changes).
- Exclude: Add the file or folder to your ignore list.
- Check on VirusTotal: Search for the file's hash on VirusTotal.
- View Online: Open the source file in your web browser (for Git projects and remote web links).
- Export & Import:
- Export Results: Save your scan to a file (CSV, Markdown, HTML, JSON, SARIF, XML, or YAML) via File > Export Results....
- Import Results: Load previous scan results from any of the supported formats via File > Import Results... or by pasting them from your clipboard (
Ctrl+V).
Customizing the Scanner
You can tailor the scanner to your needs:
- Git Changes Only: Only scan files that have been modified or are untracked in Git. Use the Git changes only checkbox or the
--git-changesflag. - Exclusions: Ignore specific files or folders by using File > Manage Exclusions... or by adding patterns to a
.gptscanignorefile. In the terminal, use the-eor--excludeflag. - Extensions: Control which file types are scanned by using File > Manage Extensions... or by editing the
extensions.txtfile. In the terminal, use the--extensionsflag. - File Size: The scanner skips files larger than 10MB during folder scans. You can adjust this limit in the Scan Options panel or by using the
--max-sizeflag. Files you select individually are always scanned, regardless of their size. - Deep Scan: Scan the entire file instead of just the beginning and end. This is more thorough but slower. Use the Deep Scan checkbox or the
-dor--deepflag. - Scan All Files: By default, the scanner only checks script-like files (like
.pyor.js). Use the Scan All Files checkbox or the--all-filesflag to check every file. - Dry Run: Preview which files would be scanned without actually checking them. Use the Dry Run checkbox or the
--dry-runflag.
Advanced Usage
Training the Model
You can train the local "quick scan" model on your own data. This requires pyyaml to be installed.
See Training the Local Scanner for more information.
Running Tests
If you want to contribute to the project or run the test suite, you can install the test dependencies and run the tests.
1. Install test packages
Run the following command to install the required testing packages (including pyyaml which is needed for training and YAML configuration tests):
python3 -m pip install pytest pytest-asyncio pytest-mock pytest-cov Pillow pyyaml2. Run the full test suite
To run all tests, run:
python3 -m pytestIf you are using Python 3.12, some training tests might fail due to TensorFlow library compatibility. In Python 3.12, you can ignore the training tests with this command:
python3 -m pytest --ignore=tests/test_train.pyHow it works
- Local Filter: The tool uses a quick scan model trained on thousands of safe and dangerous scripts. It looks for patterns like hidden code and suspicious commands.
- AI Analysis: If a file looks suspicious, you can ask an AI for a second opinion. The AI will explain why it thinks the code is dangerous, helping you decide what to do.
License
This project is licensed under the GNU Lesser General Public License v2.1.