
LivePortrait: 基于拼接与重定向控制的高效肖像动画







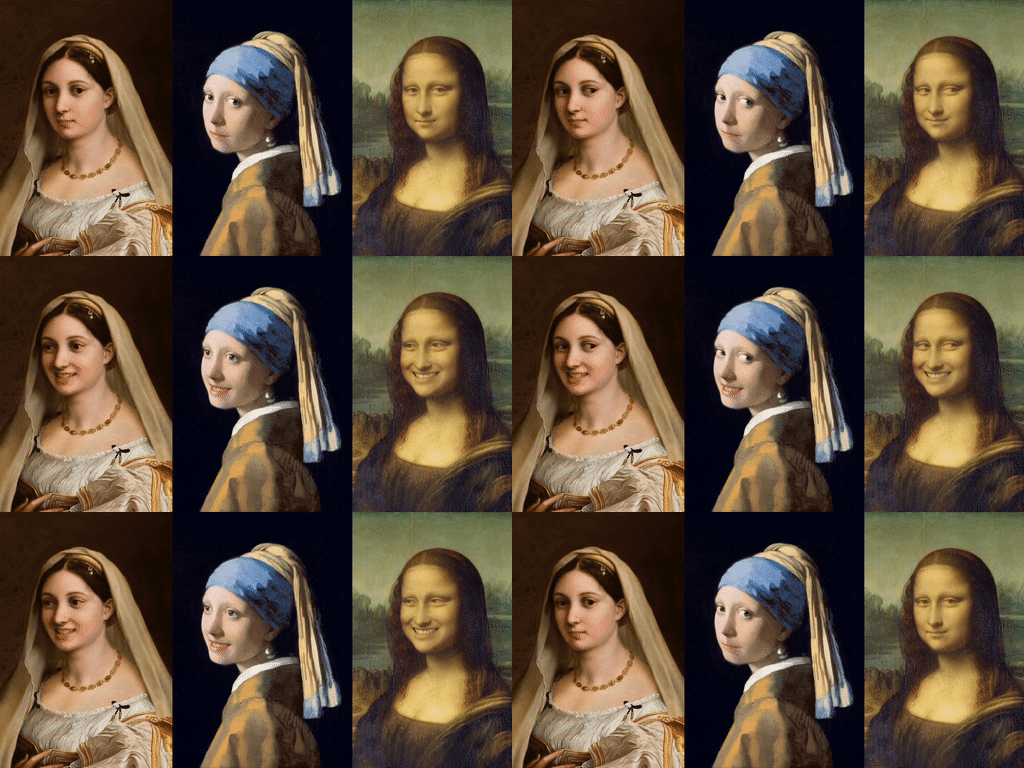
🔥 更新
-
2025/06/01: 🌍 过去一年中,LivePortrait 已 🚀 成为高效的肖像动画(人类、猫和狗)解决方案,被快手、抖音、剪映、微信视频号等主要视频平台以及众多初创公司和创作者所采用。🎉 -
2025/01/01: 🐶 我们更新了使用更多数据训练的 Animals 模型新版本,详见 此处。 -
2024/10/18: ❗ 我们已更新transformers和gradio库的版本,以避免安全漏洞。详情见 此处。 -
2024/08/19: 🖼️ 我们支持 图像驱动模式 和 区域控制。详情见 此处。 -
2024/08/06: 🎨 我们在 Gradio 界面中支持 精确肖像编辑,灵感来自 ComfyUI-AdvancedLivePortrait。详见 此处。 -
2024/08/05: 📦 Windows 用户现在可以下载 Humans 模式的 一键安装程序,并且现在也支持 Animals 模式!详情见 此处。 -
2024/08/02: 😸 我们发布了 Animals 模型 的版本,并附带了其他几项更新和改进。查看 此处 了解详情! -
2024/07/25: 📦 Windows 用户现在可以从 HuggingFace 下载该包。只需解压并双击run_windows.bat即可享受! -
2024/07/24: 🎨 我们在 Gradio 界面中支持对源肖像进行姿态编辑。我们还降低了默认检测阈值以提高召回率。尽情体验! -
2024/07/19: ✨ 我们支持 🎞️ 竖屏视频编辑(又称 v2v)!更多内容请见 此处。 -
2024/07/17: 🍎 我们支持搭载 Apple Silicon 的 macOS,基于 jeethu 的 PR #143 修改而来。 -
2024/07/10: 💪 我们支持音频和视频拼接、驱动视频自动裁剪以及模板制作以保护隐私。更多内容请见 此处。 -
2024/07/09: 🤗 我们发布了 HuggingFace Space,感谢 HF 团队和 Gradio! -
2024/07/04: 😊 我们发布了推理代码和模型的初始版本。持续更新中,敬请期待!
简介 📖
本仓库名为 LivePortrait,包含我们论文 LivePortrait: Efficient Portrait Animation with Stitching and Retargeting Control 的官方 PyTorch 实现。 我们正在积极更新和改进此仓库。如果您发现任何 bug 或有建议,欢迎提出 issue 或提交 pull request (PR) 💖。
快速开始 🏁
1. 克隆代码并准备环境 🛠️
[!Note] 请确保您的系统已安装
git、conda和FFmpeg。有关 FFmpeg 安装的详细信息,请参阅 如何安装 FFmpeg。
git clone https://github.com/KlingTeam/LivePortrait
cd LivePortrait

# create env using conda
conda create -n LivePortrait python=3.10
conda activate LivePortrait
面向 Linux 🐧 或 Windows 🪟 用户
Animals 模式所需的 X-Pose](https://github.com/IDEA-Research/X-Pose) 是一个需要安装的依赖项。如果你只想运行 Humans 模式,Check your CUDA versions 的步骤是可选的。
检查你的 CUDA 版本
首先,通过以下方式检查你当前的 CUDA 版本:
nvcc -V # example versions: 11.1, 11.8, 12.1, etc.然后,安装对应的 torch 版本。以下是不同 CUDA 版本的示例。如果你的 CUDA 版本未列出,请访问 PyTorch 官方网站 获取安装命令:
# for CUDA 11.1
pip install torch==1.10.1+cu111 torchvision==0.11.2 torchaudio==0.10.1 -f https://download.pytorch.org/whl/cu111/torch_stable.html
# for CUDA 11.8
pip install torch==2.3.0 torchvision==0.18.0 torchaudio==2.3.0 --index-url https://download.pytorch.org/whl/cu118
# for CUDA 12.1
pip install torch==2.3.0 torchvision==0.18.0 torchaudio==2.3.0 --index-url https://download.pytorch.org/whl/cu121
# ...注意:在 Windows 系统上,某些较高版本的 CUDA(例如 12.4、12.6 等)可能会导致未知问题。为了稳定性,你可以考虑将 CUDA 降级到 11.8 版本。请参阅 @dimitribarbot 的降级指南。
最后,安装其余的依赖项:
pip install -r requirements.txt面向 macOS 且使用 Apple Silicon 的用户
X-Pose 依赖项不支持 macOS,因此你可以跳过其安装。Humans 模式可以正常运行,但不支持 Animals 模式。请使用为 macOS 与 Apple Silicon 提供的 requirements 文件:
# for macOS with Apple Silicon users
pip install -r requirements_macOS.txt
2. 下载预训练权重 📥
下载预训练权重最简单的方式是从 HuggingFace 获取:
# !pip install -U "huggingface_hub[cli]"
huggingface-cli download KlingTeam/LivePortrait --local-dir pretrained_weights --exclude "*.git*" "README.md" "docs"
如果你无法访问 Huggingface,可以使用 hf-mirror 进行下载:
# !pip install -U "huggingface_hub[cli]"
export HF_ENDPOINT=https://hf-mirror.com
huggingface-cli download KlingTeam/LivePortrait --local-dir pretrained_weights --exclude "*.git*" "README.md" "docs"
或者,你可以从 Google Drive 或 Baidu Yun 下载所有预训练权重。解压并将它们放置在 ./pretrained_weights。
确保目录结构如下或包含 此。
3. 推理 🚀
快速上手(humans) 👤
# For Linux and Windows users
python inference.py

# For macOS users with Apple Silicon (Intel is not tested). NOTE: this maybe 20x slower than RTX 4090
PYTORCH_ENABLE_MPS_FALLBACK=1 python inference.py
如果脚本成功运行,你将获得一个名为 animations/s6--d0_concat.mp4 的输出 mp4 文件。该文件包含以下结果:驾驶视频、输入图像或视频,以及生成结果。
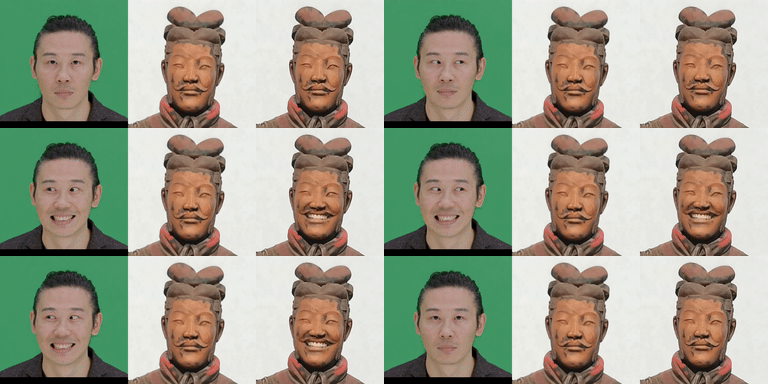
或者,您可以通过指定 -s 和 -d 参数来更改输入:
# source input is an image
python inference.py -s assets/examples/source/s9.jpg -d assets/examples/driving/d0.mp4

# source input is a video ✨
python inference.py -s assets/examples/source/s13.mp4 -d assets/examples/driving/d0.mp4

# more options to see
python inference.py -h
快速上手(动物)🐱🐶
Animals 模式仅在配备 NVIDIA GPU 的 Linux 和 Windows 上经过测试。
你需要先构建一个名为 MultiScaleDeformableAttention 的 OP(如有需要,请参阅 检查你的 CUDA 版本),该 OP 被 X-Pose 使用,这是一个通用的关键点检测框架。
cd src/utils/dependencies/XPose/models/UniPose/ops
python setup.py build install
cd - # equal to cd ../../../../../../../
Then
python inference_animals.py -s assets/examples/source/s39.jpg -d assets/examples/driving/wink.pkl --driving_multiplier 1.75 --no_flag_stitching如果脚本运行成功,你将得到一个名为 animations/s39--wink_concat.mp4 的输出 mp4 文件。

驾驶视频自动裁剪 📢📢📢
[!IMPORTANT] 若要使用您自己的驾驶视频,我们建议:⬇️
- 将其裁剪为 1:1 的宽高比(例如 512x512 或 256x256 像素),或通过
--flag_crop_driving_video启用自动裁剪。- 聚焦于头部区域,类似于示例视频。
- 尽量减少肩部动作。
- 确保驾驶视频的第一帧是中性表情的正脸。
以下是由 --flag_crop_driving_video 进行的自动裁剪案例:
python inference.py -s assets/examples/source/s9.jpg -d assets/examples/driving/d13.mp4 --flag_crop_driving_video如果您发现自动裁剪的效果不佳,可以修改 --scale_crop_driving_video、--vy_ratio_crop_driving_video 选项来调整比例和偏移,或者手动处理。
运动模板制作
您还可以使用以 .pkl 结尾的自动生成运动模板文件来加速推理,并保护隐私,例如:
python inference.py -s assets/examples/source/s9.jpg -d assets/examples/driving/d5.pkl # portrait animation
python inference.py -s assets/examples/source/s13.mp4 -d assets/examples/driving/d5.pkl # portrait video editing
4. Gradio 界面 🤗
我们还提供了一个 Gradio 
# For Linux and Windows users (and macOS with Intel??)
python app.py # humans mode

# For macOS with Apple Silicon users, Intel not supported, this maybe 20x slower than RTX 4090
PYTORCH_ENABLE_MPS_FALLBACK=1 python app.py # humans mode
我们还提供了 animals 模式的 Gradio 界面,该界面仅在配备 NVIDIA GPU 的 Linux 系统上经过测试:
python app_animals.py # animals mode 🐱🐶您可以指定 --server_port、--share、--server_name 参数以满足您的需求!
🚀 我们还提供了一个加速选项 --flag_do_torch_compile。首次推理会触发一个优化过程(约一分钟),使后续推理速度提升 20-30%。性能提升可能因不同的 CUDA 版本而异。
# enable torch.compile for faster inference
python app.py --flag_do_torch_compile注意:此方法不支持 Windows 和 macOS。
或者,轻松在 HuggingFace 🤗 上试用
5. 推理速度评估 🚀🚀🚀
我们还提供了一个脚本来评估每个模块的推理速度:
# For NVIDIA GPU
python speed.py结果在这里。
社区资源 🤗
探索由我们的社区贡献的宝贵资源,以提升您的 LivePortrait 体验。
社区开发的项目
| 仓库 | 描述 | 作者 / 链接 |
|---|---|---|
| AVTR-1 | 使用二元音频条件(dyadic audio conditioning)和 LivePortrait 风格肖像变形渲染器的实时对话式说话头部模型。 | @avaturn-live |
| ditto-talkinghead | 实时音频驱动的说话头部。 | ArXiv, Homepage |
| FasterLivePortrait | 使用 TensorRT 的更快实时版本。 | @warmshao |
| AdvancedLivePortrait-WebUI | 基于 gradio 的专用 WebUI,源自 ComfyUI-AdvancedLivePortrait。 | @jhj0517 |
| FacePoke | 一个由鼠标控制的实时头部变换应用! | @jbilcke-hf |
| FaceFusion | FaceFusion 3.0 将 LivePortrait 集成为 expression_restorer 和 face_editor 处理器。 | @henryruhs |
| sd-webui-live-portrait | LivePortrait 的 WebUI 扩展,在原始 Stable Diffusion WebUI 中添加一个标签页,以利用 LivePortrait 的功能。 | @dimitribarbot |
| ComfyUI-LivePortraitKJ | 一个用于使用 LivePortrait 的 ComfyUI 节点,以 MediaPipe 作为 Insightface 的替代方案。 | @kijai |
| ComfyUI-AdvancedLivePortrait | 一个具有实时预览功能的更快 ComfyUI 节点,启发了许多其他社区开发工具和项目。 | @PowerHouseMan |
| comfyui-liveportrait | 一个用于使用 LivePortrait 的 ComfyUI 节点,支持多人脸、表情插值等,并附有教程。 | @shadowcz007 |
游乐场、🤗 HuggingFace Spaces 及其他
- FacePoke Space
- Expression Editor Space
- Expression Editor Replicate
- Face Control Realtime Demo on FAL
- Replicate Playground
- Nuke 可以通过 CompyUI 节点使用 LivePortrait,详情见此处
- LivePortrait 托管在 Poe
视频教程
- LivePortrait 视频到视频的工作流 由 @curiousrefuge
- Google Colab 教程 由 @Planet Ai
- 论文解读 由 @TwoMinutePapers
- ComfyUI 高级 LivePortrait 由 TutoView
- LivePortarit 探索 和 深入剖析 LivePortrait 由 TheoreticallyMedia
- LivePortrait 实战教程 由 @AI Search
- ComfyUI 教程 由 @Sebastian Kamph
- BiliBili 上的教程
还有来自我们社区的众多精彩贡献,多到无法一一列举 💖
致谢 💐
我们要感谢 FOMM、Open Facevid2vid、SPADE、InsightFace 和 X-Pose 仓库的贡献者,感谢他们的开源研究和贡献。
伦理考量 🛡️
肖像动画技术伴随着社会风险,尤其是在被滥用于制作深度伪造(deepfakes)方面的潜在风险。为了缓解这些风险,遵循伦理准则并采用负责任的使用实践至关重要。目前,合成结果中包含的视觉伪影可能有助于检测深度伪造。请注意,我们不对本项目生成结果的使用承担任何法律责任。
引用 💖
如果您发现 LivePortrait 对您的项目或研究有用,欢迎 🌟 此仓库,并使用以下 BibTeX 引用我们的工作:
@article{guo2024liveportrait,
  title   = {LivePortrait: Efficient Portrait Animation with Stitching and Retargeting Control},
  author  = {Guo, Jianzhu and Zhang, Dingyun and Liu, Xiaoqiang and Zhong, Zhizhou and Zhang, Yuan and Wan, Pengfei and Zhang, Di},
  journal = {arXiv preprint arXiv:2407.03168},
  year    = {2024}
}
Long live in arXiv.
联系方式 📧
Jianzhu Guo (郭建珠); guojianzhu1994@gmail.com
Star History 🌟
Click to view Star chart