
FireMongo
About
FireMongo is a project aimed at integrating the functionalities of Firebase Realtime Database with the robust querying and indexing capabilities of MongoDB. The goal is to create a seamless data management system that leverages the strengths of both databases while emulating the RESTful functionalities of Firebase. This project was developed to simplify data operations, enhance data retrieval efficiency, and provide a flexible yet powerful backend for various applications.
Description
Main Features
- Data Model Design: Implemented a data model that effectively utilizes MongoDB's querying and indexing features while replicating the JSON structure of Firebase.
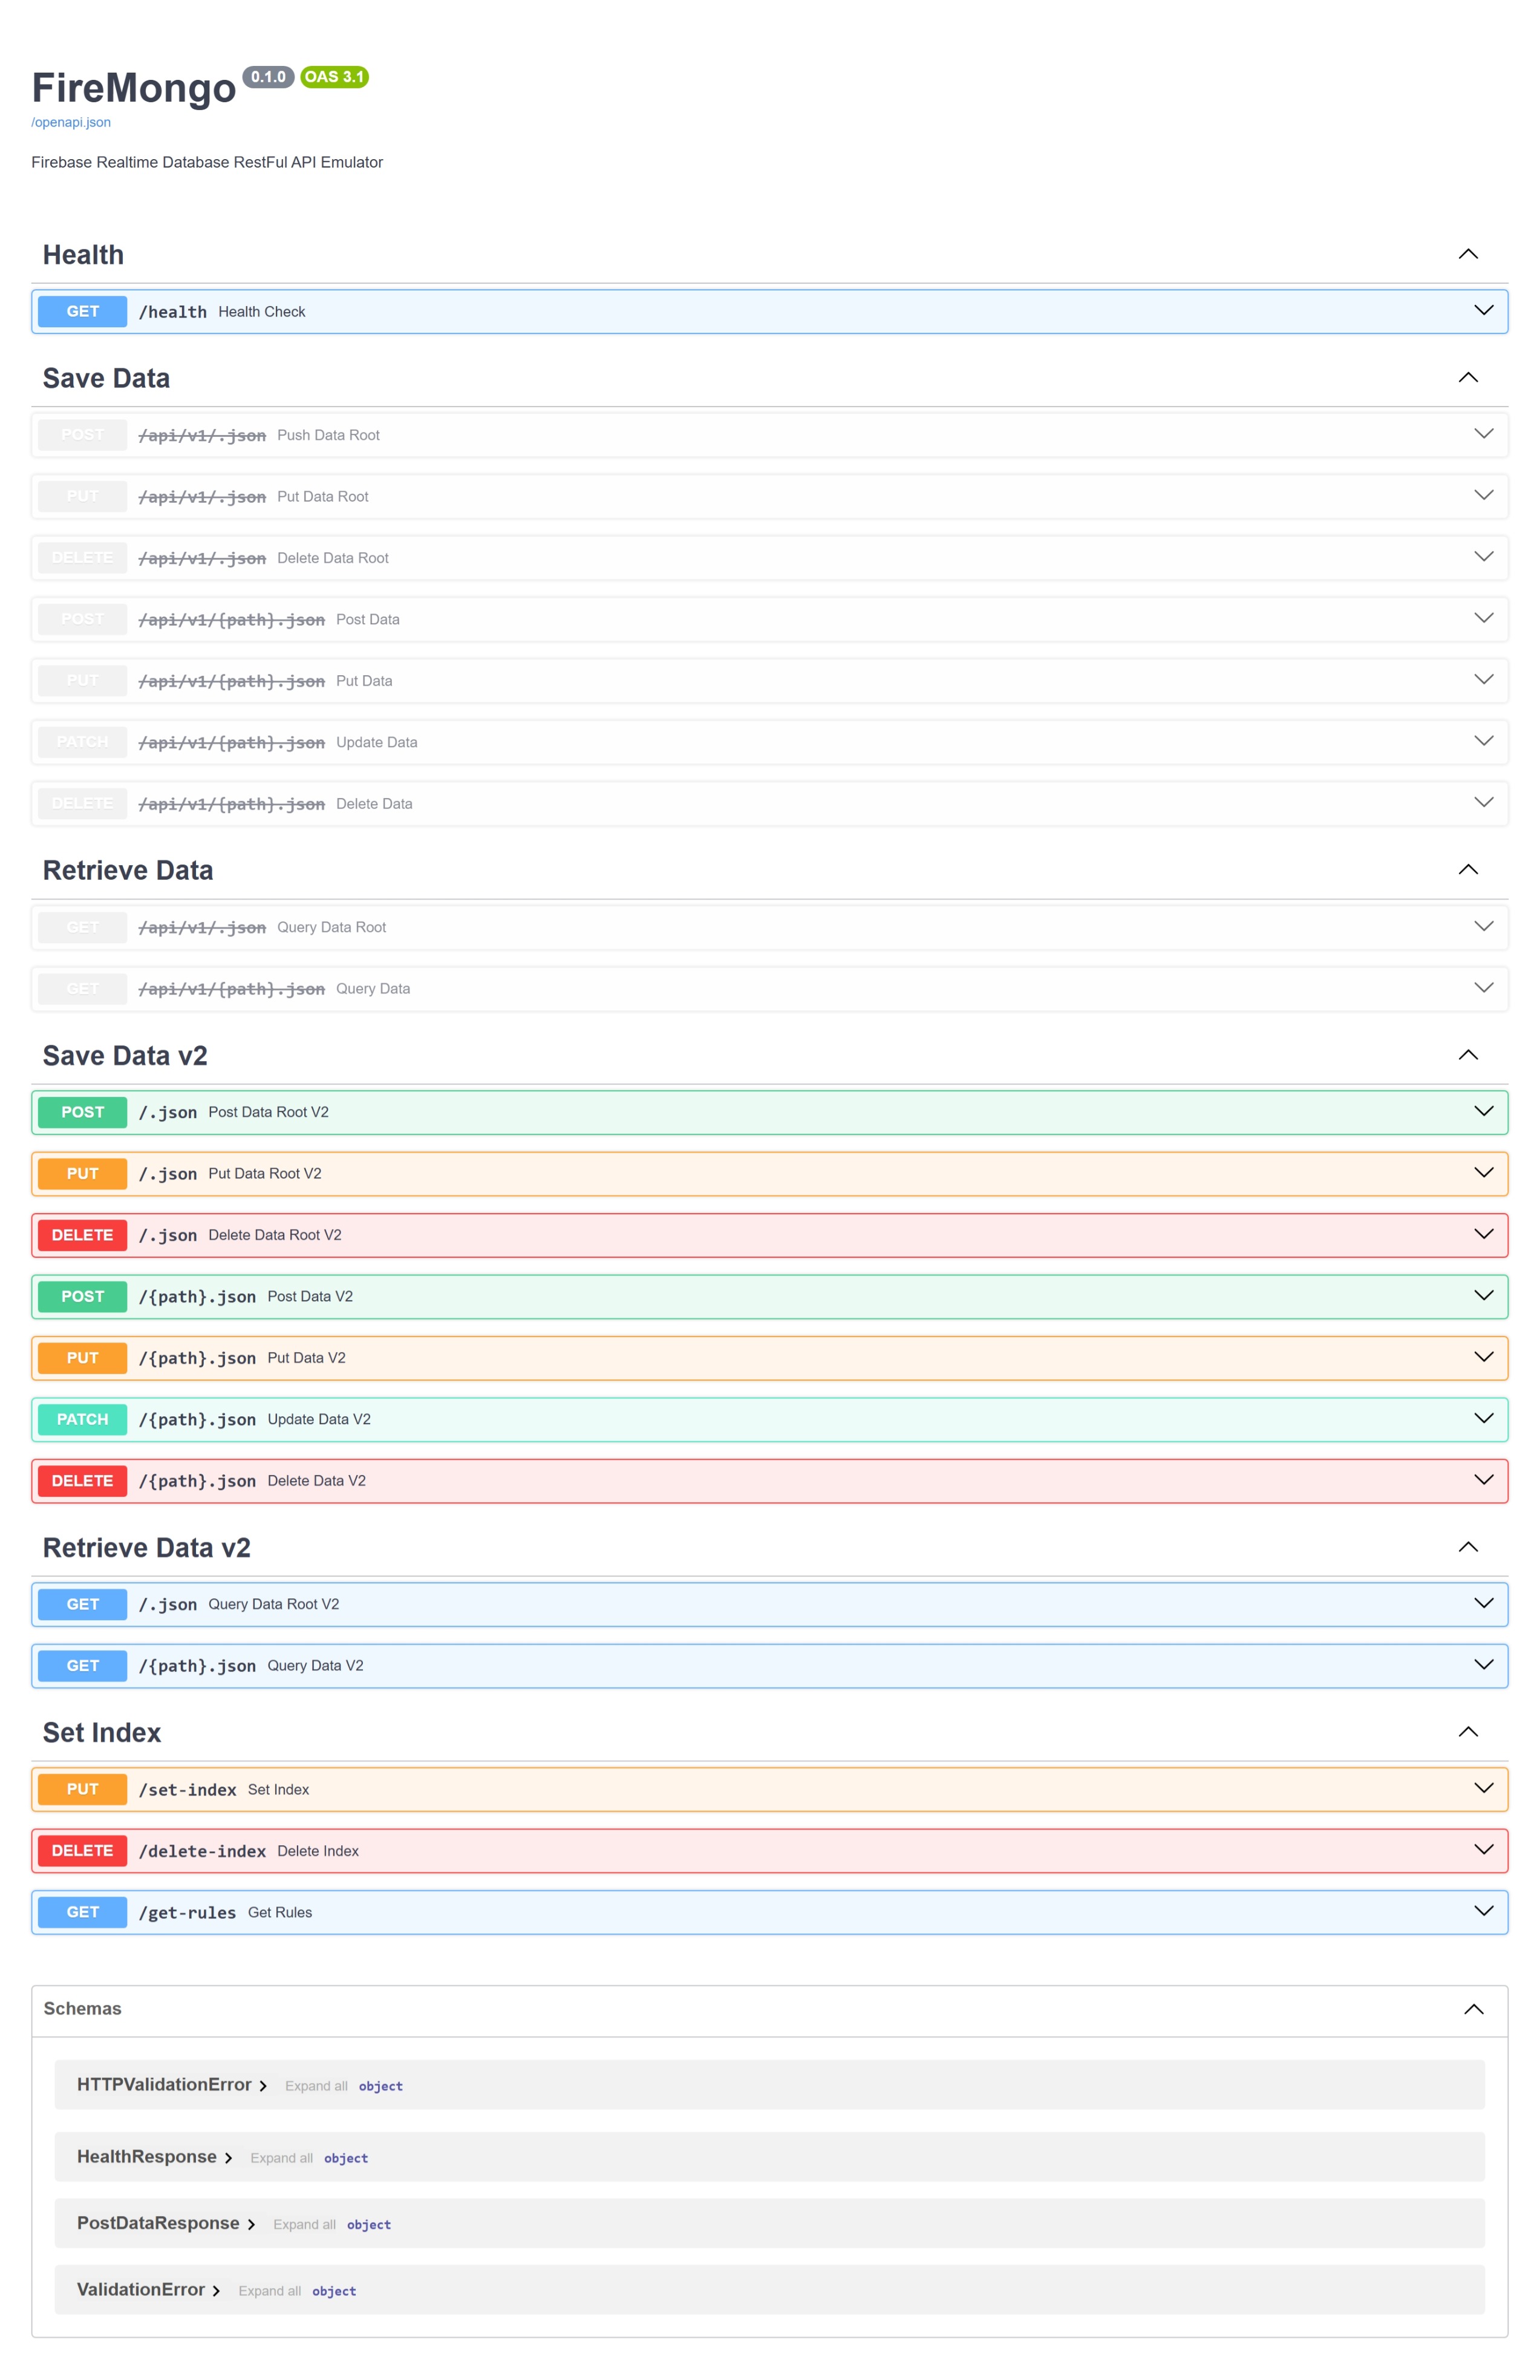
- RESTful API Endpoints: Developed comprehensive RESTful API endpoints (GET, POST, PUT, PATCH, DELETE) to manage data operations seamlessly, emulating Firebase's CRUD functionalities.
- Rules Configuration: Configured and managed rules for setting indexes and modifying them to ensure data integrity and optimize query performance.
- Automatic API Documentation: Utilized OpenAPI specification for automatic API documentation, making it easy for developers to understand and use the API.
- Deployment: Packages a lightweight multi-stage Docker image, publishes it to GitHub Container Registry, and deploys it to Render.
- Testing: Uses deterministic pytest unit and integration suites, with an opt-in test against a real MongoDB database.
Implementations
- Data Modeling: Designed two versions of data models. The initial version used a nested document structure, which was later optimized to improve read and write operations.
- API Development: Created RESTful API endpoints to handle CRUD operations efficiently, closely following the RESTful functionalities of Firebase.
- Rules Configuration: Implemented server-side logic for rules configuration to set and modify indexes, ensuring optimal performance and data integrity.
- Server-Side Logic: Implemented complex data filtering and querying to optimize performance.
- Deployment and Testing: Deployed the application using Docker, ensuring it is easily portable and manageable across different environments. Conducted extensive testing to ensure reliability and performance.
Purpose of RESTful API Endpoints
- GET: Retrieve data from the database with support for complex filtering and querying.
- POST: Create new entries in the database with a flexible data structure.
- PUT: Update existing entries with new data, ensuring data integrity and consistency.
- PATCH: Partially update specific fields in an existing entry.
- DELETE: Remove entries from the database securely and efficiently.
- Rules Configuration: Set and modify indexes to optimize query performance and maintain data integrity.
Summary
FireMongo aims to bridge the gap between Firebase Realtime Database's JSON structure and MongoDB's powerful querying capabilities, while emulating the RESTful functionalities of Firebase. By leveraging the strengths of both databases, this project provides a robust backend solution for managing complex data operations. The RESTful API endpoints offer a flexible and efficient way to interact with the database, making it a versatile tool for developers. The application is packaged as a multi-stage Docker image and delivered through GitHub Container Registry and Render.
Getting Started
Setup of development environment
-
Install uv.
-
Create the Python 3.12 environment and install all locked dependencies.
uv sync
Setup Environment Variables for the App
Requirements
- You need have you own MongoDB Atlas Cluster
- Get the connection details including the URI, username and password
Creating a .env file
- Create a new environment file named
.env - Copy the environment variables from
example.envfile from the root directory and paste it into the.envfile created above - Add the MongoDB Atlas URI with username and password next to the
MONGODB_URIenvironment variable - To generate a the secret key, run the following command:
openssl rand -hex 32
Run the APP
Locally
Run the command below in the terminal
-
Linux
scripts/server.sh -
Windows
uv run uvicorn app.main:app --reload -
Run with Uvicorn multiple workers
uv run uvicorn app.main:app --host 0.0.0.0 --port 8000 --workers 4 -
Run with Gunicorn & Uvicorn
uv run gunicorn app.main:app --workers 4 --worker-class uvicorn.workers.UvicornWorker --bind 0.0.0.0:8000
Tests
The pytest suite runs in-process with an isolated MongoDB-compatible database. It does not use the configured Atlas database or require a running API server.
uv run pytest
uv run pytest -m unit
uv run pytest -m integration
The real-database test is opt-in. It reads MONGODB_URI, creates a uniquely named temporary database, verifies the /health endpoint and original v2 demo flow, and removes every temporary collection when it finishes:
uv run pytest -m real_db --real-mongodbThe application exposes GET /health as a readiness check. It returns HTTP 200 only when MongoDB responds to a ping; unavailable database connections return HTTP 503. The Docker image uses this endpoint for its container health check.
The original university presentation walkthrough is preserved in docs/university-demo.md. Its CRUD, query, and index examples are automated in tests/integration/test_demo_flow.py.
Containers and deployment
Run with Docker Compose
The Compose service builds the production runtime stage, listens on port 8080 by default, and reads application settings from .env:
docker compose up --buildOverride HOST_PORT, PORT, IMAGE_NAME, or IMAGE_TAG when needed. The published default-branch image is available at:
ghcr.io/kayvanshah1/firebase-realtime-db-emulator:latestGitHub Actions
The workflow in .github/workflows/ci-cd.yml performs the following gated sequence:
- Pull requests and
mainpushes run the Python 3.12 pytest suite plus Ruff lint and formatting checks whenapp/**,templates/**,.github/workflows/**, orDockerfilechanges. Manual dispatch remains available for all other changes. - Pull requests build the
linux/amd64runtime image without publishing it. - Successful
mainpushes publishlatest, branch, and immutable commit-SHA tags to GHCR. - After the image is published, the default branch triggers the configured Render service and creates a GitHub deployment record.
Configure Render
- Connect the repository as a Render Blueprint using
render.yaml. It defines the free Singaporefiremongoimage-backed service, its GHCR image,/healthcheck, port, generatedSECRET_KEY, and the requiredMONGODB_URIprompt. - If the GHCR package is private, add a GitHub registry credential in Render using a personal access token with
read:packages. A public package needs no registry credential. - The container automatically binds to Render's
PORTvalue. Add any additional runtime settings through the Render service environment. - Disable Render Auto-Deploy because GitHub Actions owns the deployment trigger.
- In GitHub repository settings, add
RENDER_SERVICE_IDandRENDER_API_KEYunder Actions secrets. The service ID is shown on the Render service page; create the API key under Render Account Settings.
Until both Render secrets are added, tests and GHCR publishing continue normally and the deployment job reports that Render is not configured.
About
The theme of this semester’s project was emulation where the goal was to develop a prototype system that emulates the interface and working of a big data system.
Project Developed for DSCI 551: Foundations of Data Management | Spring 2023
Developed By Kayvan Shah | M.S. in Applied Data Science |
University of Southern California