
dblab




PostgreSQL、MySQL、SQLite3、Oracle 和 SQL Server 的交互式客户端。
目录
概述
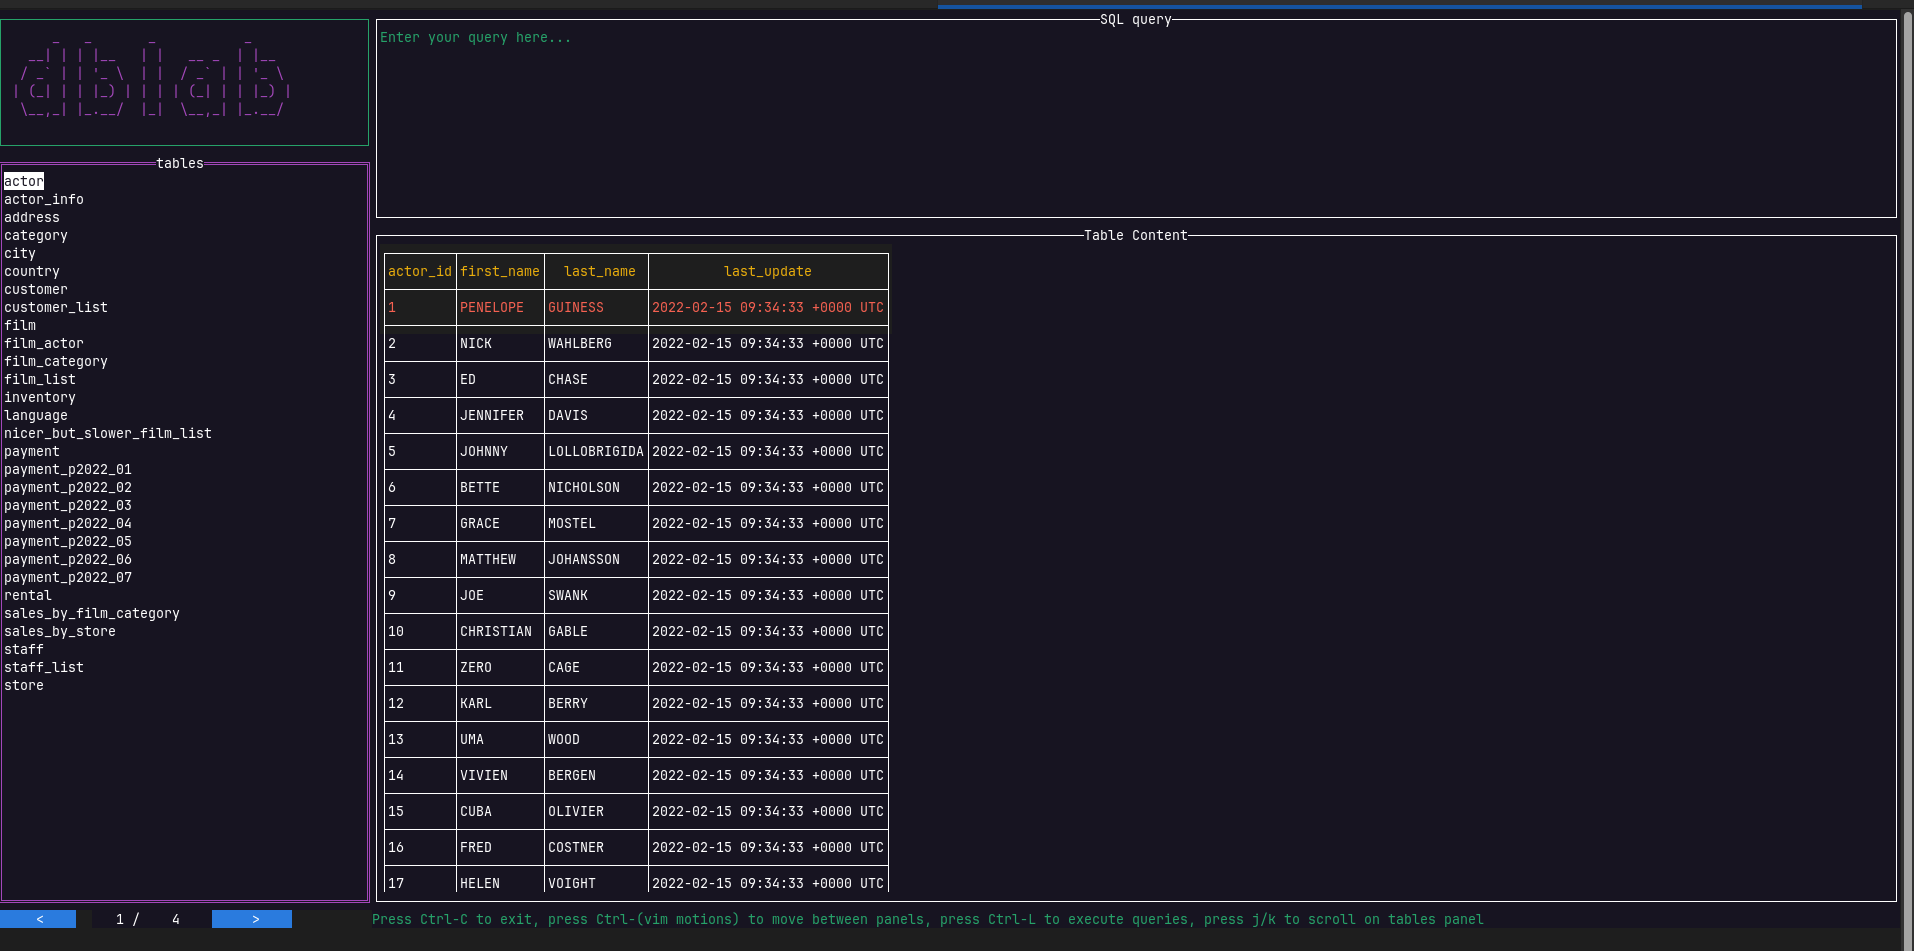
dblab 是一个快速且轻量级的交互式基于终端的 UI 应用程序,用于 PostgreSQL、MySQL 和 SQLite3, 使用 Go 编写,并可在 macOS、Linux 和 Windows 机器上运行。使用 Go 进行后端开发的主要理念 是利用编译器为多个平台生成零依赖二进制文件的能力。dblab 的创建旨在构建一个非常简单且可移植的 应用程序,用于处理本地或远程的 PostgreSQL/MySQL/SQLite3/Oracle/SQL Server 数据库。
特性
- 支持 macOS/Linux/Windows 跨平台(32/64 位)
- 安装简单(以单个二进制文件分发)
- 零依赖。
- Vim 风格查询编辑器(普通模式和插入模式,面向行的编辑命令)。
- 多查询执行:编写多个以
;分隔的 SQL 语句,并并发运行,结果在单独的标签页中显示。 - 单查询执行:按 ctrl+r 仅执行当前光标所在行的查询,而不运行编辑器中的其他语句。
- 连接配置文件,凭据安全存储在操作系统密钥环中。
- 查询历史:已执行的查询在会话之间持久化,并可通过可过滤列表浏览/重用。
- 只读模式:使用
--readonly通过将数据库会话强制为只读模式来防止意外写入(支持 PostgreSQL、MySQL、SQLite、Oracle 和 SQL Server)。 - 内置帮助模态框:按 ? 显示帮助覆盖层,展示所有可用的键绑定;按 Esc 关闭它。
安装
Homebrew
它也适用于 Linux。
brew install --cask danvergara/tools/dblab
或
brew tap danvergara/tools
brew install --cask dblab
二进制发布版(Linux/macOS/Windows)
您可以从发布页面手动下载二进制发布版。
自动化安装/更新
别忘了始终验证您通过管道传入 bash 的内容
使用我们的 bash 脚本安装二进制文件:
curl https://raw.githubusercontent.com/danvergara/dblab/master/scripts/install_update_linux.sh | bash帮助
dblab is a terminal UI-based interactive database client

Usage:
  dblab [flags]
  dblab [command]

Available Commands:
  connect     Re-use saved connection profiles
  help        Help about any command
  version     The version of the project

Flags:
      --cfg-name string                   Database config name section
      --config                            Get the connection data from a config file (default locations are: current directory, $HOME/.dblab.yaml or $XDG_CONFIG_HOME/.dblab.yaml)
      --keybindings, -k                   Get the keybindings configuration from the config file (default locations are: current directory, $HOME/.dblab.yaml or $XDG_CONFIG_HOME/.dblab.yaml)
      --db string                         Database name
      --driver string                     Database driver
      --encrypt string                    [strict|disable|false|true] whether data sent between client and server is encrypted
  -h, --help                              help for dblab
      --host string                       Server host name or IP
      --limit uint                        Size of the result set for the table content query (should be greater than zero, otherwise the app will error out) (default 100)
      --pass string                       Password for user
      --port string                       Server port
      --save-as string                    Save the connection as a named profile for later reuse
      --schema string                     Database schema (optional for postgres and oracle only)
      --socket string                     Path to a Unix socket file
      --ssh-host string                   SSH Server Hostname/IP
      --ssh-key string                    File with private key for SSH authentication
      --ssh-key-pass string               Supports connections with protected private keys with passphrase
      --ssh-pass string                   SSH Password (Empty string for no password)
      --ssh-port string                   SSH Port
      --ssh-user string                   SSH User
      --ssl string                        SSL mode
      --ssl-verify string                 [enable|disable] or [true|false] enable ssl verify for the server
      --sslcert string                    This parameter specifies the file name of the client SSL certificate, replacing the default ~/.postgresql/postgresql.crt
      --sslkey string                     This parameter specifies the location for the secret key used for the client certificate. It can either specify a file name that will be used instead of the default ~/.postgresql/postgresql.key, or it can specify a key obtained from an external “engine”
      --sslpassword string                This parameter specifies the password for the secret key specified in sslkey
      --sslrootcert string                This parameter specifies the name of a file containing SSL certificate authority (CA) certificate(s). The default is ~/.postgresql/root.crt
      --timeout string                    in seconds (default is 0 for no timeout), set to 0 for no timeout. Recommended to set to 0 and use context to manage query and connection timeouts
      --trace-file string                 File name for trace log
      --trust-server-certificate string   [false|true] whether the server certificate is checked
  -u, --url string                        Database connection string
      --user string                       Database user
  -v, --version                           version for dblab
      --readonly                            Forces a read-only connection with the target database
      --wallet string                     Path for auto-login oracle wallet

Use "dblab [command] --help" for more information about a command.
用法
你可以不传递任何标志或参数来启动应用;届时会要求你提供连接数据。

$ dblab --host localhost --user myuser --db users --pass password --ssl disable --port 5432 --driver postgres --limit 50
$ dblab --db path/to/file.sqlite3 --driver sqlite
$ dblab --host localhost --user system --db FREEPDB1 --pass password --port 1521 --driver oracle --limit 50
$ dblab --host localhost --user SA --db msdb --pass '5@klkbN#ABC' --port 1433 --driver sqlserver --limit 50
也支持连接 URL 方案:
$ dblab --url 'postgres://user:password@host:port/database?sslmode=[mode]'
$ dblab --url 'mysql://user:password@tcp(host:port)/db'
$ dblab --url 'file:test.db?_pragma=foreign_keys(1)&_time_format=sqlite'
$ dblab --url 'oracle://user:password@localhost:1521/db'
$ dblab --url 'sqlserver://SA:myStrong(!)Password@localhost:1433?database=tempdb&encrypt=true&trustservercertificate=false&connection+timeout=30'
如果你使用的是 PostgreSQL 或 Oracle,你可以选择定义要操作的 schema。--schema 标志是可选的:如果省略,dblab 将在侧边栏树中显示连接用户有权访问的所有 schema。如果提供,则仅显示该特定 schema。
# Postgres
$ dblab --host localhost --user myuser --db users --pass password --schema myschema --ssl disable --port 5432 --driver postgres --limit 50
$ dblab --url postgres://user:password@host:port/database?sslmode=[mode] --schema myschema

# Oracle
$ dblab --host localhost --user user2 --db FREEPDB1 --pass password --port 1521 --driver oracle --limit 50 --schema user1
$ dblab --url 'oracle://user2:password@localhost:1521/FREEPDB1' --schema user1
你可以使用 --readonly 标志以只读模式打开连接。这会阻止执行任何写操作(INSERT、UPDATE、DELETE 等),当你需要安全地浏览生产数据库时非常有用。也可以通过在数据库配置文件中设置 readonly: true 来实现相同的效果(参见 Configuration)。
# Postgres
$ dblab --host localhost --user myuser --db users --pass password --ssl disable --port 5432 --driver postgres --limit 50 --readonly

# MySQL
$ dblab --host localhost --user myuser --db mydb --pass password --ssl disable --port 3306 --driver mysql --limit 50 --readonly

# SQLite
$ dblab --db path/to/file.sqlite3 --driver sqlite --readonly

# Oracle
$ dblab --host localhost --user system --db FREEPDB1 --pass password --port 1521 --driver oracle --limit 50 --readonly

# SQL Server
$ dblab --host localhost --user SA --db msdb --pass '5@klkbN#ABC' --port 1433 --driver sqlserver --limit 50 --readonly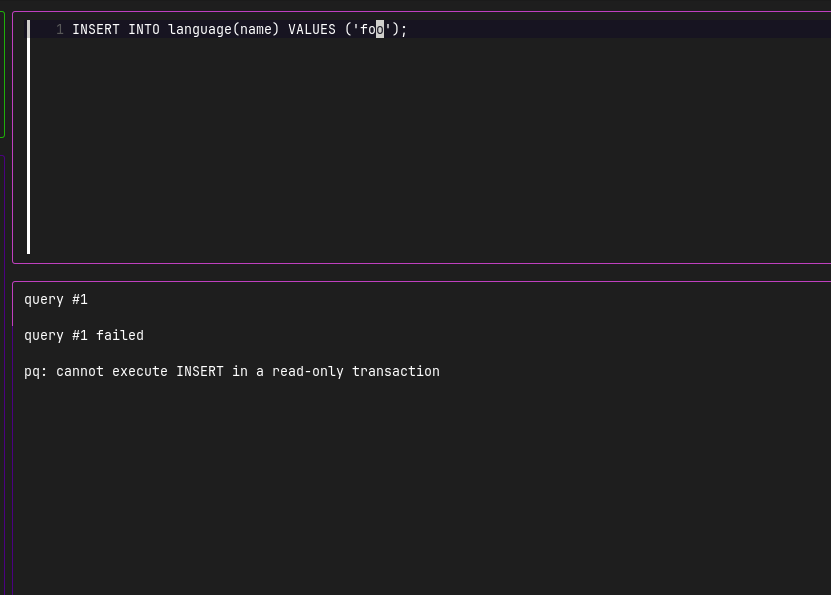
按照 #125 的要求,已集成对 MySQL/MariaDB 套接字的支持。
$ dblab --url "mysql://user:password@unix(/path/to/socket/mysql.sock)/dbname?charset=utf8"
$ dblab --socket /path/to/socket/mysql.sock --user user --db dbname --pass password --ssl disable --port 5432 --driver mysql --limit 50
通过 Unix 套接字连接 Postgres:
$ dblab --url "postgres://user:password@/dbname?host=/path/to/socket"
$ dblab --socket /path/to/socket --user user --db dbname --pass password --ssl disable --port 5432 --driver postgres --limit 50
现在,可以使用 PostgreSQL 数据库确保 SSL 连接。已添加 SSL 相关参数,例如 --sslcert、--sslkey、--sslpassword 和 --sslrootcert。有关如何使用此类连接标志的更多信息,请参见 此处。
dblab --host db-postgresql-nyc3-56456-do-user-foo-0.fake.db.ondigitalocean.com --user myuser --db users --pass password --schema myschema --port 5432 --driver postgres --limit 50 --ssl require --sslrootcert ~/Downloads/foo.crt
SSH 隧道
现在,可以通过 SSH 使用密码或 SSH 密钥文件连接到服务器上的 Postgres 或 MySQL(后续将支持更多)数据库。
为此,dblab 命令新增了 6 个标志:
| 标志 | 描述 |
|---|---|
| --ssh-host | SSH 服务器主机名/IP |
| --ssh-port | SSH 端口 |
| --ssh-user | SSH 用户 |
| --ssh-pass | SSH 密码(无密码时为空字符串) |
| --ssh-key | 用于 SSH 认证的私钥文件 |
| --ssh-key-pass | 受保护私钥文件的密码短语 |
示例
通过 SSH 隧道使用密码连接 Postgres:
dblab --host localhost --user postgres --pass password --schema public --ssl disable --port 5432 --driver postgres --limit 50 --ssh-host example.com --ssh-port 22 --ssh-user root --ssh-pass root
使用 SSH 私钥文件通过 SSH 隧道连接 Postgres:
dblab --host localhost --user postgres --pass password --schema public --ssl disable --port 5432 --driver postgres --limit 50 --ssh-host example.com --ssh-port 22 --ssh-user root --ssh-key my_ssh_key --ssh-key-pass password
通过 SSH 隧道使用 url 参数和密码连接 Postgres:
dblab --url postgres://postgres:password@localhost:5432/users?sslmode=disable --schema public --ssh-host example.com --ssh-port 22 --ssh-user root --ssh-pass root
使用密码通过 SSH 隧道连接 MySQL:
dblab --host localhost --user myuser --db mydb --pass 5@klkbN#ABC --ssl enable --port 3306 --driver mysql --limit 50 --ssh-host example.com --ssh-port 22 --ssh-user root --ssh-pass root
使用 SSH 私钥文件通过 SSH 隧道连接 MySQL:
dblab --host localhost --user postgres --pass password --ssl enable --port 3306 --driver mysql --limit 50 --ssh-host example.com --ssh-port 22 --ssh-user root --ssh-key my_ssh_key --ssh-key-pass passphrase
通过 SSH 隧道使用密码,利用 url 参数建立 MySQL 连接:
dblab --url "mysql://myuser:5@klkbN#ABC@mysql+tcp(localhost:3306)/mydb" --driver mysql --ssh-host example.com --ssh-port 22 --ssh-user root --ssh-pass root
配置
每次输入这些标志都很繁琐,因此 dblab 提供了几个标志来提供帮助:--config 和 --cfg-name。
dblab 将查找名为 .dblab.yaml 的文件。目前,有三个位置可以放置配置文件:
- $XDG_CONFIG_HOME ($XDG_CONFIG_HOME/.dblab.yaml)
- $HOME ($HOME/.dblab.yaml)
- .(运行命令行工具的当前目录)
如果要使用此功能,--config 是必需的,而 --cfg-name 可以省略。配置文件可以在 database 字段下存储一个或多个数据库连接部分。database 是一个数组;此前它只是一个对象,一次只能存储单个连接部分。
我们强烈建议从 v0.18.0 开始采用新格式。--cfg-name 指定要连接的所需数据库部分的名称。它可以省略,其默认值将是数组中的第一项。
从 v0.21.0 开始,配置文件中支持 SSL 连接选项。
# default: test
$ dblab --config

$ dblab --config --cfg-name "prod"
按键绑定配置
按键绑定可以通过 .dblab.yaml 文件进行配置。其中有一个名为 keybindings 的字段,可用于修改按键绑定。在 keybindings 下,一个 editor 部分用于配置 Vim 风格的查询编辑器(包括普通模式与插入模式之间的切换、普通模式下的光标移动,以及编辑器的执行查询快捷键)。默认情况下,按键绑定不会被加载,因此您需要使用 --keybindings 或 -k 标志来加载它们。请参阅示例以查看可更改的按键绑定完整列表。该文件展示了默认值。可用按键绑定的列表属于 bubbletea 库。具体而言,请参阅 KeyNames 映射 以获取准确参考。
已弃用: keybindings 下的顶层 execute-query 字段。请改用 keybindings.editor 下的 execute-query。
.dblab.yaml 示例
database:
  - name: "test"
    host: "localhost"
    port: 5432
    db: "users"
    password: "password"
    user: "postgres"
    driver: "postgres"
    # optional for postgres and oracle
    # if omitted, all accessible schemas are shown
    schema: "myschema"
    # optional: set to true to force a read-only session
    readonly: true
  - name: "prod"
    # example endpoint
    host: "mydb.123456789012.us-east-1.rds.amazonaws.com"
    port: 5432
    db: "users"
    password: "password"
    user: "postgres"
    schema: "public"
    driver: "postgres"
    ssl: "require"
    sslrootcert: "~/.postgresql/root.crt."
  - name: "oracle"
    host: "localhost"
    port: 1521
    db: "FREEPDB1"
    schema: "user1"
    password: "password"
    user: "user2"
    driver: "oracle"
    ssl: "enable"
    wallet: "path/to/wallet"
    ssl-verify: true
  - name: "sqlserver"
    driver: "sqlserver"
    host: "localhost"
    port: 1433
    db: "msdb"
    password: "5@klkbN#ABC"
    user: "SA"
  - name: "ssh-tunnel"
    host: "localhost"
    port: 5432
    db: "users"
    password: "password"
    user: "postgres"
    schema: "public"
    driver: "postgres"
    ssh-host: "example.com"
    ssh-port: 22
    ssh-user: "ssh-user"
    ssh-pass: "password"
  - name: "realistic-ssh-example"
    host: "rds-endpoint.region.rds.amazonaws.com"
    port: 5432
    db: "database_name"
    user: "db_user"
    password: "password"
    schema: "schema_name"
    driver: "postgres"
    ssl: "require"
    ssh-host: "bastion.host.ip"
    ssh-port: 22
    ssh-user: "ec2-user"
    ssh-key-file: "/path/to/ssh/key.pem"
    ssh-key-pass: "hiuwiewnc092"
# should be greater than 0, otherwise the app will error out
limit: 50
keybindings:
  next-tab: 'tab'
  prev-tab: 'shift+tab'
  page-top: 'g'
  page-bottom: 'G'
  end-of-line: '$'
  beginning-of-line: '0'
  help: '?'
  quit: 'ctrl+c'
  navigation:
    up: 'ctrl+k'
    down: 'ctrl+j'
    left: 'ctrl+h'
    right: 'ctrl+l'
  editor:
    up: 'k'
    down: 'j'
    left: 'h'
    right: 'l'
    insert: 'i'
    normal: 'esc'
    execute-query: 'ctrl+e'
    execute-single-query: 'ctrl+r'
或者对于 SQLite:
database:
  - name: "prod"
    db: "path/to/file.sqlite3"
    driver: "sqlite"
仅 host、ssl 和 schema 字段为可选。host 默认为 127.0.0.1,ssl 默认为 disable。schema 字段仅适用于 PostgreSQL 和 Oracle;如果省略,则显示所有可访问的 schema。
连接配置文件
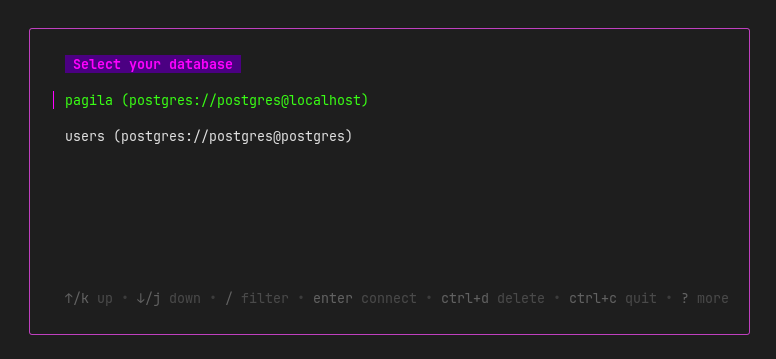
dblab 支持保存和复用数据库连接配置文件。当您成功连接到数据库时,可以使用 --save-as 标志将连接参数存储为命名配置文件。数据库密码和 SSH 隧道密码(在使用 SSH 连接时)会安全地存储在操作系统的密钥环中(例如 GNOME Keyring、macOS Keychain 或 Windows Credential Manager),而不是以明文形式存储。
保存配置文件
在任何连接中使用 --save-as 标志,将其保存为命名配置文件:
$ dblab --host localhost --user myuser --db users --pass password --ssl disable --port 5432 --driver postgres --limit 50 --save-as myprofile连接参数会保存到 $XDG_CONFIG_HOME/dblab/dblab.json(不包括密码),而数据库密码和 SSH 密码(如果提供)则存储在操作系统密钥环中。
使用已保存的配置
使用 connect 命令启动交互式菜单,列出所有已保存的配置:
$ dblab connect这将打开一个 TUI 选择器,您可以:
- 浏览已保存的数据库配置文件
- 按 Enter 连接到所选配置文件
- 按 Ctrl+D 删除配置文件
- 按 Ctrl+C 退出
连接时,密码会自动从操作系统密钥环中获取。
配置文件存储格式
配置文件存储在 $XDG_CONFIG_HOME/dblab/dblab.json:
{
  "profiles": {
    "myprofile": {
      "host": "localhost",
      "port": "5432",
      "db": "users",
      "user": "postgres",
      "schema": "public",
      "driver": "postgres"
    }
  }
}
导航
UI 分为三个面板:左侧的侧边栏树、右上方的查询编辑器以及其下方的结果集面板。使用 Ctrl+H、Ctrl+J、Ctrl+K 和 Ctrl+L 在它们之间移动焦点。
本 README 中的所有键绑定均为默认值。它们都可以通过 .dblab.yaml 配置文件进行替换——没有相关的标志——因此,如果您自定义了某个绑定,请将其替换为此处显示的默认值。参见 键绑定配置。
面板与侧边栏树
dblab 连接到单个数据库(--db 标志是必需的),并在侧边栏中以树的形式显示其目录。对于 PostgreSQL 和 Oracle,树显示数据库、其模式以及每个模式下的表。对于 MySQL、SQLite 和 SQL Server,树直接显示数据库及其表。如果为 PostgreSQL 或 Oracle 提供了 --schema 标志,则仅显示该模式;否则,将列出所有可访问的模式。
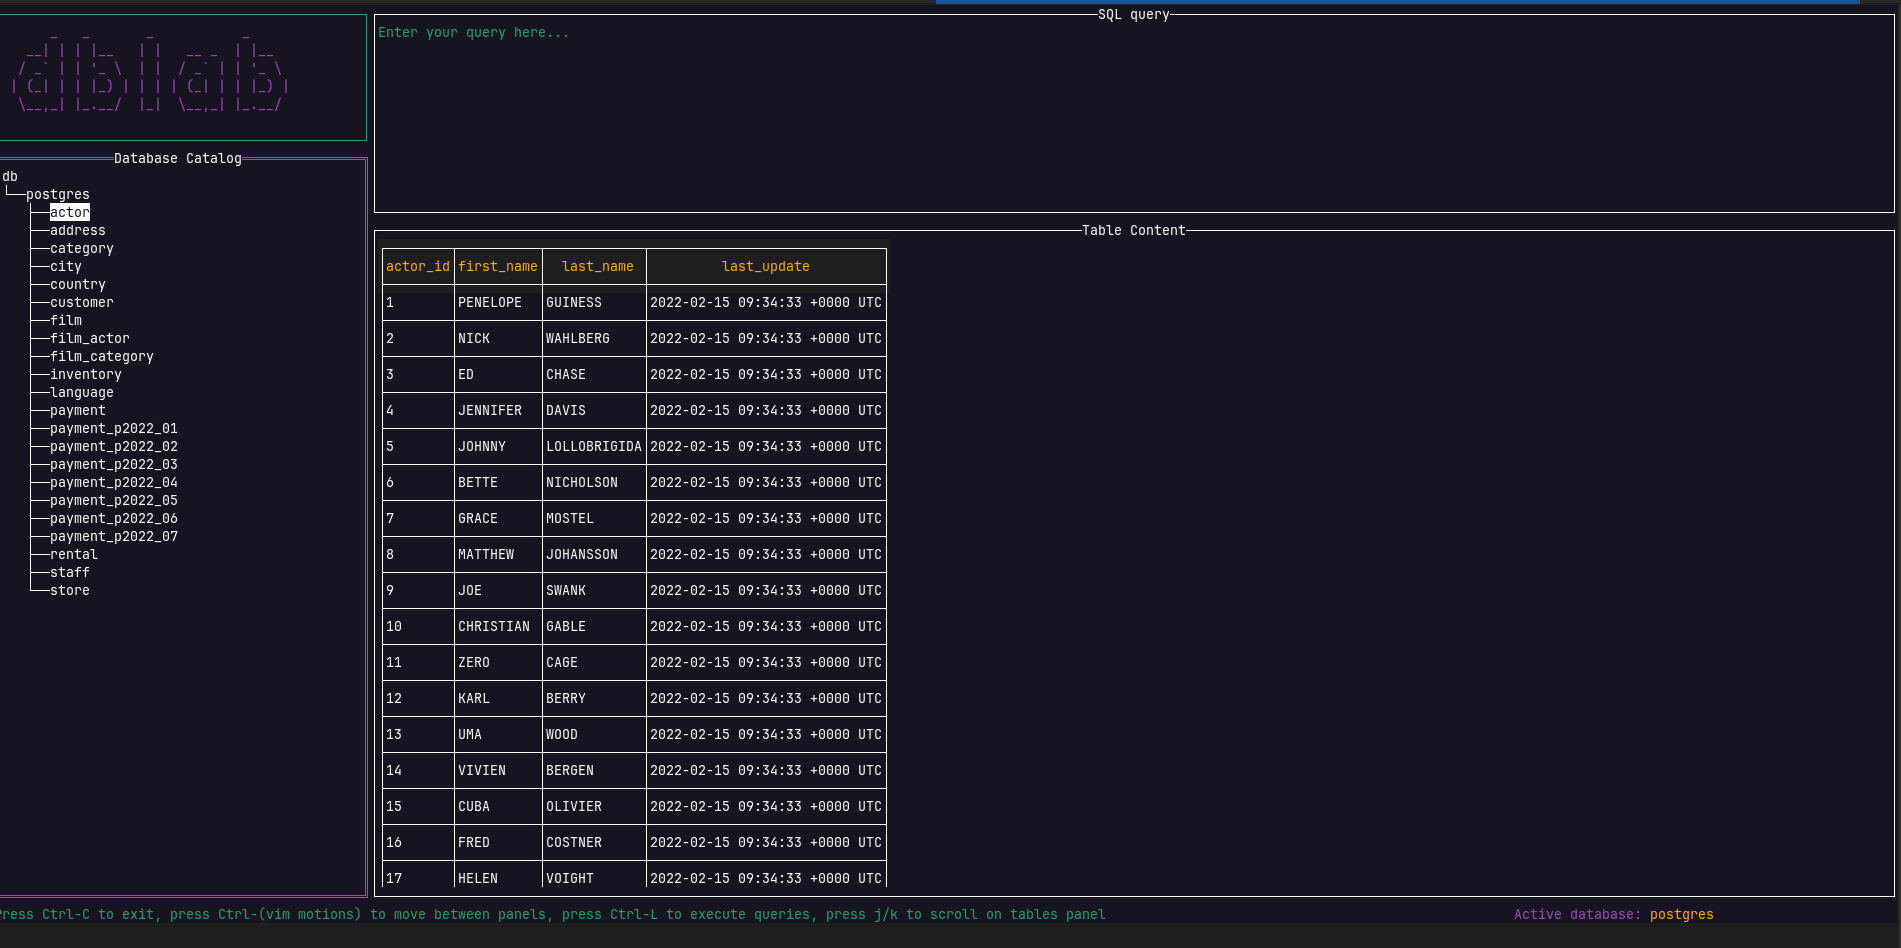
使用 Up 和 Down(或 k 和 j)在树中导航,并在表格上按 Enter 将其行加载到结果集面板中。
结果集
选择表格会填充结果集面板,该面板为表格的每个视图提供一个选项卡。按 tab 和 shift+tab 在它们之间切换:
- Data — 表格的行,或您执行的查询的结果
- Columns — 表格的模式
- Indexes — 表格上的索引
- Constraints — 表格上的约束
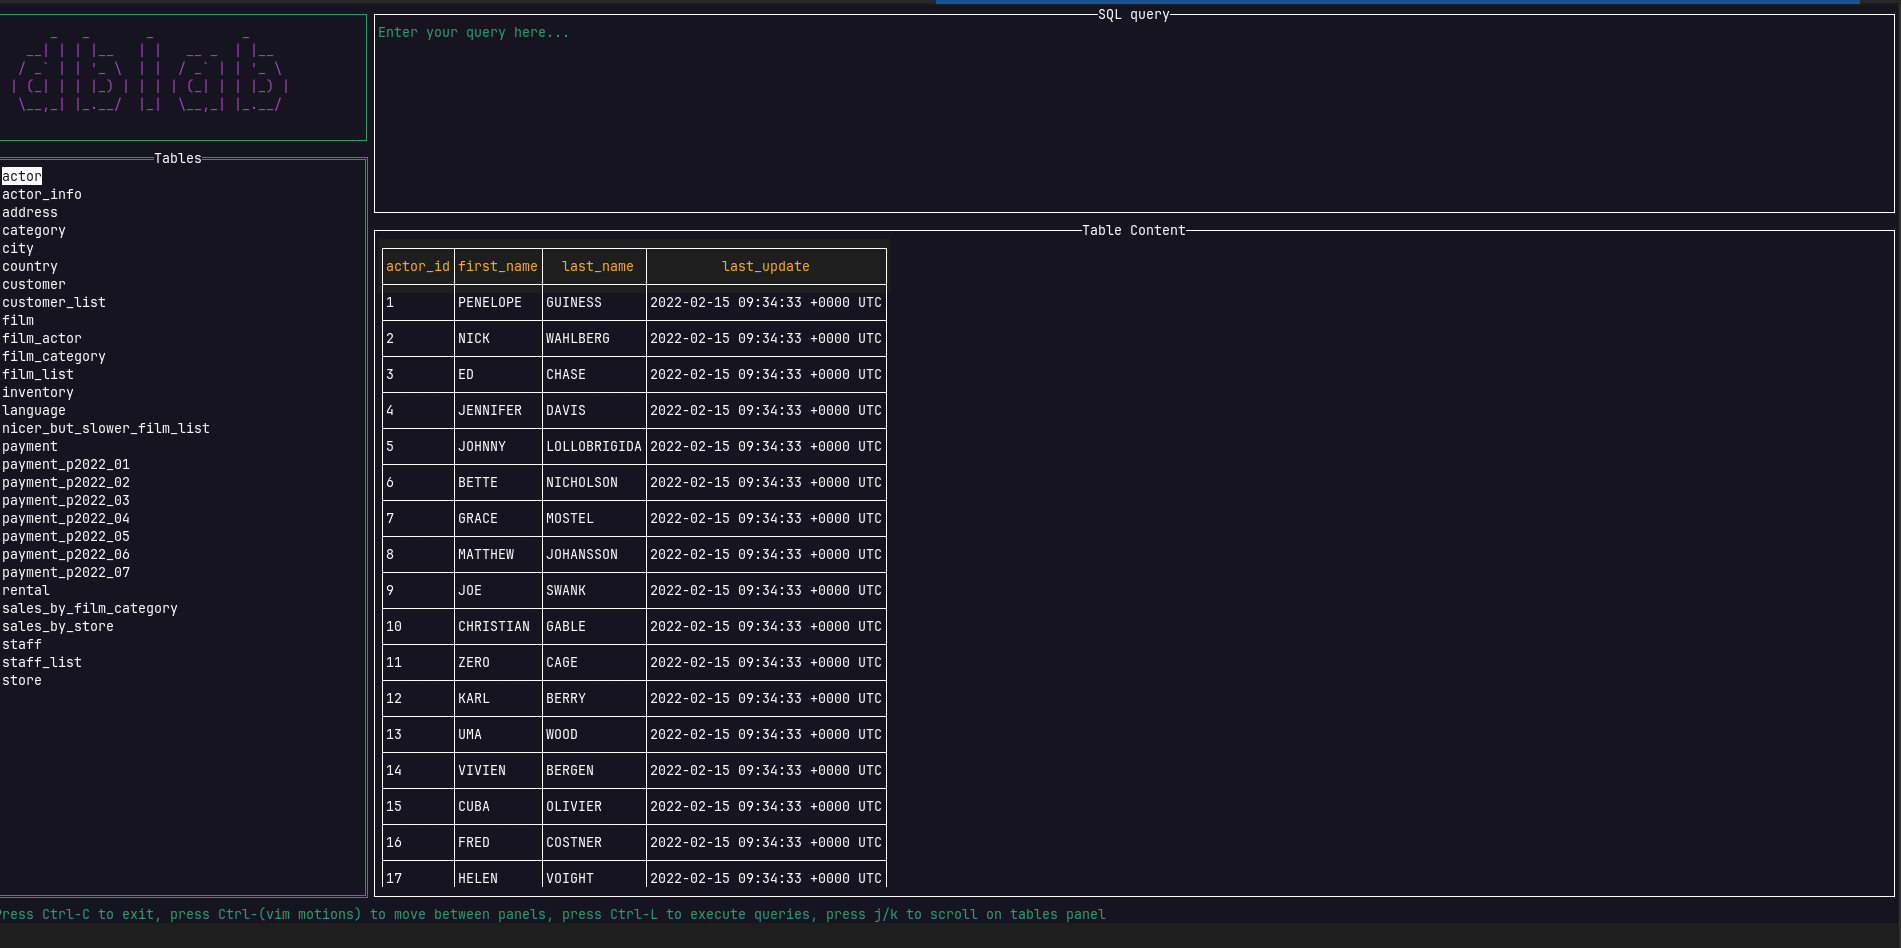
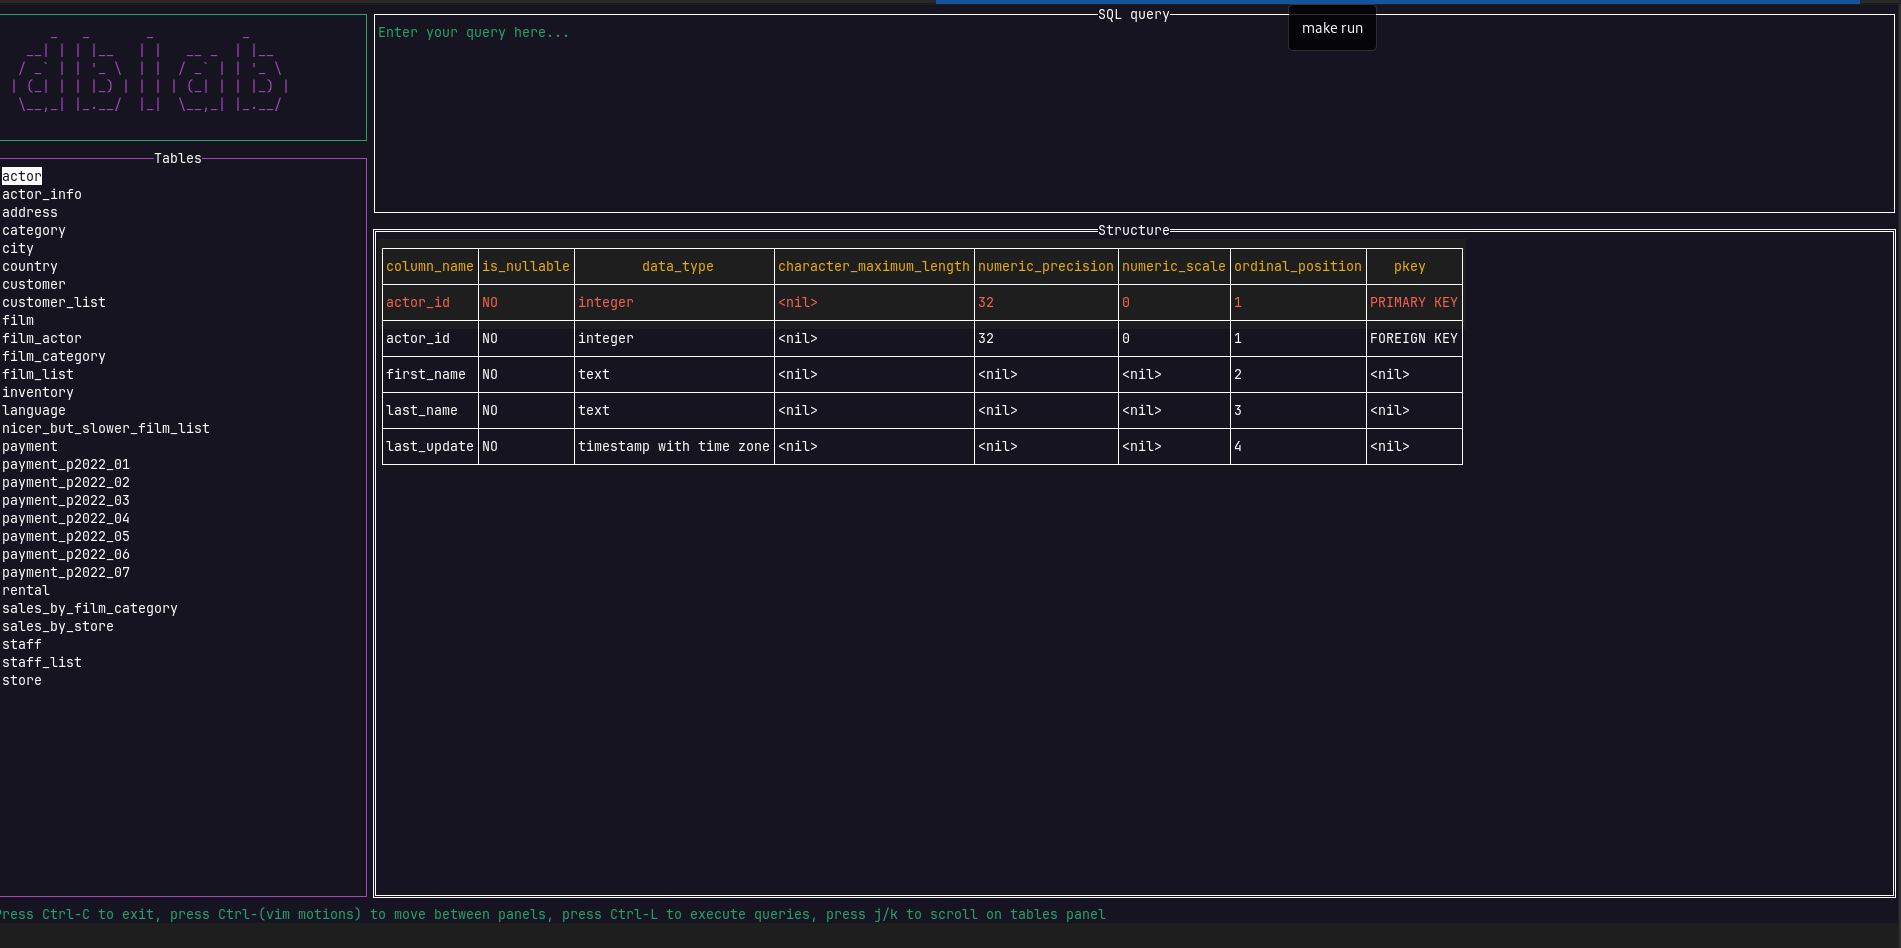
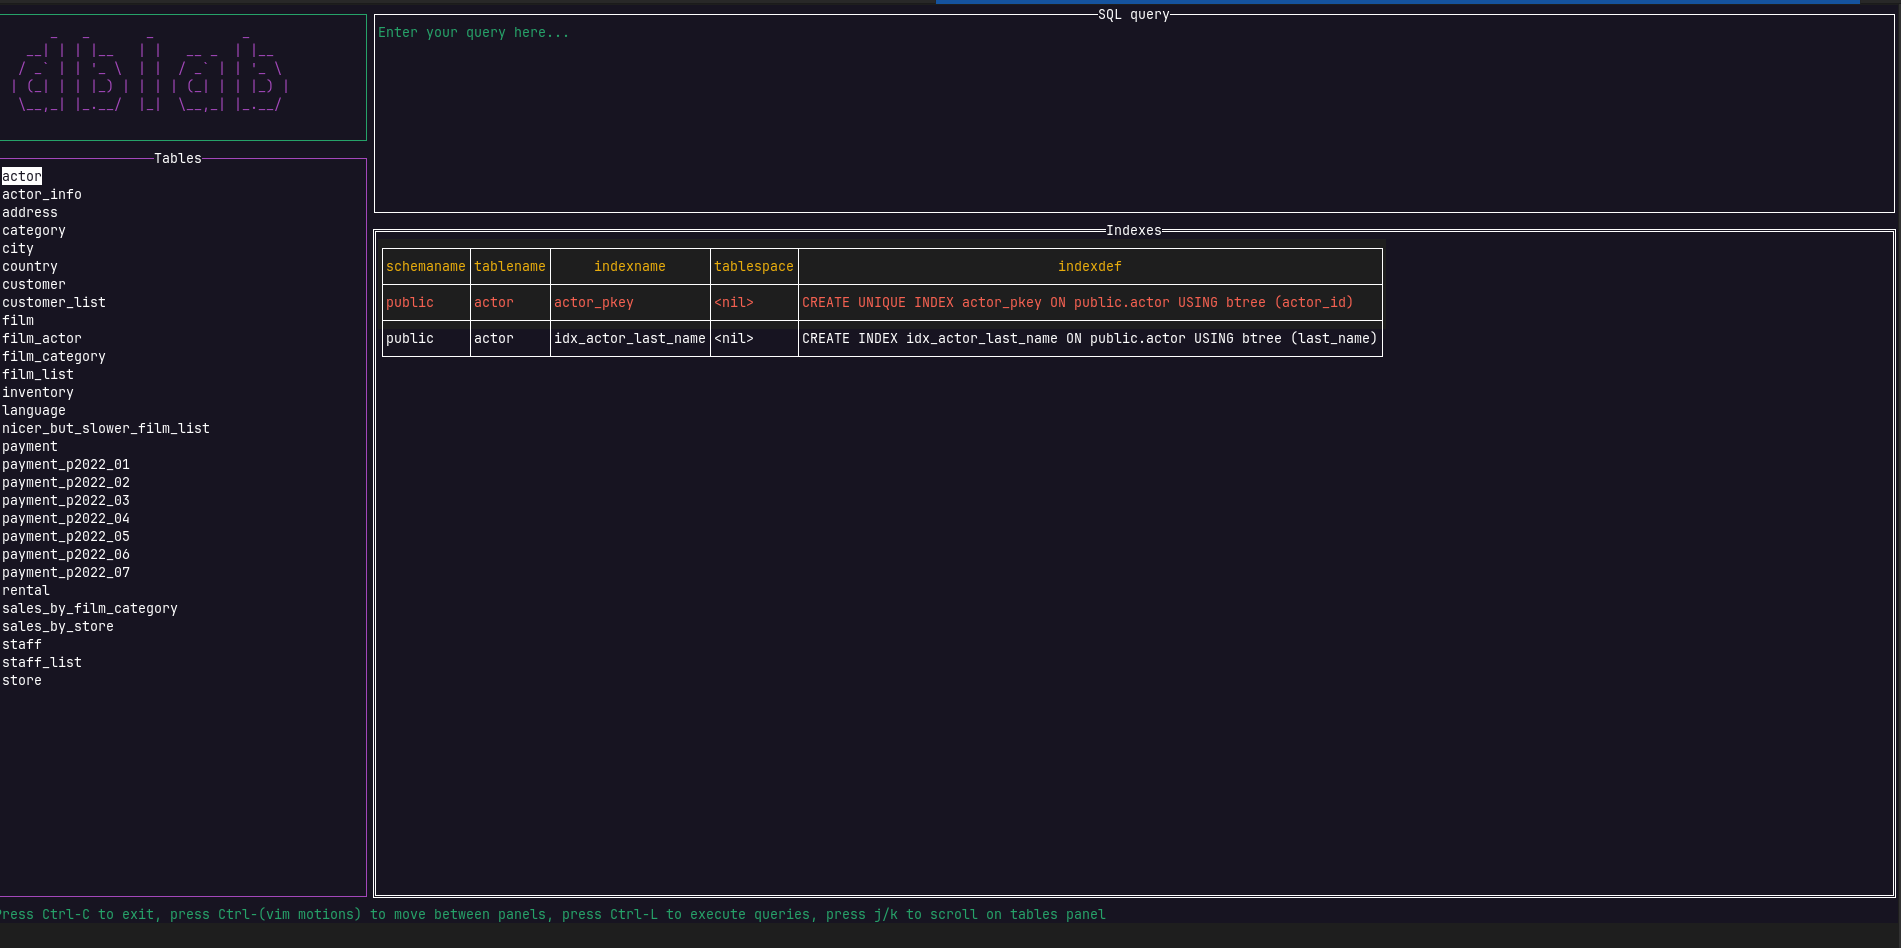
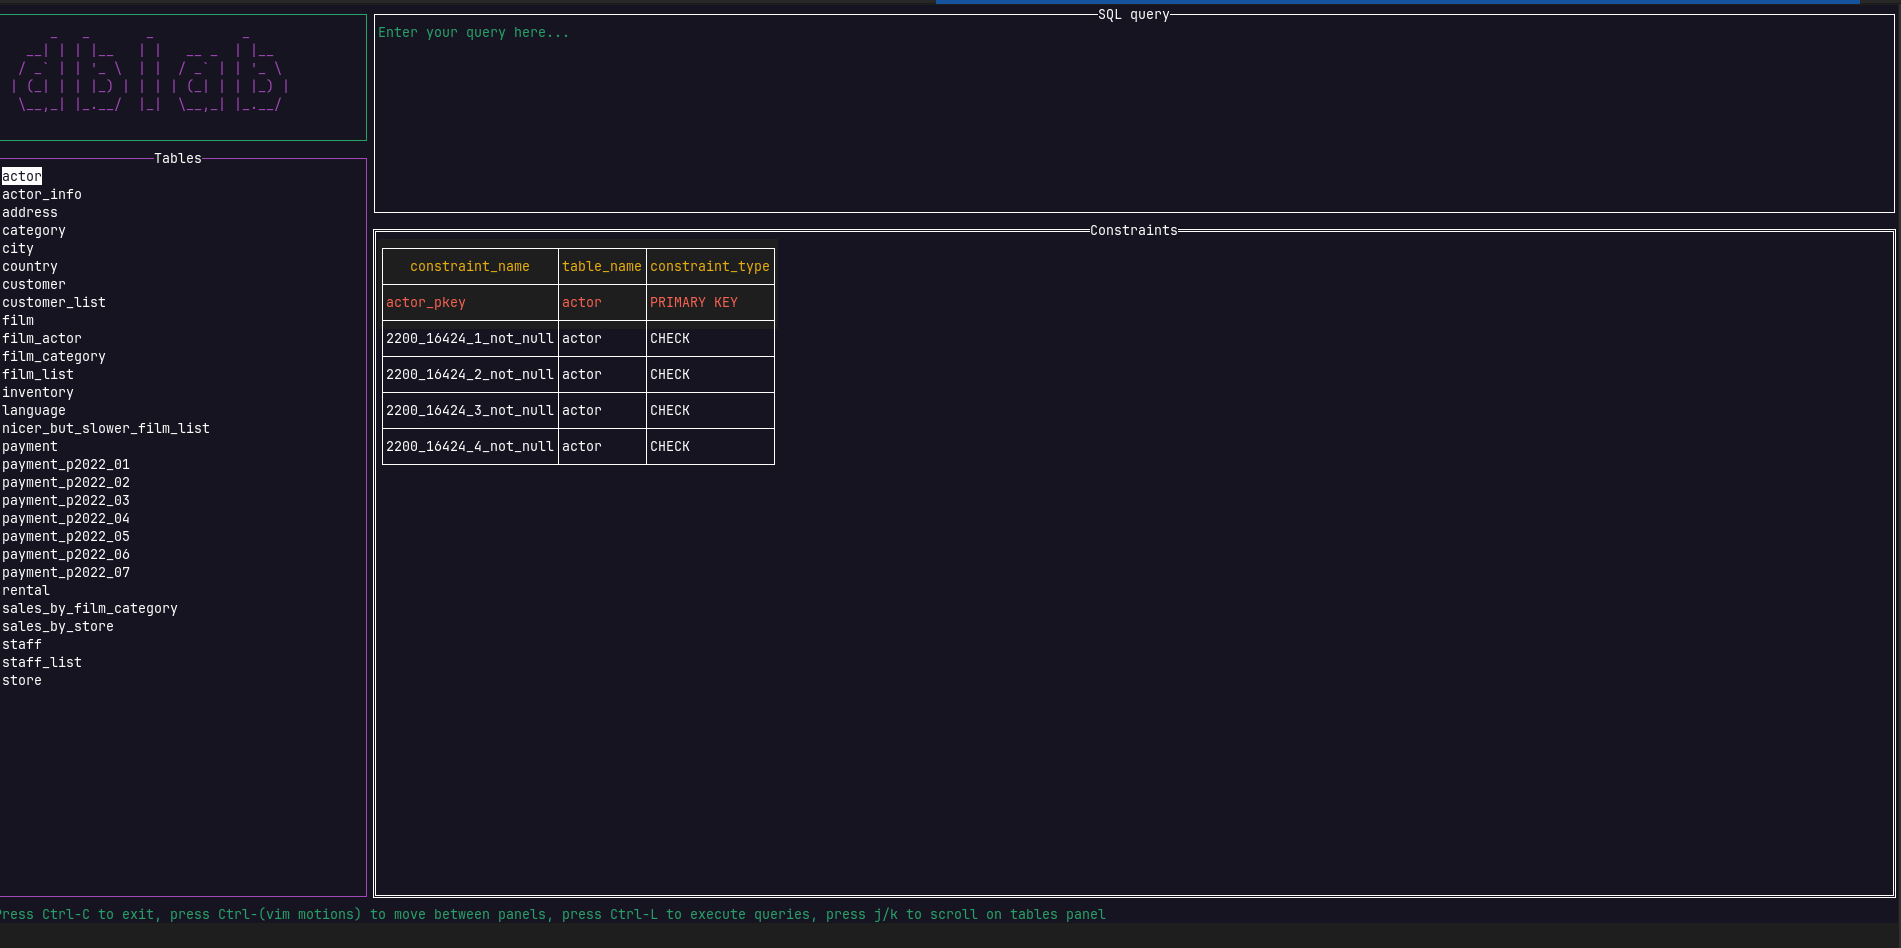
使用方向键或 h/j/k/l 在结果集中移动。选中的单元格会高亮显示,以便您查看当前位置;在单元格上按 Enter 可复制其内容。
没有分页控件——事实证明,它们翻页速度太慢,无法有效浏览表格。要处理大型表格,请改为编写带有显式 OFFSET 和 LIMIT 的 SELECT。
查询编辑器
模式
查询编辑器使用 normal 和 insert 模式,类似于 Vim。当您聚焦编辑器时,它会以 normal 模式启动。按 i 进入 insert 模式并输入或编辑 SQL;按 Escape 返回 normal 模式(光标向左移动一个字符,与 Vim 相同)。
光标移动取决于模式:在插入模式下使用方向键,在普通模式下使用 h、j、k 和 l。
编辑与运动
在普通模式下:
- dd deletes the current line, yy yanks it into an internal register, and p pastes the yanked or deleted line after the current line
- x deletes the character under the cursor
- 0 and $ move to the beginning and end of the current line
- g and G jump to the first and last line of the buffer
- Ctrl+D clears the entire editor content
执行查询
按 ctrl+e 执行编辑器(keybindings.editor.execute-query)中的内容。仅包含空白字符的查询将被忽略。
按 ctrl+r 仅执行当前光标所在行(keybindings.editor.execute-single-query)的查询,编辑器中的其他语句保持不变。两种绑定在任意模式下均可使用。
多条语句
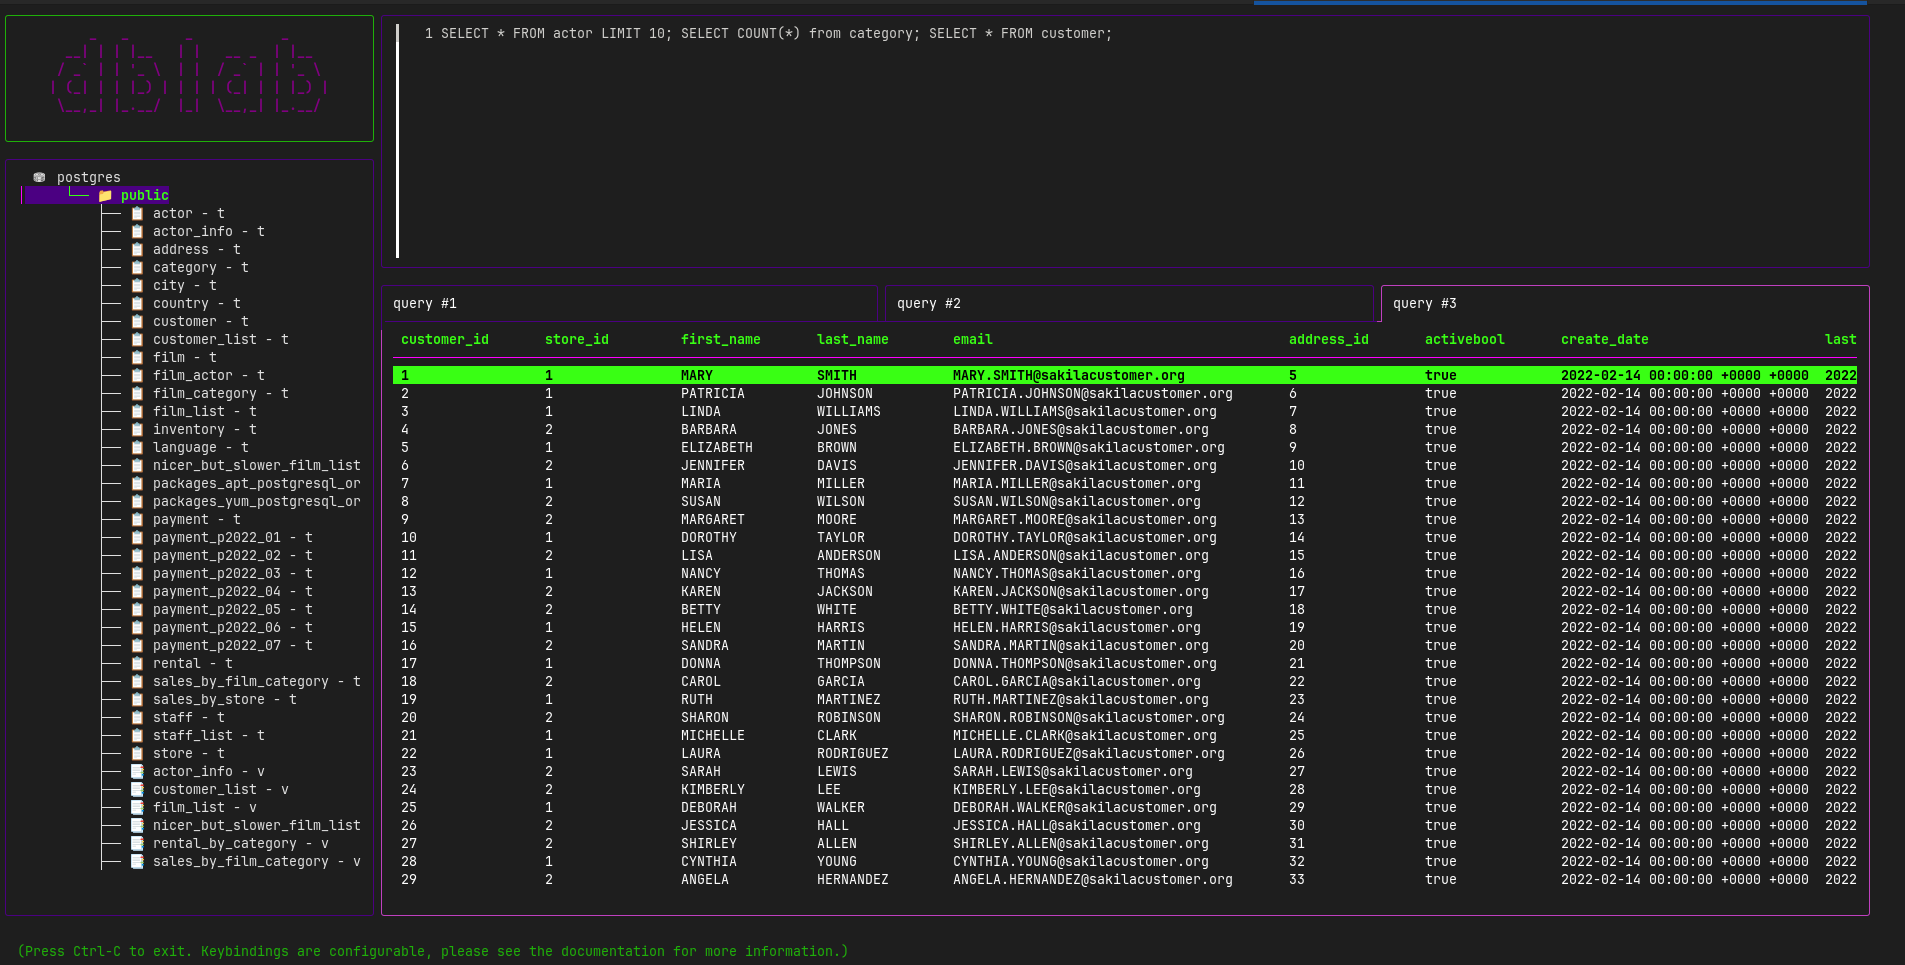
你可以编写多个以分号分隔的 SQL 语句(;),并使用 ctrl+e 一次性执行它们:
SELECT * FROM users; SELECT * FROM orders; SELECT count(*) FROM products;这些语句并发执行,每个结果都显示在各自的标签页中(“query #1”、“query #2”,依此类推)——以上述示例为例,共有三个标签页。如果某条语句执行失败,其标签页将显示错误信息,而成功执行的语句仍会显示其结果。每个批次最多可执行 5 条语句。
在批次运行期间,按 Ctrl+c 可取消该批次;再次按 Ctrl+c 可退出 dblab。
查询历史
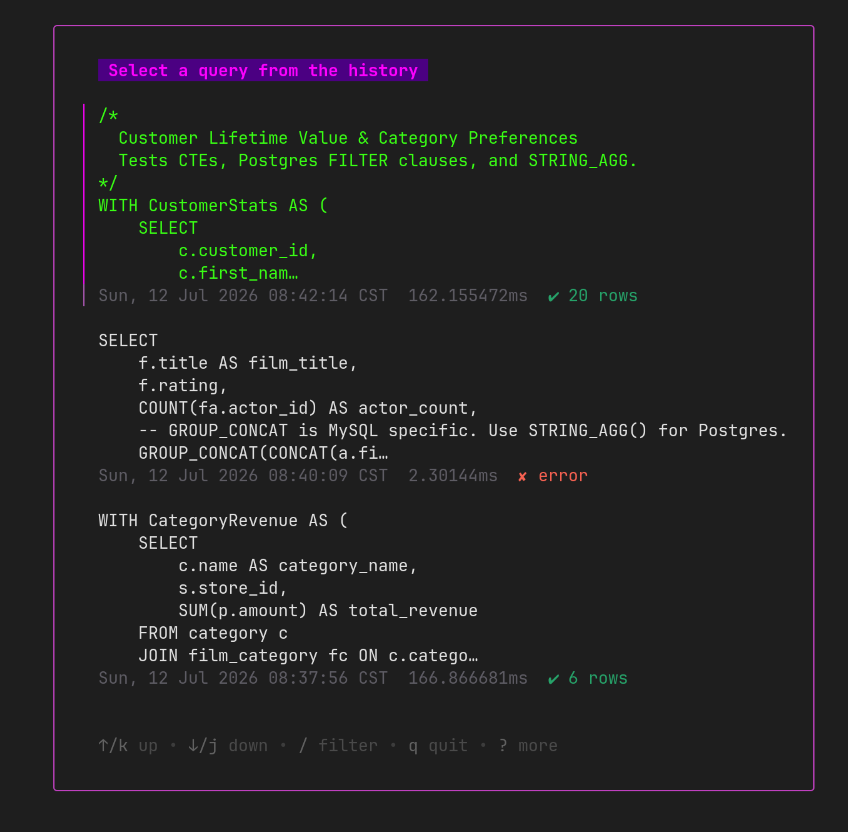
dblab 会自动将每条已执行的查询保存到本地历史记录文件($XDG_CONFIG_HOME/dblab/dblab.gob)。按 F8 打开查询历史视图,该视图以可筛选的列表形式按最新优先顺序显示过去的查询。使用内置搜索功能缩小结果范围,按 Enter 将选中的查询重新加载到编辑器中,或按 Esc 返回而不选择任何内容。
帮助模态框
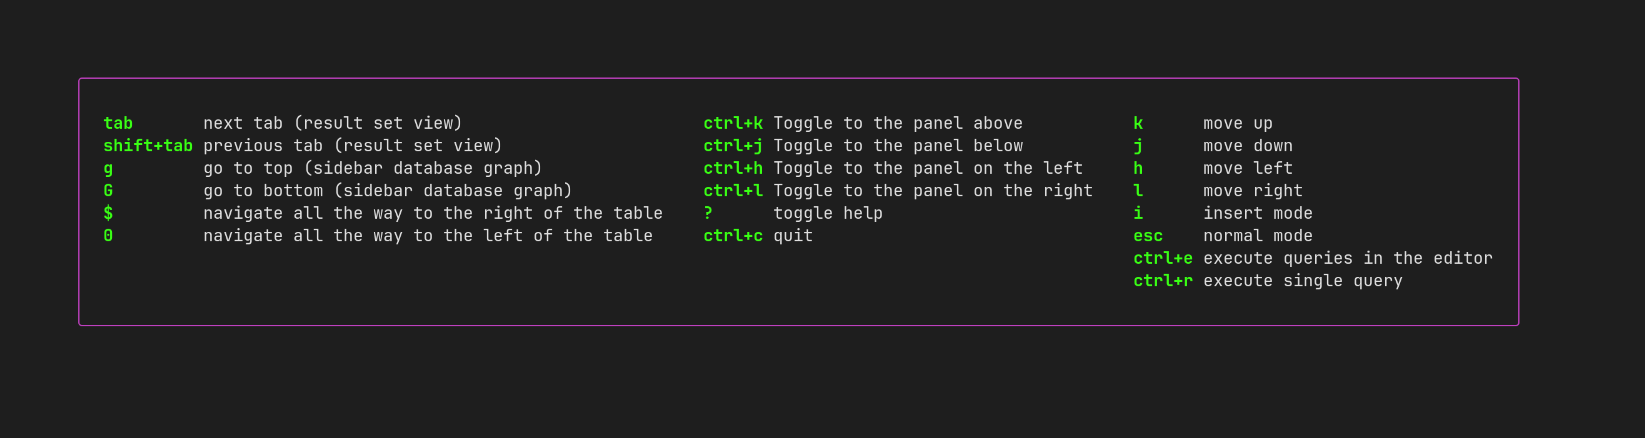
随时按 ? 打开帮助模态框,该模态框会在居中的覆盖层中显示所有可用的键绑定。按 Esc 关闭它;焦点将返回到查询编辑器。
按键绑定
这些是默认设置;请参阅 按键绑定配置 以更改它们。
面板导航
| 键 | 描述 |
|---|---|
| Ctrl+H | 切换至左侧面板 |
| Ctrl+J | 切换至下方面板 |
| Ctrl+K | 切换至上方面板 |
| Ctrl+L | 切换至右侧面板 |
查询编辑器(两种模式)
| 键 | 描述 |
|---|---|
| ctrl+e | 执行编辑器中的内容 |
| ctrl+r | 仅执行当前光标所在行的查询 |
查询编辑器(普通模式)
| Key | Description |
|---|---|
| i | Enter insert mode |
| h j k l | Move the cursor left, down, up, right |
| dd | Delete the current line |
| yy | Yank the current line |
| p | Paste the yanked or deleted line after the current line |
| x | Delete the character under the cursor |
| 0 / $ | Move to the start / end of the current line |
| g / G | Jump to the first / last line of the buffer |
| Ctrl+D | Clear the entire editor content |
查询编辑器(插入模式)
| 键 | 描述 |
|---|---|
| Escape | 返回普通模式 |
| 方向键 | 移动光标 |
侧边栏树
| 键 | 描述 |
|---|---|
| 向上箭头 / k | 在树中向上移动 |
| 向下箭头 / j | 在树中向下移动 |
| Enter | 列出所选表的所有行并显示其结构 |
结果集面板
适用于结果集面板的所有选项卡。
| Key | Description |
|---|---|
| tab / shift+tab | Navigate to the next / previous metadata tab |
| Arrow Up / k | Navigate the table upward |
| Arrow Down / j | Navigate the table downward |
| Arrow Left / h | Navigate the table to the left |
| Arrow Right / l | Navigate the table to the right |
| g / G | Move to the top / bottom of the dataset |
| 0 / $ | Move to the left / right edge of the row |
| Enter | Copy the content of the selected cell |
全局
| 键 | 描述 |
|---|---|
| F8 | 打开查询历史视图 |
| ? | 打开显示所有键位绑定的帮助模态框 |
| Esc | 关闭帮助模态框(或在查询编辑器中返回普通模式) |
| Ctrl+c | 如果存在正在运行的查询则取消;否则退出应用程序 |
贡献
License
MIT 许可证 (MIT)。详见 LICENSE 文件以获取更多详情。