








简介
Platypush 是一个通用且可扩展的自动化平台,支持跨多个服务和设备,拥有数百种受支持的集成。
它允许用户基于事件(_如果发生此情况则执行该操作*)创建自己的自托管自动化组件,并提供一个全面且可定制的用户界面,将你需要可视化和控制的所有内容汇集在一处。
它借鉴了 IFTTT、 Tasker 和 Home Assistant 的概念,提供了一个用户可以轻松将事物连接在一起的环境。它专注于自动化即代码(automation-as-code) 和 API 优先的方法,为高级用户提供了定制例程的巨大灵活性。
它以兼容性和灵活性为设计核心,可以轻松运行在任何能运行 Python 解释器的设备上——从 Raspberry Pi、旧智能手机到高性能服务器。
它能做什么
你可以使用 Platypush 来执行以下操作:
- 控制你的智能 灯光
- 跨多台设备控制你的音乐
- 创建自定义且隐私安全的语音助手,在你的 短语上运行自定义钩子
- 在传感器、 摄像头、 麦克风 和机器学习 模型 之间构建集成,以创建例如人员 检测 或声音 检测 的智能自动化组件
- 显示你日历中的事件并基于它们构建自动化
- 基于你的传感器 数据构建自动化例程和可视化
- 控制和自动化自制的 机器人
- 从自定义 RSS 摘要中发送自动化新闻通讯
- 同步你设备上的 剪贴板
- 实现自定义的文本转语音 逻辑
- 使用 Tasker 在你的 Android 设备上构建任何类型的自动化例程
- 播放本地 视频、 YouTube 视频以及来自任何设备和服务的 torrent 媒体,到任何设备,支持 Kodi、Chromecast、VLC、Jellyfin、Plex 等
- 获取你所在位置的天气预报事件并基于它们构建自动化例程
- 为 Zigbee 和 Z-Wave 智能设备创建自定义单一网关
- 构建你自己的 Web 仪表板,包含日历、天气、新闻和音乐控制 (基本上,任何带有 Platypush Web 小部件的内容)
- ...以及更多(基本上,任何带有 Platypush 插件 的内容)。
完整的可用集成列表可在 docs.platypush.tech 上找到,其中还包含有关平台支持功能的 更深入的 wiki。
该 wiki 也在 git.platypush.tech 上进行了镜像。
博客 定期发布包含 分步教程和配方的内容。
核心概念
Platypush 的基础建立在几个简单的构建模块之上,这些模块提供了 极大的灵活性,用于构建任意复杂的自动化例程:
-
🧩 插件。插件是平台的核心。每个插件 都暴露了一个 API,用于与集成进行交互——有用于媒体 播放器和设备、日历、传感器、语音助手、智能设备、 云服务等等的插件。
- ⏻ 操作。这些是插件通过简单的 JSON RPC API 透明地暴露给
用户的方法,它们始终以
<plugin_name>.<action_name>格式表达。例如,light.hue.on可用于打开兼容 Philips Hue 的灯光,media.vlc.play用于在 VLC 播放器上播放一些媒体,等等。
- ⏻ 操作。这些是插件通过简单的 JSON RPC API 透明地暴露给
用户的方法,它们始终以
-
⚙️ Backends。这些是特殊的集成,其主要目的是 将消息传递到主应用程序。主要的是
httpbackend, 它暴露了 HTTP 和 WebSocket API,提供主 UI,并被多个集成用于提供额外服务。还提供了一个noderedbackend, 用于将 Platypush 动作组件暴露给 Node-RED 实例,以及一个内部redisbackend 和一个 (不安全的)tcpbackend,用于接收 原始消息。 -
📧 Events。插件在特定条件发生时发出 events, 例如,新的媒体轨道被 播放, 语音助手对话已 开始, 等等。
- 🪝 Hooks。用户可以在事件上定义自定义回调,形式为 _hooks*。Hooks 可以包含在特定事件 匹配 hook condition* 时要执行的操作列表,或任何类型的自定义逻辑 - 例如, 当车库中的存在传感器开启时,在我的手机上发送通知,或 *如果我告诉语音助手“播放新闻”,则使用 TTS 插件处理最新 RSS 源的摘要。事件 hooks 可以以 YAML 格式或 Python 运行时脚本表示。
-
📜 Procedures. Procedures 是自定义的逻辑片段,可以通过 Platypush API 调用。例如,你可以定义一个
at_homeprocedure,它会在你到家时执行,从而打开灯光、播放音乐、设置恒温器温度等,然后你可以从任何设备通过 Platypush API 调用它。与事件钩子类似,procedures 既可以定义为 YAML 格式(如果你只想执行一系列操作而不需要太多额外逻辑,这很合适),也可以定义为 Python 脚本。- 🕗 Cronjobs. Cronjobs 是特殊的 procedures,可以按固定间隔执行(支持 UNIX cron 语法),或在特定时间执行(一次性)。与 procedures 一样,它们既可以定义为 YAML,也可以定义为 Python 脚本。
-
💡 Entities. 某些插件暴露通用的 entities - 例如 lights、 sensors、media players、switches、voice assistants 等。这些 entities 可以通过 相同的通用 APIs 控制,发出 相同类型的 events, 可以从相同的 Web 视图或仪表板控制,并且它们的状态会在运行之间持久化。
一些示例
Platypush 的大部分配置位于 config.yaml 文件下。
仓库中提供了一个详尽的 config.yaml
示例。
所有部分都是可选的 - 默认启用的只有 HTTP 服务器,backend.http,但这也是可选的。
让我们看一个示例,其中我们想要控制以下 entities:
-
一个飞利浦 Hue 桥接器及其连接的智能灯具。
-
一个设备端语音助手(在本示例中,我们将使用 Google Assistant,因为它最容易配置,尽管 Google 早已弃用了 Assistant 库)。
-
一个兼容的音乐播放器 - 在本示例中,我们将使用 MPD/Mopidy,因为它们在 Platypush 中支持得最好,并且 Mopidy 还提供了基本上适用于任何音频后端的插件。
我们需要在 config.yaml 中启用以下插件:
light.hueassistant.googlemusic.mopidy或music.mpd(它们暴露了相同的 API)
这些插件的文档页面已经提供了一些全面的配置片段,您可以直接使用。
最基本的配置可能如下所示:
# Enable it if you want the enable the HTTP API and the Web interface
backend.http:

light.hue:
  # IP/hostname of the Hue bridge
  bridge: 192.168.1.10
  # Default groups that should be targeted by actions if none is specified
  # (default: all lights/groups)
  groups:
    - Living Room

# Check the plugin documentation on how to get the credentials
assistant.google:

music.mopidy:  # Or music.mpd
  # IP/hostname of the MPD/Mopidy server
  host: 192.168.1.2
现在我们已经配置好了集成,让我们来构建一些自动化例程。
当我这么说时打开灯
在这种情况下,我们将不得不创建一个钩子,用于监听由助手触发的
SpeechRecognizedEvent
——例如,当我们说出“OK, Google”后接着说“turn on the lights”时。
我们可以直接在 config.yaml 中以 YAML 格式声明该钩子,或者通过 include: 指令包含在其中的某个文件里声明:
event.hook.turn_lights_on_voice_command:
  if:
    type: platypush.message.event.assistant.SpeechRecognizedEvent
    # Note that a minimal regex-like syntax is supported here.
    # This condition matches both a phrase that contains
    # "turn on the lights" and one that contains "turn on lights"
    phrase: "turn on (the)? lights"
  then:
    - action: light.hue.on
      args:
      groups:
        - Living Room
或者,我们可以在 Python 脚本中声明该钩子——您只需在位于与您的 config.yaml 相同文件夹下的 scripts 目录中创建一个 .py
文件(例如 lights.py):
from platypush import run, when
from platypush.events.assistant import SpeechRecognizedEvent

@when(SpeechRecognizedEvent, phrase="turn on (the)? lights")
def lights_on_voice_command():  # Also accepts an optional `event` argument
  run('light.hue.on', groups=['Living Room'])
或者,使用 get_plugin API:
from platypush import get_plugin, when
from platypush.events.assistant import SpeechRecognizedEvent

@when(SpeechRecognizedEvent, phrase="turn on (the)? lights")
def lights_on_voice_command():
  get_plugin('light.hue').on(groups=['Living Room'])
当我指示时播放音乐
对于“播放音乐”语音命令,方法类似。YAML:
event.hook.play_music_voice_command:
  if:
    type: platypush.message.event.assistant.SpeechRecognizedEvent
    phrase: "play (the)? music"
  then:
    - action: music.mopidy.play
Python:
from platypush import run, when
from platypush.events.assistant import SpeechRecognizedEvent

@when(SpeechRecognizedEvent, phrase="play (the)? music")
def lights_on_voice_command():
  run('music.mopidy.play')
太阳落山时打开灯光
此示例需要配置 sun
插件:
sun:
  latitude: LAT
  longitude: LONG
然后,您只需订阅
SunsetEvent。
YAML:
event.hook.sunset_lights_on:
  if:
    type: platypush.message.event.sun.SunsetEvent
  then:
    - action: light.hue.on
Python:
from platypush import run, when
from platypush.events.sun import SunsetEvent

@when(SunsetEvent)
def sunset_lights_on():
  run('light.hue.on')
通过钩子模板进行事件匹配和令牌提取
如果值为字符串,您还可以从事件参数中执行令牌提取。
例如,您可以使用高级模式匹配和令牌提取来创建语音助手钩子,该钩子将匹配一个带有参数化字段的模板,该字段将作为参数传递给您的事件钩子:
from platypush import run, when
from platypush.events.assistant import SpeechRecognizedEvent

@when(SpeechRecognizedEvent, phrase='play ${title} by ${artist}')
def on_music_play_command(event, title, artist):
  results = run(
    'music.mpd.search',
    filter={
      'artist': artist,
      'title': title,
    }
  )

  if results:
    run('music.mpd.play', results[0]['file'])
复杂的钩子条件
你的事件钩子也可以包含更复杂的过滤器。针对部分事件参数的结构化过滤也是可能的,并且也支持关系运算符。例如:
from platypush import when
from platypush.events.sensor import SensorDataChangeEvent

@when(SensorDataChangeEvent, data=1):
def hook_1(event):
    """
    Triggered when event.data == 1
    """

@when(SensorDataChangeEvent, data={'state': 1}):
def hook_2(event):
    """
    Triggered when event.data['state'] == 1
    """

@when(SensorDataChangeEvent, data={
  'temperature': {'$gt': 25},
  'humidity': {'$le': 15}
}):
def hook_3(event):
    """
    Triggered when event.data['temperature'] > 25 and
    event.data['humidity'] <= 15.
    """
支持的关联字段与 ElasticSearch 支持的相同 - $gt
用于大于,$lt 用于小于,$ge 用于大于或等于,$ne 用于
不等于,等等。
在凌晨 1 点关灯
我们可以使用 cron 来处理这种情况。YAML:
cron.lights_off_night:
  # Run this every day at 1 AM
  cron_expression: '0 1 * * *'
  actions:
      - action: light.hue.off
Python:
from platypush import cron, run

@cron('0 1 * * *')
def lights_off_night():
  run('light.hue.off')
当我回家时,用灯光和音乐向我问好
让我们为此目的创建一个 at_home 过程。我们还可以使用像 tts
插件(它无需配置,因为它依赖于 Google Translate 前端 API,但也有其他更复杂的插件可用)这样的文本转语音插件,让一个温暖的声音欢迎我们回家。YAML:
# Make sure that the sound plugin is also enabled, for audio processing
sound:

procedure.at_home:
  - action: tts.say
    args:
      text: "Welcome home!"

  # Get luminosity data from a sensor - e.g. LTR559
  - action: gpio.sensor.ltr559.get_data

  # If it's lower than a certain threshold, turn on the lights.
  # Note that we can directly access attributes returned by the
  # previous request(s) as local context variables within the
  # procedure/hook/cron. In this case, `light` is an attribute returned
  # on the response of the previous command.

  # Otherwise, you can also use the special `output` variable to get only
  # the response of the latest action, e.g. `output['light']`

  # Also note the use of the special `if ${}` construct. It accepts
  # a snippet of Python code and it can access variables within the
  # current context.
  - if ${light is not None and light < 110}:
      - action: light.hue.on

  - action: music.mopidy.play
    args:
      resource: "uri:to:my:favourite:playlist"
Python:
from platypush import procedure, run

@procedure("at_home")
def at_home_proc():
  run('tts.say', text='Welcome home!')

  luminosity = run('gpio.sensor.ltr559.get_data').get('light', 0)
  if luminosity < 110:
    run('light.hue.on')

  run('music.mopidy.play', resource='uri:to:my:favourite:playlist')
然后,您可以从钩子或另一个脚本中调用该过程:
from platypush import run

run('procedure.at_home')
或者,从 YAML:
procedure.some_other_procedure:
- action: procedure.at_home或者使用可用的 API。
核心安装
系统包管理器安装
Arch Linux
您可以通过您喜爱的 AUR 包管理器安装
platypush 包(用于
最新稳定版本)或
platypush-git 包
(用于最新的 git 版本)。例如,使用 yay:
$ yay platypush
# Or
$ yay platypush-git
AUR 上的 Arch Linux 软件包会在新的 git 提交或标签时自动更新。
Debian/Ubuntu
- 将 Platypush APT 密钥添加到您的可信密钥环:
# wget -q -O \
    /etc/apt/trusted.gpg.d/platypush.asc \
    https://apt.platypush.tech/pubkey.txt
- 将 Platypush 仓库添加到您的 APT 源中:
#  wget -q -O \
    /etc/apt/sources.list.d/platypush.list \
    https://apt.platypush.tech/lists/platypush-<deb_version>-<branch>.list
其中:
-
deb_version可以是:-
stable:当前 Debian 稳定版 -
oldstable:上一个 Debian 稳定版 -
ubuntu:最新 Ubuntu 发行版 -
branch可以是:main:最新稳定版发行dev:始终与最新 git 版本同步的软件包
例如,要在 Debian 稳定版上安装最新稳定版标签:
# wget -q -O \ /etc/apt/sources.list.d/platypush.list \ https://apt.platypush.tech/lists/platypush-stable-main.list -
- 更新您的仓库并安装 Platypush:
# apt update
# apt install platypush
Fedora
针对最新 Fedora 版本构建的 RPM 包会在每次推送流水线中自动构建。
要在 Fedora 上通过 RPM 安装 Platypush:
- 将 Platypush RPM 仓库配置添加到包管理器:
# yum config-manager --add-repo https://rpm.platypush.tech/platypush.repo
- 安装 Platypush,可选择最新稳定版或随 main 分支每次提交而更新的滚动版:
# yum install platypush
# Or
# yum install platypush-git
pip
$ pip install platypush或者,对于最新的 git 版本:
# Official repo
$ pip install git+https://git.platypush.tech/platypush/platypush
# Github mirror
$ pip install git+https://github.com/blacklight/platypush
Docker
基础镜像安装
$ docker run -it --name platypush \
    -p 8008:8008 \
    -e "PLATYPUSH_DEVICE_ID=my-device" \
    -v /path/to/your/platypush/config:/etc/platypush \
    -v /path/to/your/platypush/share:/var/lib/platypush \
    quay.io/platypush/platypush
当前支持以下架构:
amd64/x86_64(标准 Intel 架构)arm64/aarch64(ARM64,例如现代基于 ARM 的 MacBook、大多数 Android 设备或 RaspberryPi 4 和 5)armv7l(较旧的基于 ARM 的设备,例如 RaspberryPi 2 和 3 或较旧的 Android 设备)
Web 服务将在 http://localhost:8008 上可用,如果不存在,默认
配置文件将在
/path/to/your/platypush/config/config.yaml 下初始化。服务的
后续执行可以通过 docker start platypush 触发。
请注意,这将安装基于 Alpine 的镜像。对于其他基础镜像(例如 Debian、Ubuntu 或 Fedora),请参阅 custom docker-compose way。
另外请注意,如果在容器中安装了额外的插件依赖项,当容器被删除时,这些依赖项将会丢失。
为了在安装和配置插件后保留容器的状态,您可以利用 docker commit 命令:
❯ docker ps
CONTAINER ID   IMAGE                         COMMAND                  CREATED          STATUS         PORTS                                       NAMES
f00546d3bd35   quay.io/platypush/platypush   "/bin/sh -c 'platypu…"   38 minutes ago   Up 8 minutes   0.0.0.0:8008->8008/tcp, :::8008->8008/tcp   platypush
❯ docker commit f00546d3bd35 my-custom-platypush-image
sha256:13d4a4cae4e7eedee924a8a79deae9a9978aa70b46699c1f2abfd16bf5ed910b
# You can now use the my-custom-platypush-image even if the container is destroyed
或者,您可以使用 the platydock 命令 直接从配置创建 Docker 镜像或 Dockerfile,其中所有必需的插件和依赖项均已预装。
The docker-compose way
$ git clone https://git.platypush.tech/platypush/platypush.git
$ cd platypush
# Copy .env.example to .env and edit docker-compose.yml if required.
# In particular, you may want /etc/platypush and /var/lib/platypush
# to point to directories on your hosts
$ docker compose up
请注意,默认的 Dockerfile 使用 Alpine,但在 docker-compose.yml 中
您也可以指定替代的 Dockerfile - 支持 Debian、Ubuntu 和 Fedora。
暴露主机设备
请注意,某些插件可能需要访问主机硬件 - 例如 USB 设备、蓝牙适配器等。
为了使这些设备对 Docker 容器可见,您可能需要 显式地将它们挂载为卷。
例如,serial
插件 可能需要
通过 USB 访问 Arduino/ESP 设备。您可以仅将该设备导出到
Docker 容器:
$ docker run --device=/dev/ttyUSB0 ...
# Or, if you set up static naming via udev rules
$ docker run --device=/dev/arduino ...
或者,通过 docker-compose.yml:
services:
  platypush:
    # ...
    devices:
      - /dev/ttyUSB0
否则,在 Linux 主机上获取 USB 总线的特权访问权限:
$ docker run --priviliged -v /dev/bus/usb:/dev/bus/usb ...或者,通过 docker-compose.yml:
services:
  platypush:
    # ...
    volumes:
      - /dev/bus/usb:/dev/bus/usb
手动安装
$ git clone https://git.platypush.tech/platypush/platypush.git
$ cd platypush
$ pip install .
插件安装
安装核心平台后,主仓库中包含的所有插件均可用。
但是,某些插件可能需要额外的(可选)依赖项。你有 几种方式来安装这些依赖项:
pip
您可以通过 pip extras 安装额外的依赖项:
pip install 'platypush[plugin1,plugin2,...]'例如:
pip install 'platypush[light.hue,music.mpd,rss]'将安装 Platypush 以及 light.hue、music.mpd
和 rss 插件的依赖项。
Web 界面
也可以从 Web 界面安装插件。在侧边栏中导航到 Extensions 条目,选择要安装的扩展, 选择 Install 选项卡并点击 Install。
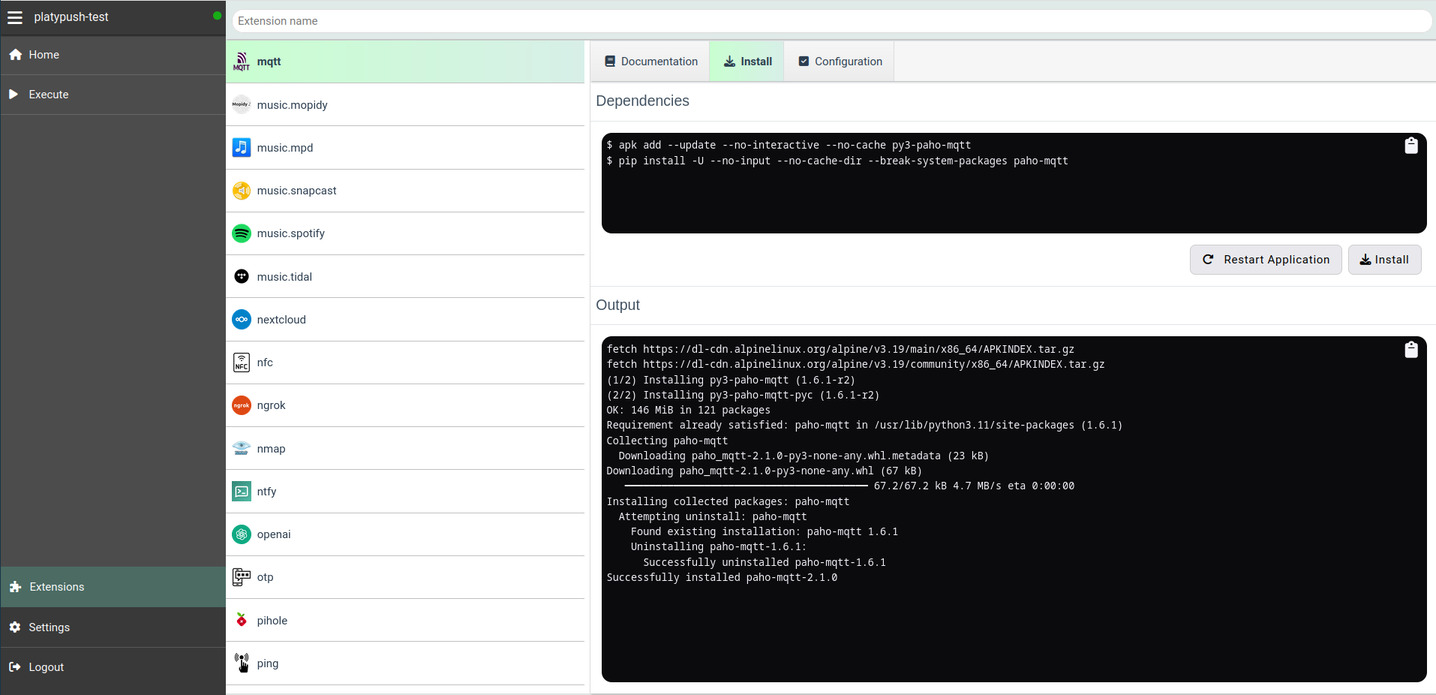
本节还包含 Configuration 选项卡,其中提供了该插件的即贴即用配置片段模板,以及一个包含给定插件支持的所有操作及其触发事件的文档页面。
Docker (platydock)
如果您的机器上已经安装了 Platypush 的基础版本,并且拥有一个包含自定义集成集合的配置文件,那么您可以选择使用 platydock 命令,从您的配置文件生成一个自定义 Docker 镜像,其中已配置好所有额外的依赖项。
以下命令:
❯ platydock -c /path/to/your/config.yaml -d platypush-test将为 ID 为 platypush-test 的设备创建一个 Platypush Docker 镜像,
包含 config.yaml 中列出的所有额外集成所需的要求。
如果你只想打印输出 Dockerfile 的内容而不是生成镜像,可以传递 --print 选项。
默认情况下,镜像将使用 Alpine Linux 作为基础。你可以使用
-i/--image 来指定另一个受支持的基础镜像 - ubuntu、debian 或
fedora。
虚拟环境(platyvenv)
如果你的机器上已经安装了 Platypush 的基础版本,并且你有一个包含自定义集成
集合的配置文件,那么你可以选择使用 platyvenv 命令从你的配置文件生成一个自定义
虚拟环境,其中包含所有已配置的额外依赖项。
以下命令:
❯ platyvenv -c /path/to/your/config.yaml -o /path/to/your/venv将在 /path/to/your/venv 下创建一个新的虚拟环境,并使用
指定的 config.yaml 来确定应安装哪些可选依赖项。
激活新环境后,您可以运行 Platypush:
❯ source /path/to/your/venv/bin/activate
❯ platypush -c /path/to/your/config.yaml
手动安装
插件/后端文档 报告了每个插件所需的所有 依赖项,以及在多个平台上安装它们的命令。
如果您想要自定义安装,或者需要为需要一些手动步骤的插件 安装依赖项,您可以查阅其文档中的任何特定于插件的安装步骤。
HTTP API
操作和过程也可以通过 Platypush 暴露的 JSON-RPC API 进行调用。
如果您想使用 HTTP API,您的配置需要启用 backend.http
部分 - 默认监听端口:8008。
在确保 HTTP 后端已启用后,前往
http://localhost:8008 并注册一个新用户。
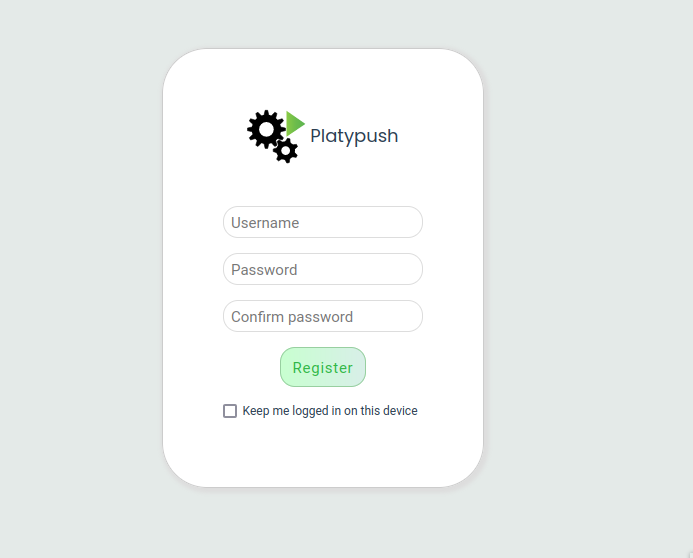
从 Web UI 进入 Settings → Tokens,再次输入您的密码, 然后点击 Generate JWT token。
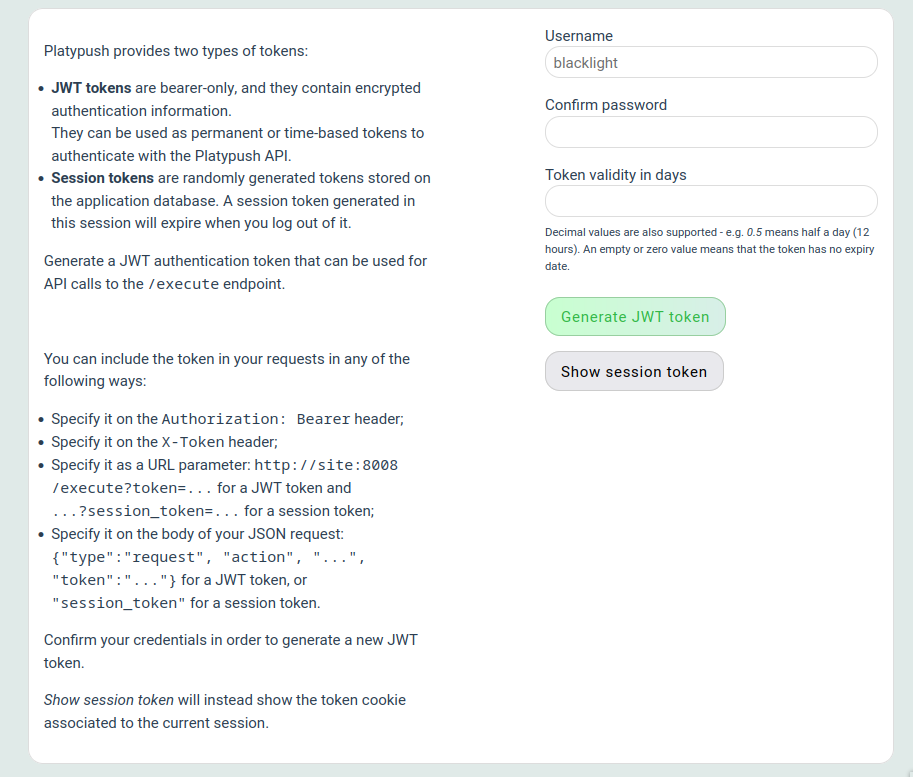
或者,您可以通过 HTTP 请求获取令牌:
❯ curl -XPOST -H 'Content-Type: application/json' -d '
{
  "username": "$YOUR_USER",
  "password": "$YOUR_PASSWORD"
}' http://localhost:8008/auth
然后,您可以使用简单的 RPC API 向 Platypush 发送请求:
❯ curl -XPOST \
    -d '{"type":"request", "action":"procedure.at_home"}' \
    -H "Authorization: Bearer $YOUR_TOKEN" \
    -H "Content-Type: application/json" \
    http://localhost:8008/execute
❮
{
  "id": "724754df98968247a284557ce32f74bb",
  "type": "response",
  "target": "http",
  "origin": "myhost",
  "_timestamp": 1716575901.046127,
  "response": {
    "output": {
      "success": true
    },
    "errors": []
  }
}
环境变量令牌
对于无头或容器化部署,您还可以设置 PLATYPUSH_API_TOKEN
环境变量。当设置后,携带该令牌值(通过
Authorization: Bearer、X-Token 请求头或 ?token 查询参数)的请求
将在无需注册用户或数据库查询的情况下完成身份验证。
该令牌是操作员级别的机密,不会显示在 Web UI
令牌列表中。
❯ export PLATYPUSH_API_TOKEN=my-secret-token
❯ curl -XPOST \
    -d '{"type":"request", "action":"procedure.at_home"}' \
    -H "Authorization: Bearer $PLATYPUSH_API_TOKEN" \
    -H "Content-Type: application/json" \
    http://localhost:8008/execute
如果你的过程返回了某个值,那么该值也会包含在 API 响应中,以便下游消费者可以使用它。
POST /execute 端点接受以下格式的负载:
{
  "type": "request",  // Constant
  "action": "<plugin-name>.<action-name>",  // Or procedure.<name>
  "args": {
    "arg1": "arg2",
    // ...
  }
}
在我们的 procedure.at_home 示例中,例如,你可以创建一个与你的手机配对的自动化
片段,该片段在你到家时(或你的手机检测到到家时)运行例程:
-
安装像 Tasker 这样的应用,以在你的 Android 设备上 创建自动化任务。
-
安装像 AutoLocation 这样的插件,以 基于你手机的位置创建自动化任务。
-
创建一个配置文件,该配置文件在你进入家庭位置时(和/或 离开时)触发。
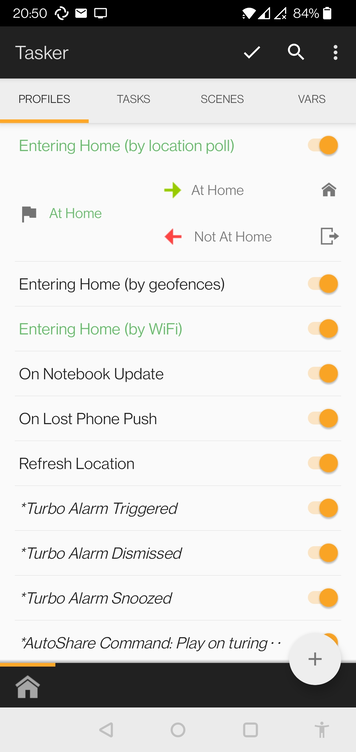
- 利用 HTTP Request Tasker 操作向你的 Platypush API 发送请求以触发例程。
Execute 选项卡
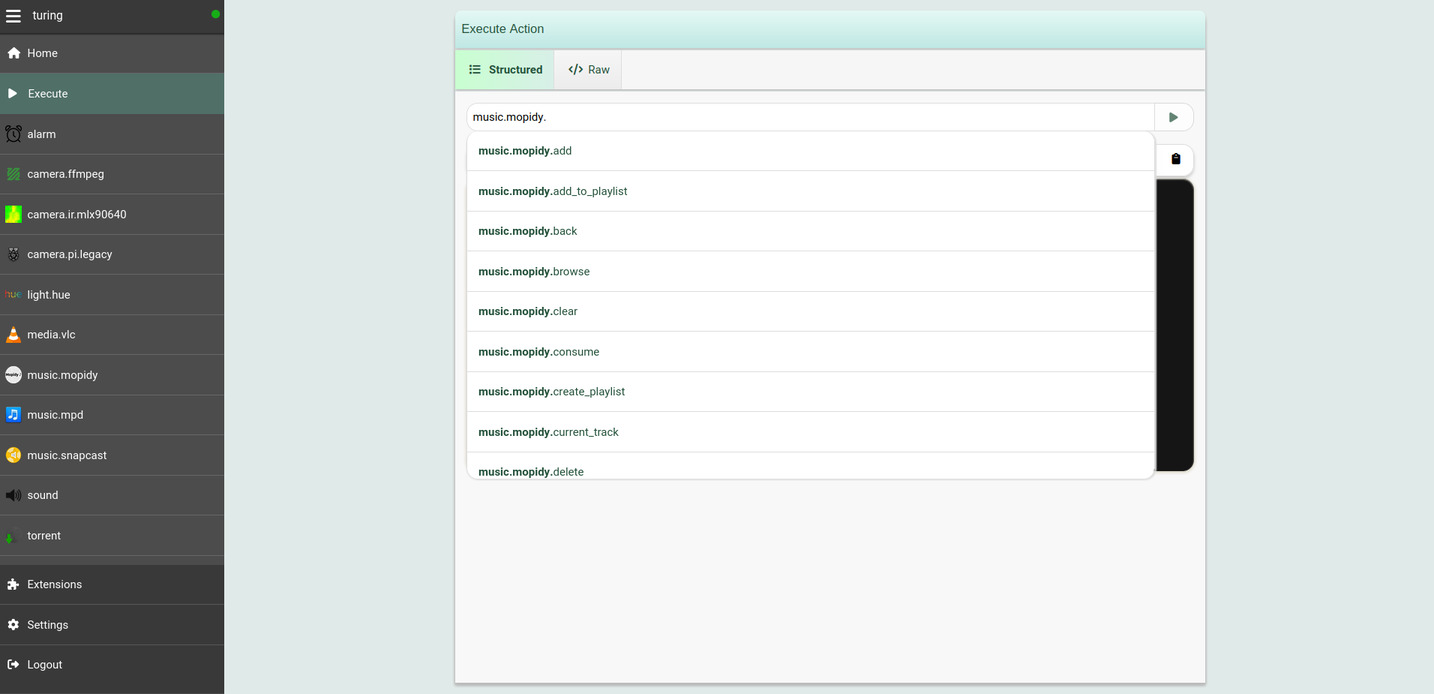
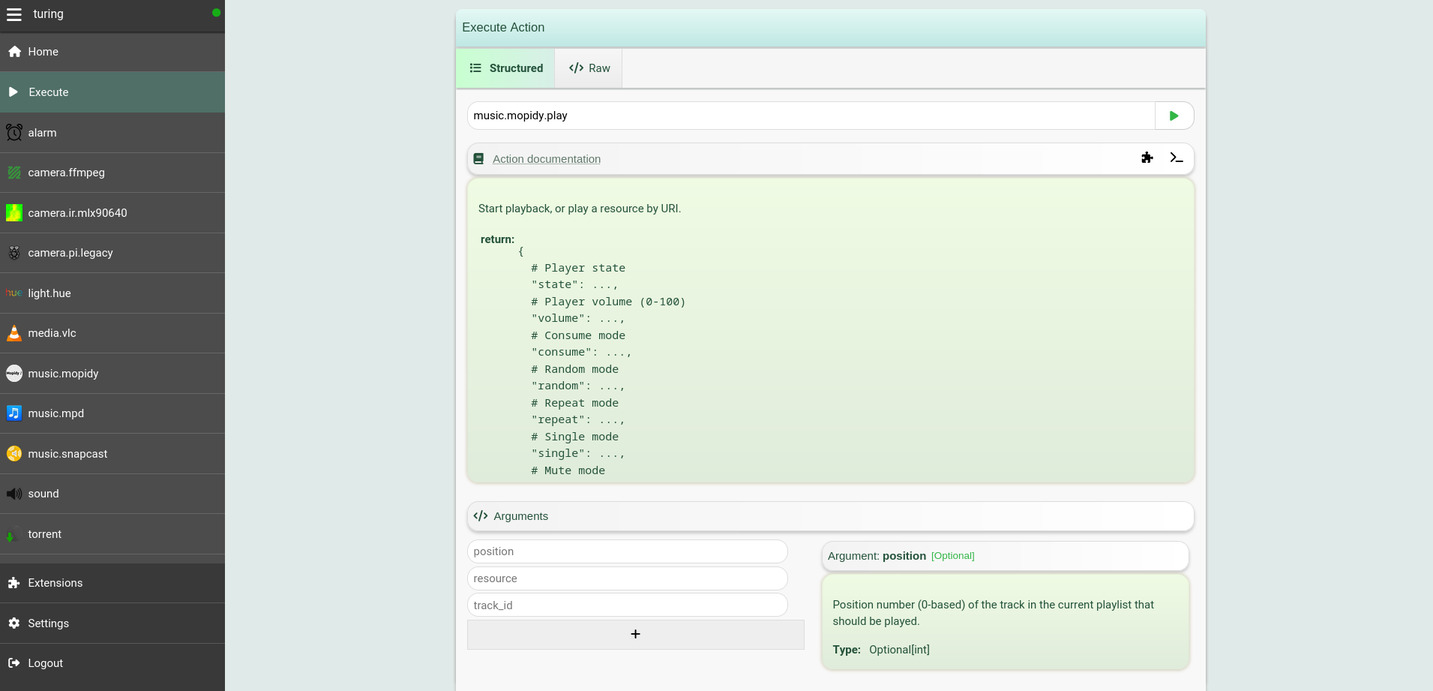
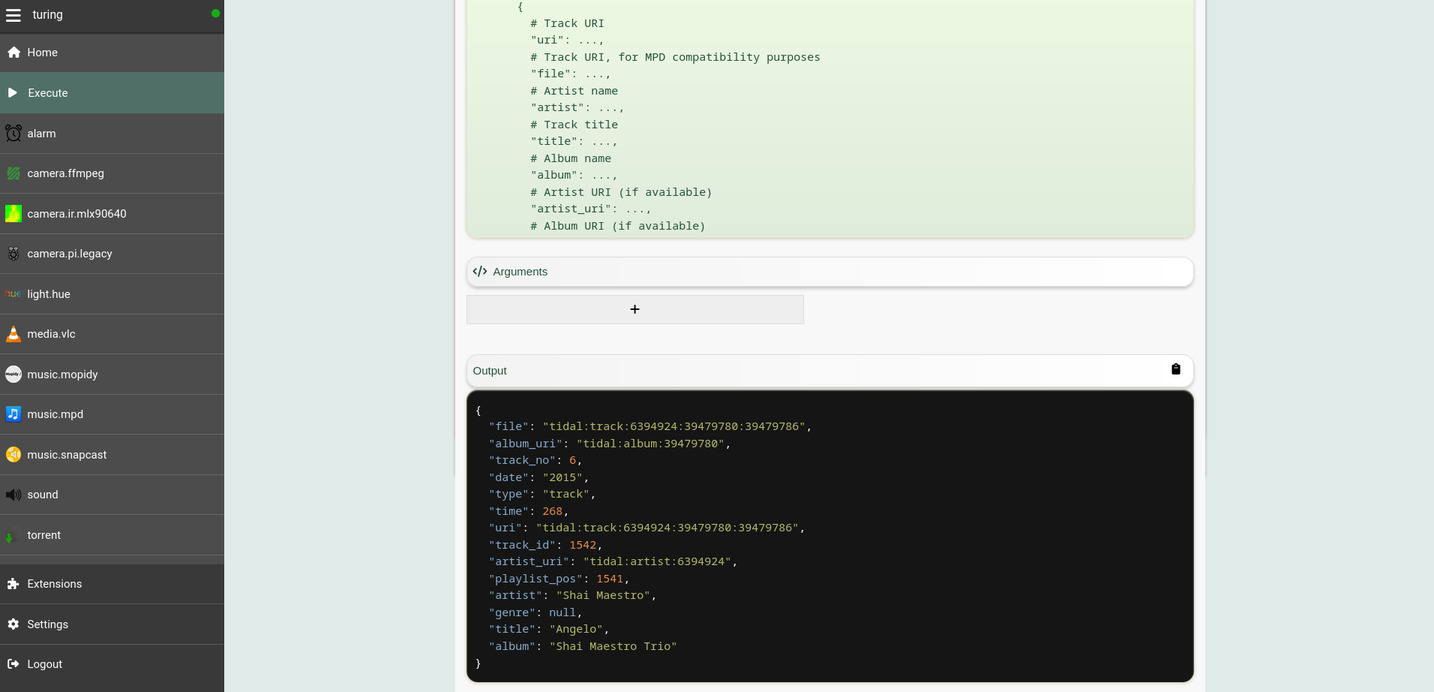
Web 界面还在菜单侧边栏下提供了一个 Execute 选项卡。你可以使用此选项卡动态发现各种插件(以及你自己的过程)所暴露的操作:
Websocket API
Events
你可以通过 /ws/events
Websocket 端点订阅应用程序生成的事件,也可以向该端点发送事件。
如果你希望将 Platypush 事件与另一个客户端同步, 或发送应用程序原生事件之外的自定义事件并基于它们构建 自定义自动化钩子,这将非常有用。
发送事件:
❯ wscat -H "Authorization: Bearer $YOUR_TOKEN" \
    -c "ws://localhost:8008/ws/events" \
    -w 1 \
    -x '
{
  "type": "event",
  "args": {
    "type": "platypush.message.event.custom.CustomEvent",
    "subtype": "foo",
    "args": {
      "bar": "baz"
    }
  }
}'
接收事件:
❯ wscat -H "Authorization: Bearer $YOUR_TOKEN" -c "ws://localhost:8008/ws/events"操作
你还可以向 /ws/requests Websocket 端点发送请求,并在同一通道上异步获取响应:
❯ wscat -H "Authorization: Bearer $YOUR_TOKEN" \
    -c "ws://localhost:8008/ws/requests" \
    -w 1 \
    -x '{"type": "requests", "action": "procedure.foo.bar"}'
Web 钩子
你可以使用 Platypush 将你的自定义例程暴露为动态 Web 钩子, 供任何客户端调用。
你只需要为
WebhookEvent
from platypush import run, when
from platypush.events.http.hook import WebhookEvent

hook_token = "abcdefabcdef"

# Expose the hook under the /hook/at_home endpoint
@when(WebhookEvent, hook="at_home")
def at_home_webhook(event: WebhookEvent):
    # Unlike the calls to /execute, custom web hooks are unauthenticated.
    # If you want authentication, you'll need to implement your custom logic by
    # parsing the event headers
    if event.headers.get("X-Token") != hook_token:
        # Tuple with <response, http-code, [response-headers]>
        event.send_response(("Unauthorized", 401))
        return

    run('procedure.at_home')

    # Return anything back to the client
    return {'status': 'ok'}
然后你可以通过 HTTP 调用你的自定义逻辑:
❯ curl -H 'X-Token: abcdefabcdef' 'http://localhost:8008/hook/at_home'实体
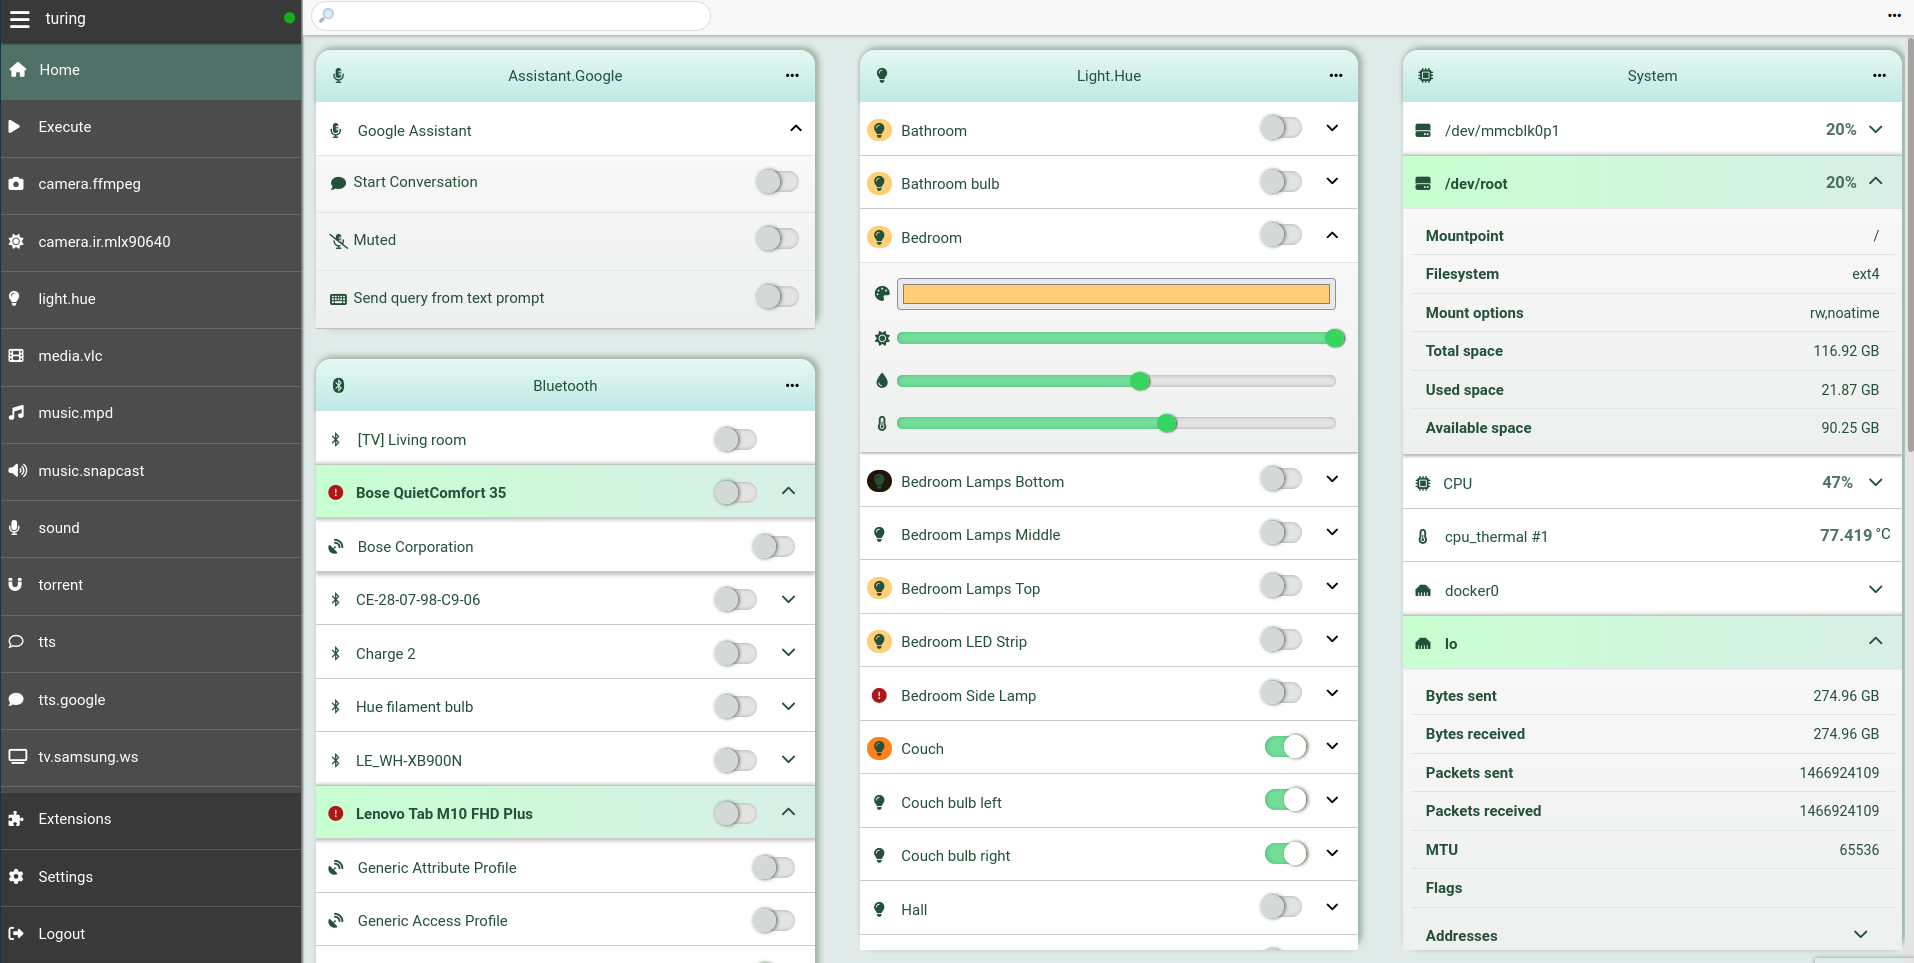
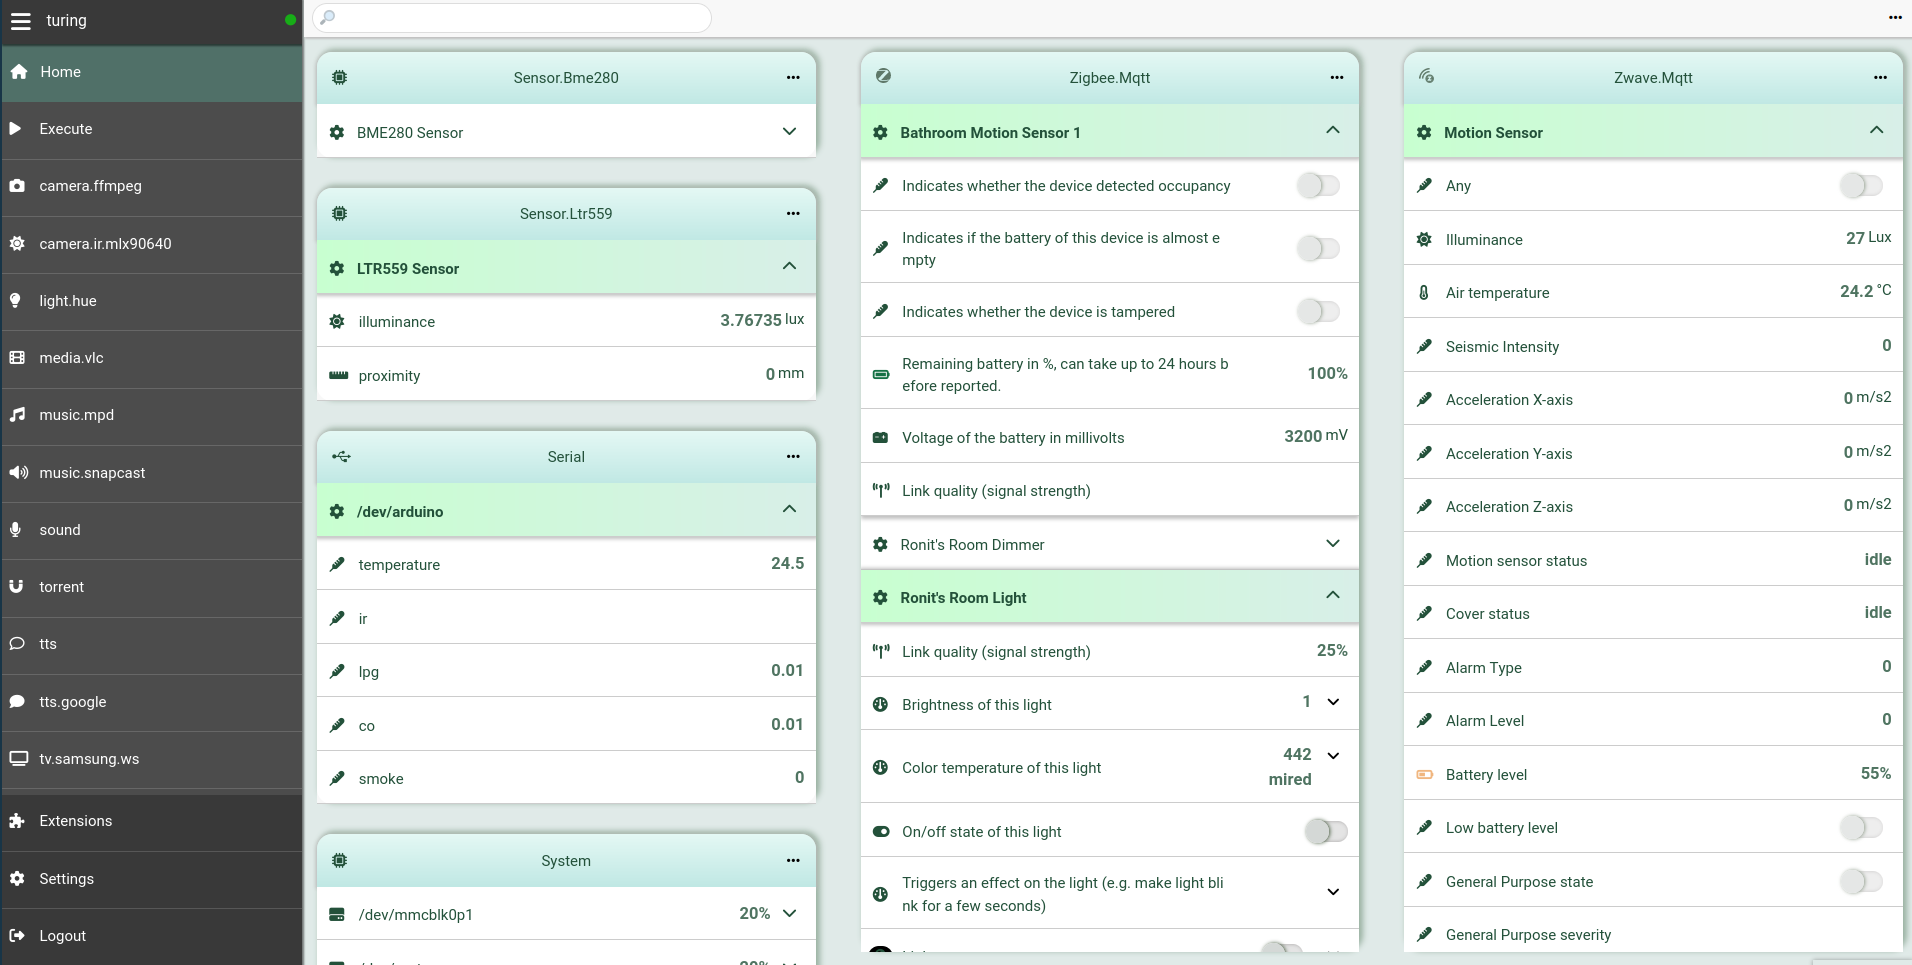
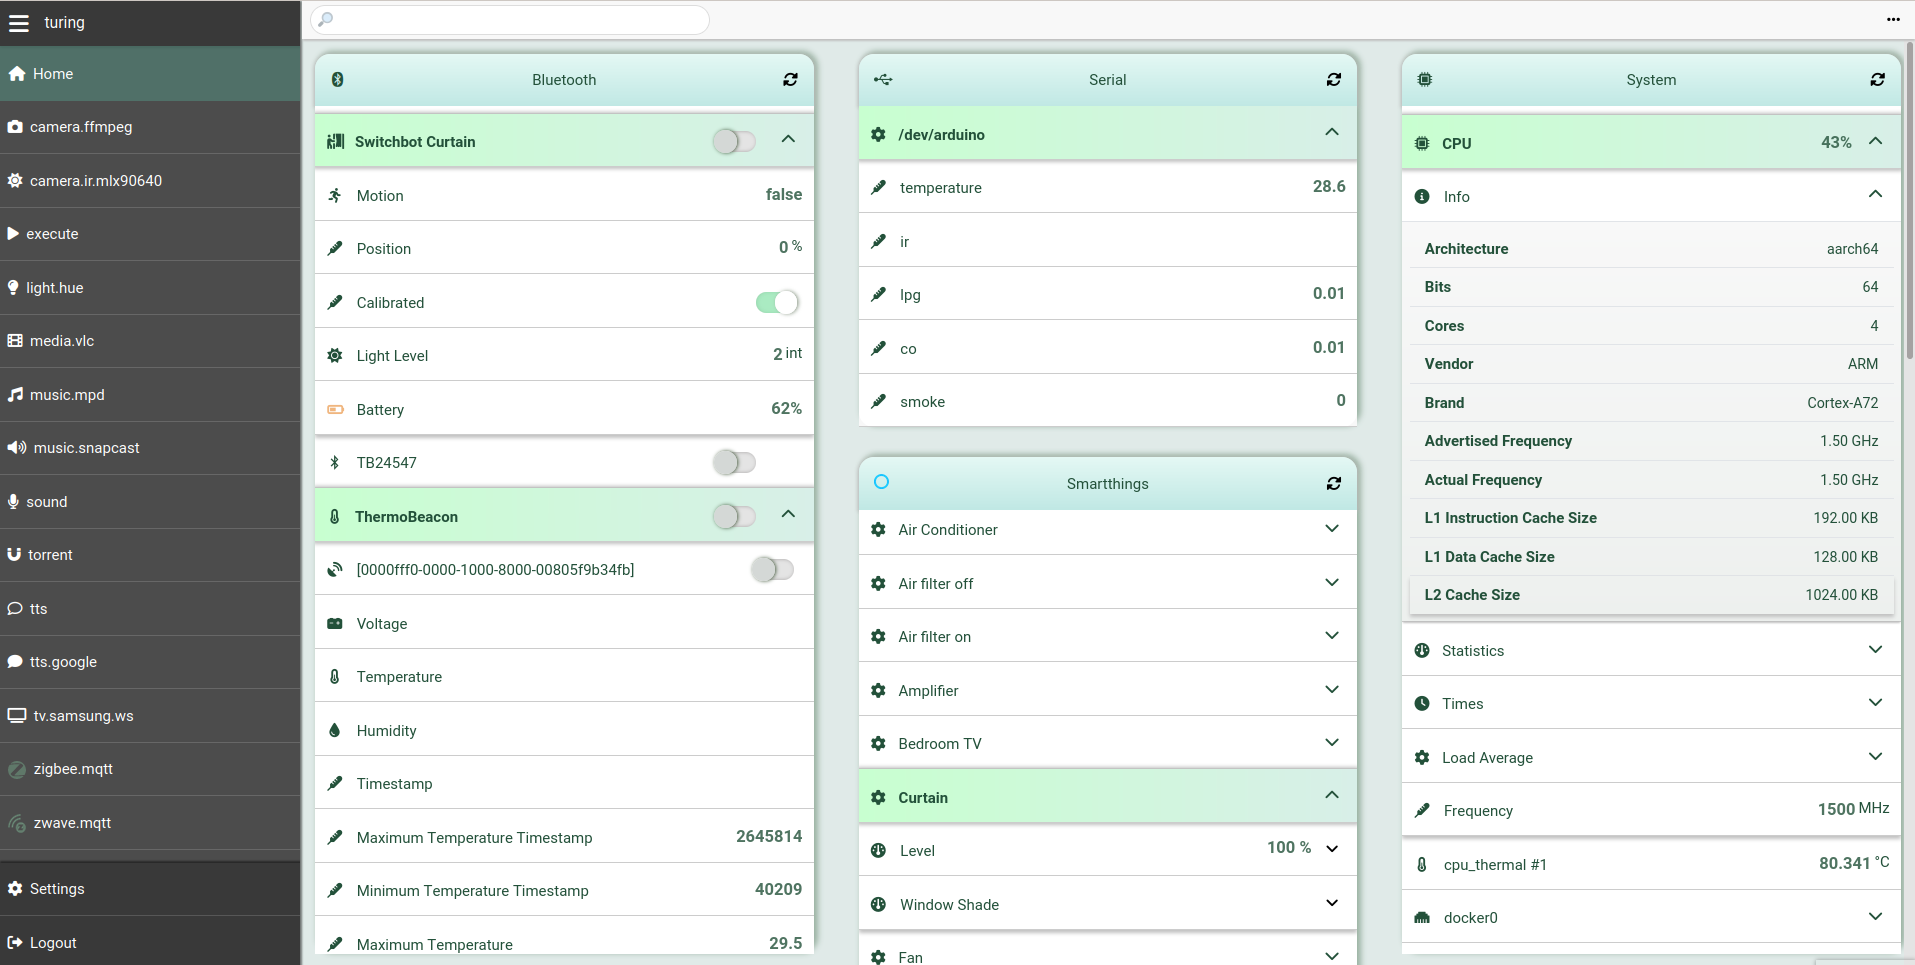
实体是 Platypush 的另一个构建模块。许多集成会以实体的形式存储其状态或已连接的设备——例如,由 Z-Wave/Zigbee/Bluetooth 集成检测到的传感器,或连接到 Hue 网桥的灯具,或您的云节点,或您的自定义 Arduino/ESP 设备,等等。
实体提供了一种一致的接口,用于与您的集成进行交互,无论其类型以及处理它们的插件如何。例如,所有温度传感器都将暴露相同的接口,无论它们是 Bluetooth 还是 Zigbee 传感器,并且所有媒体插件都将暴露相同的接口,无论它们管理的是 Chromecasts、Kodi、Plex、Jellyfin 还是本地 VLC 播放器。
一旦您启用了 HTTP 后端和几个导出实体并注册用户,您就可以通过以下方式查询检测到的实体:
curl -XPOST -H 'Content-Type: application/json' \
    -H "Authorization: Bearer $YOUR_TOKEN" \
    -d '{"type":"request", "action":"entities.get"}' \
    http://localhost:8008/execute
所有实体都暴露相同的接口,并可通过相同的 API 进行操作。此外,当实体被更新时,它始终会发出
EntityUpdateEvent,
因此您可以轻松创建响应这些事件的钩子,并对多种类型的实体进行操作。
如果您启用了 HTTP 后端,则还可以从 Web UI 的主面板访问所有实体。
配置
配置文件
您可以使用 默认
config.yaml
作为模板/参考。
应用程序所使用的 config.yaml 的位置按以下方式确定:
- 可以通过命令行
-c/--config参数传递。 - 如果未通过
-c指定,则从PLATYPUSH_CONFIG环境变量中读取。 - 如果未指定,则使用可用的
./config.yaml。 - 如果不可用,并且您正在 Docker 容器内运行 Platypush,
或以特权用户身份运行(通常不应该这样做),或以受支持的包管理器创建的 systemd 服务
身份运行,则如果可用,将使用
/etc/platypush/config.yaml。 - 否则,如果您以非特权用户身份或在虚拟环境中运行 Platypush,
将使用
$XDG_CONFIG_HOME/platypush/config.yaml(默认为~/.config/platypush/config.yaml)。
脚本目录
默认情况下,任何自定义 Python 脚本都将在
<CONFDIR>/scripts 下搜索,其中 <CONFDIR> 是您 config.yaml 的路径。
您可以在您的 config.yaml 中覆盖它:
scripts_dir: /path/to/custom/scripts由于 scripts 目录下的所有内容都将作为子模块导入, 你可以创建自己的脚本库,这些库可以导入其他脚本:
# Content of scripts/music.py

from platypush import run

def music_play(plugin='music.mopidy', resource=None):
  run(f'{plugin}.play', resource)

# Content of scripts/lights.py

from platypush import run

def lights_toggle(plugin='light.hue', groups=('Living Room',)):
  run(f'{plugin}.toggle', groups=groups)

# Content of scripts/home.py

from platypush import procedure

from scripts.music import music_play
from scripts.lights import lights_toggle

@procedure
def at_home():
  music_play()
  lights_toggle()
将配置拆分到多个文件
config.yaml 文件可能会变得非常复杂,尤其是在其中以 YAML 格式嵌入许多
钩子和过程时。
为了使配置更易于维护,并且隔离可在多个实例中复用的模块,您可以利用 include
指令:
# All paths are relative to config.yaml, or to the location of the current file
include:
  - assistant.yaml
  - db.yaml
  - media.yaml
  - mqtt.yaml
  - sensors.yaml
  # ...
工作目录
这是应用程序存储数据以及集成插件存储其数据的位置。优先级顺序为:
-w/--workdir命令行参数。PLATYPUSH_WORKDIR环境变量。- 配置文件中的
workdir字段。 - 如果以非特权用户启动,则为
$XDG_DATA_HOME/platypush(默认:~/.local/share/platypush);如果以 root 或系统用户启动,则为/var/lib/platypush。
数据库
应用程序在数据库中存储实体、变量、用户、集成状态等。引擎配置支持 SQLAlchemy 引擎语法。
注意:应用程序默认使用本地 SQLite 数据库,该数据库由 SQLAlchemy 原生支持。应用程序也已针对 MySQL/MariaDB 和 Postgres 进行了测试,并且应该可以正常支持任何 SQLAlchemy 支持的现代关系型数据库。但是,除 SQLite 以外的任何后端可能需要额外的 Python 依赖项来支持 SQLAlchemy 驱动程序(例如,PostgreSQL 的 pg8000)。
引擎的优先级顺序:
--main-db/--db命令行参数。PLATYPUSH_DB环境变量。- 配置文件中的
main.db字段。 sqlite:///<WORKDIR>/main.db
设备 ID
设备 ID 是网络上 Platypush 实例的唯一标识符,用于在多个实例使用共享后端时可靠地分发消息。
优先级顺序为:
--device-id命令行参数。PLATYPUSH_DEVICE_ID环境变量。- 配置文件中的
device_id字段。 - 机器的主机名。
systemd 服务
如果您通过系统包管理器安装了 Platypush,那么也会为其安装一个 systemd 服务。
您可以像其他 systemd 服务一样启动/启用 Platypush:
# systemctl start platypush
# systemctl enable platypush
或者,如果你想以普通用户身份运行 Platypush 服务:
❯ systemctl --user start platypush
❯ systemctl --user enable platypush
否则,你可以复制 提供的
.service
文件
到例如 ~/.config/systemd/user 或 /etc/systemd/system 来创建你自己的 systemd 服务。
Redis
Platypush 使用 Redis 作为内存队列来传递消息,并作为进程间通信的发布/订阅 总线。
如果你通过包管理器安装了 Platypush,那么当你以特权用户身份启动 Platypush 服务时, Redis 服务将自动安装并启动。
如果你在容器中运行 Platypush,则默认情况下它会通过 --start-redis 命令行选项启动自己的 Redis
实例。
你可以通过以下方式自定义 Redis 配置:
--redis-host、--redis-port和--redis-queue命令行选项。PLATYPUSH_REDIS_HOST、PLATYPUSH_REDIS_PORT和PLATYPUSH_REDIS_QUEUE环境变量。- 通过你的
config.yaml:
# See https://redis-py.readthedocs.io/en/latest/connections.html#redis.Redis
# for the full list of supported parameters
redis:
  host: redis-host
  port: 6379
  username: redis-user
  password: redis-pass
如果设置了 --start-redis,应用程序可以配置为通过以下方式启动自定义
redis-server 可执行文件:
--redis-bin命令行选项。PLATYPUSH_REDIS_BIN环境变量。
也支持 keydb-server、valkey 或
redict 等替代的 drop-in 实现。
nginx
如果你想在家庭网络之外访问你的 Platypush Web 面板,使用带有有效 SSL 证书的 nginx/Apache 反向代理(例如由 certbot 管理)可能是一个好主意。仓库中提供了一个 nginx 配置示例 。
Web 界面
其他 Web 面板
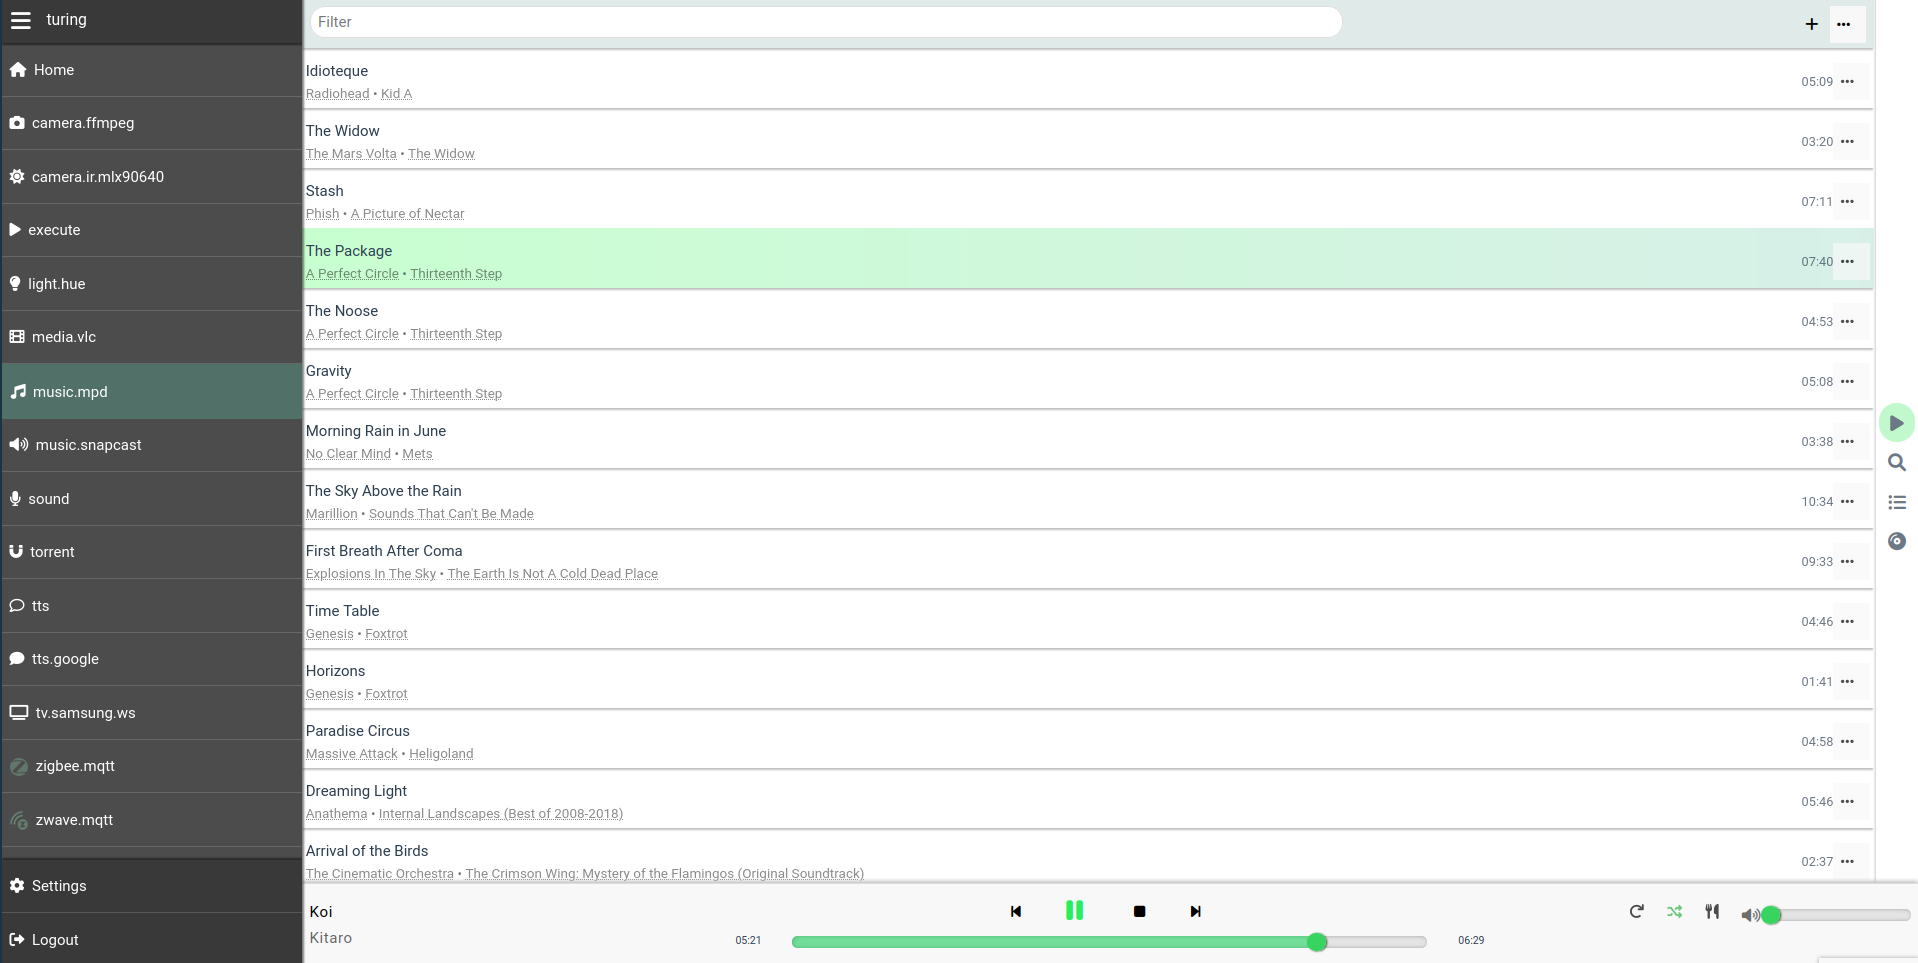
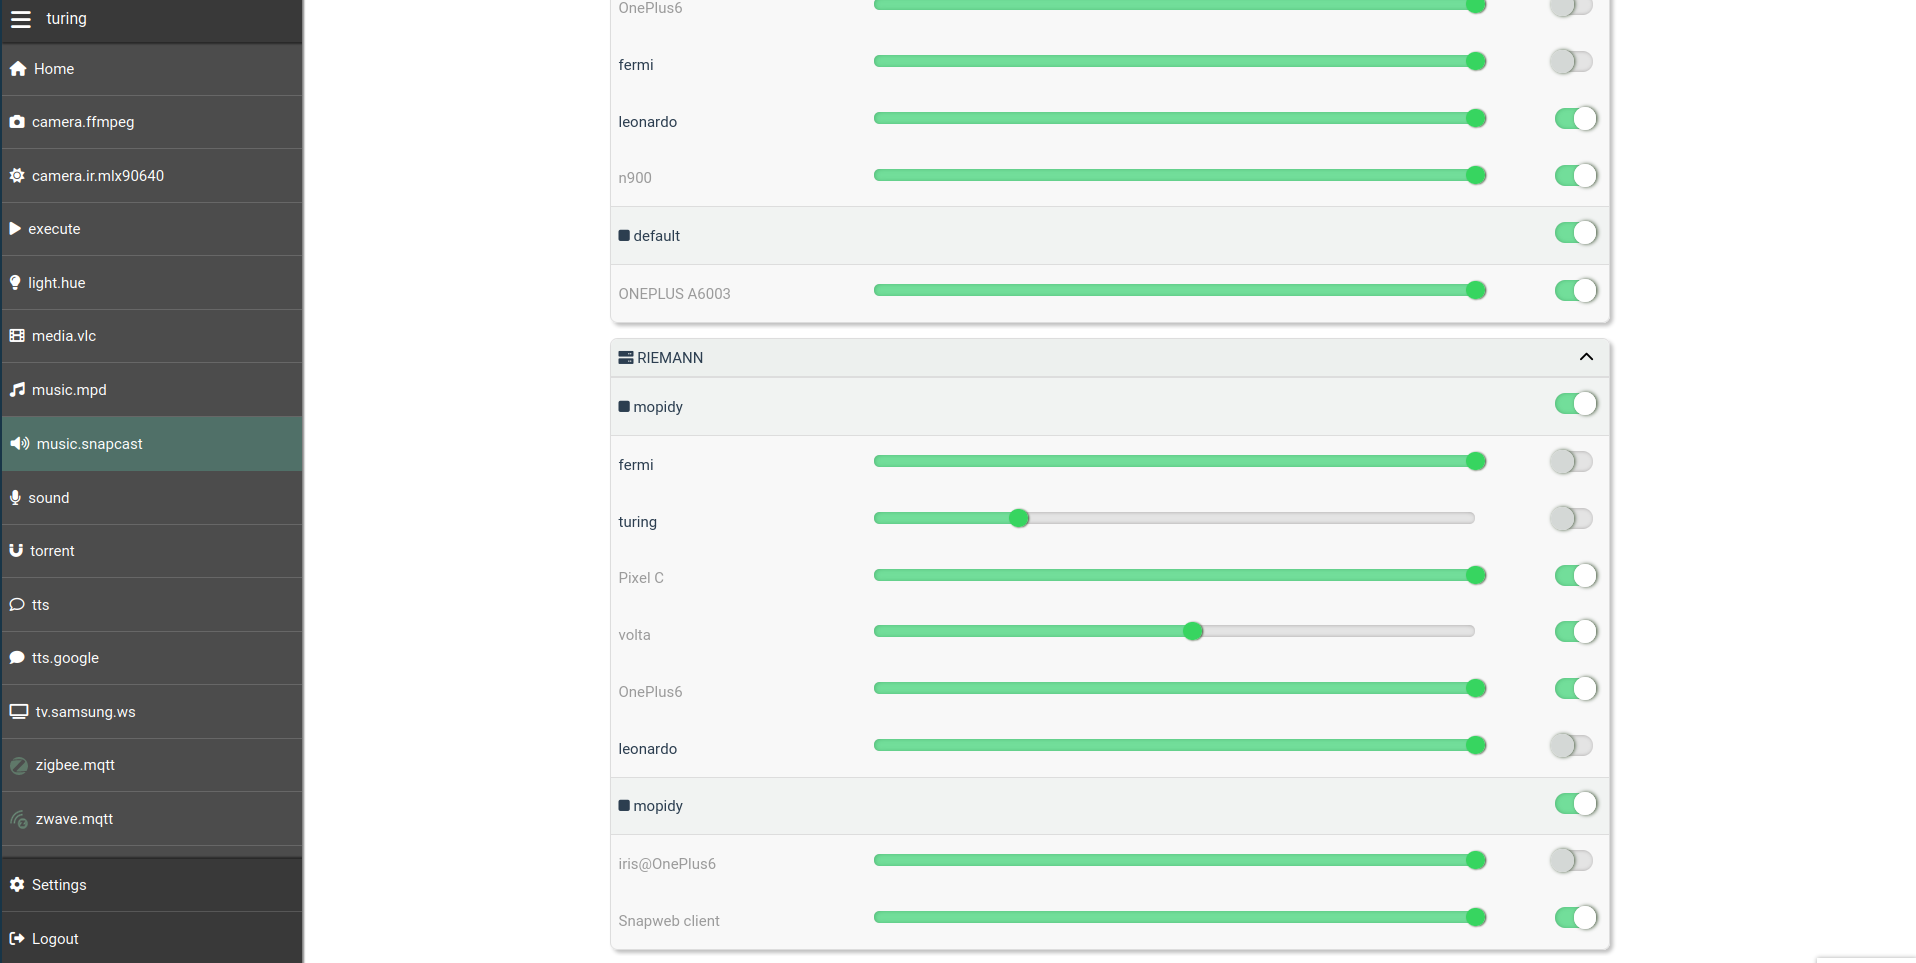
除了我们在其他章节中已经看到的内置面板外, 许多集成还为 Web 视图添加了功能丰富的面板,使 Platypush 成为通往你所有服务的网关——从 Zigbee 传感器,到 媒体播放器和服务,再到你的音乐云,等等。
例如,音乐视图可用于大多数 music 插件。
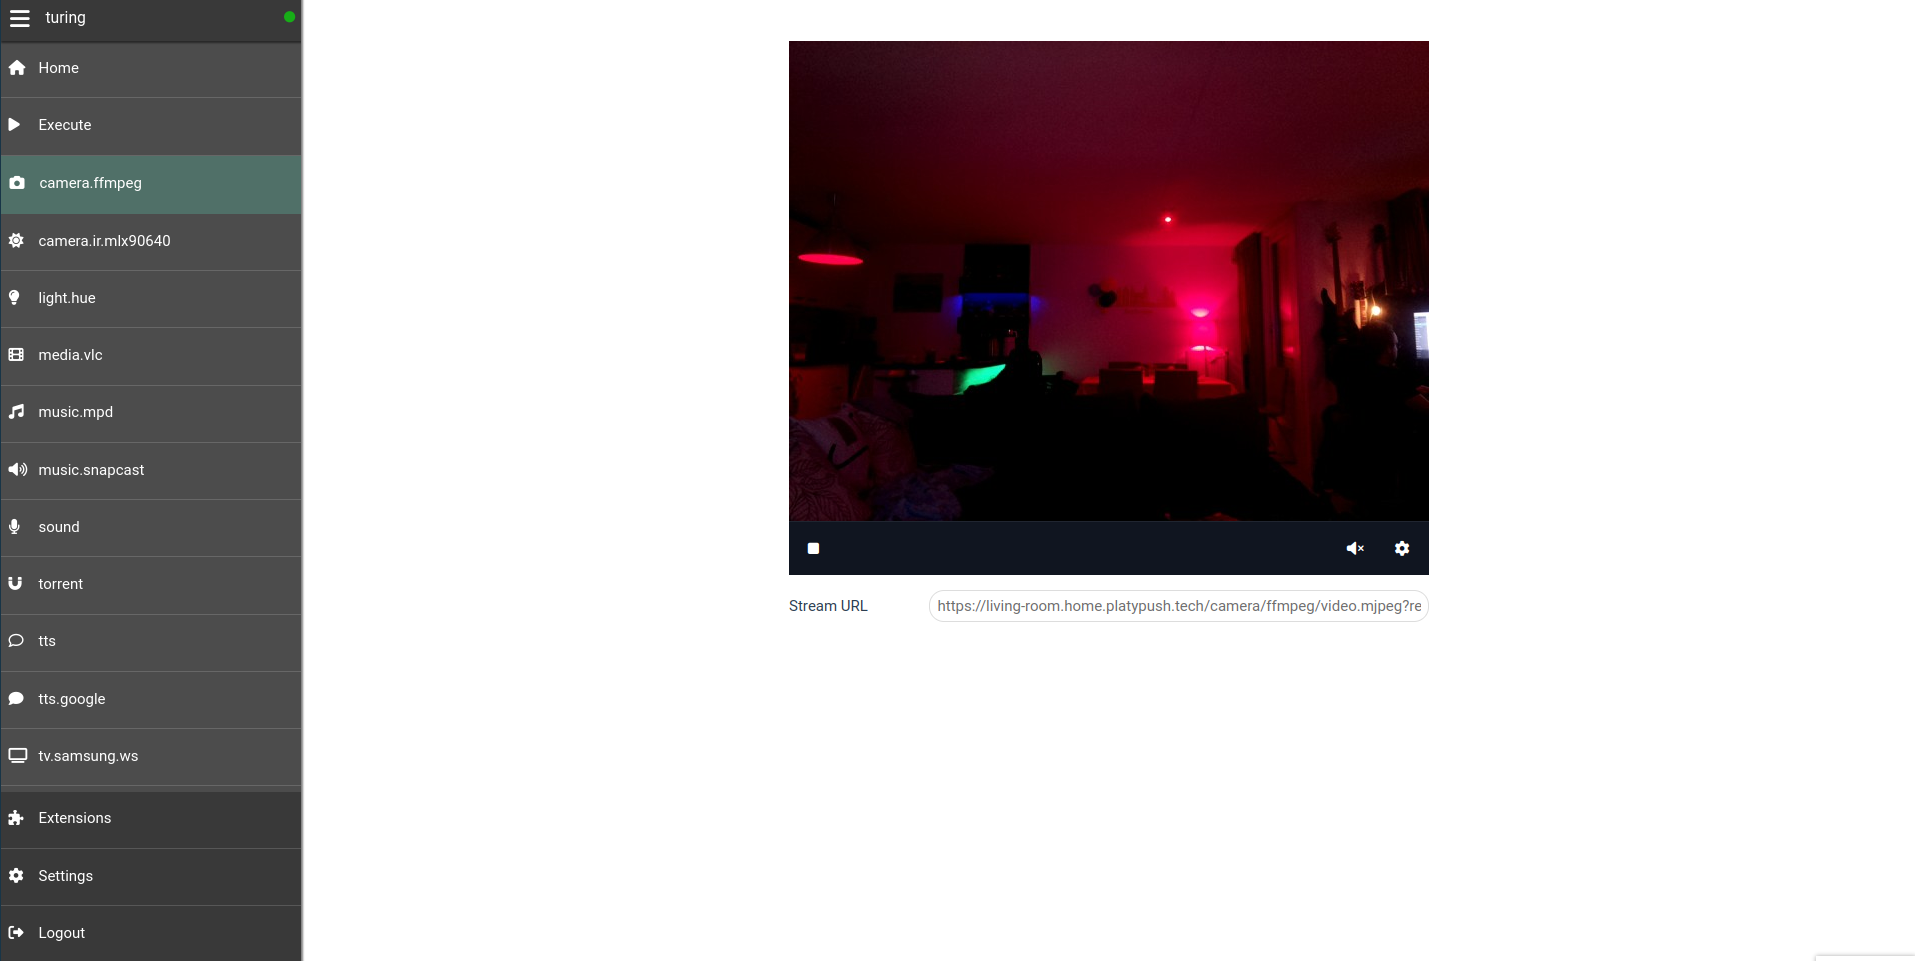
另一个示例是摄像头面板,用于监控您的摄像头、获取独立的
视频流 URL 以及拍照。如果您启用至少一个 camera 插件,
该功能将在 UI 中可用。
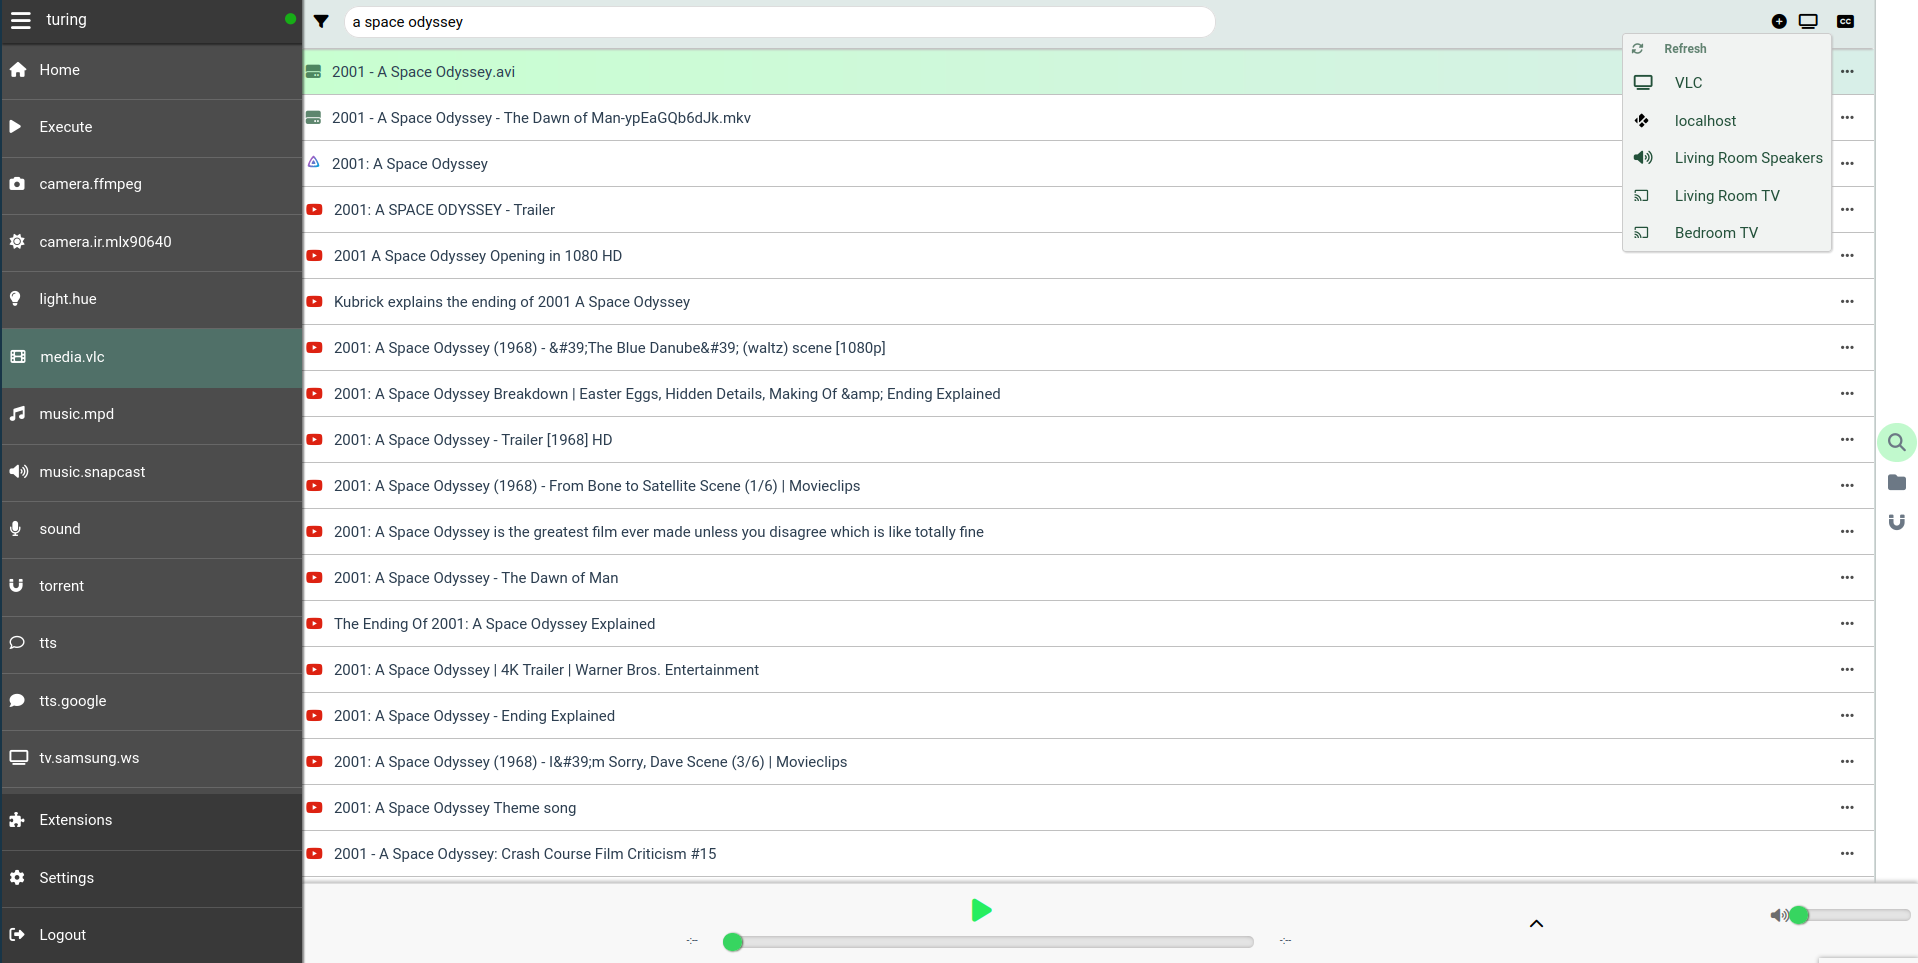
如果您启用了至少一个本地 media 插件(例如 media.vlc、
media.mplayer 等),您还将解锁媒体 UI,它允许您对已配置的 media_dirs 下的媒体文件
进行索引、搜索、查看和投屏,并且它还与其他已配置/支持的后端(如 YouTube、
Plex 和 Jellyfin)集成。
仪表板
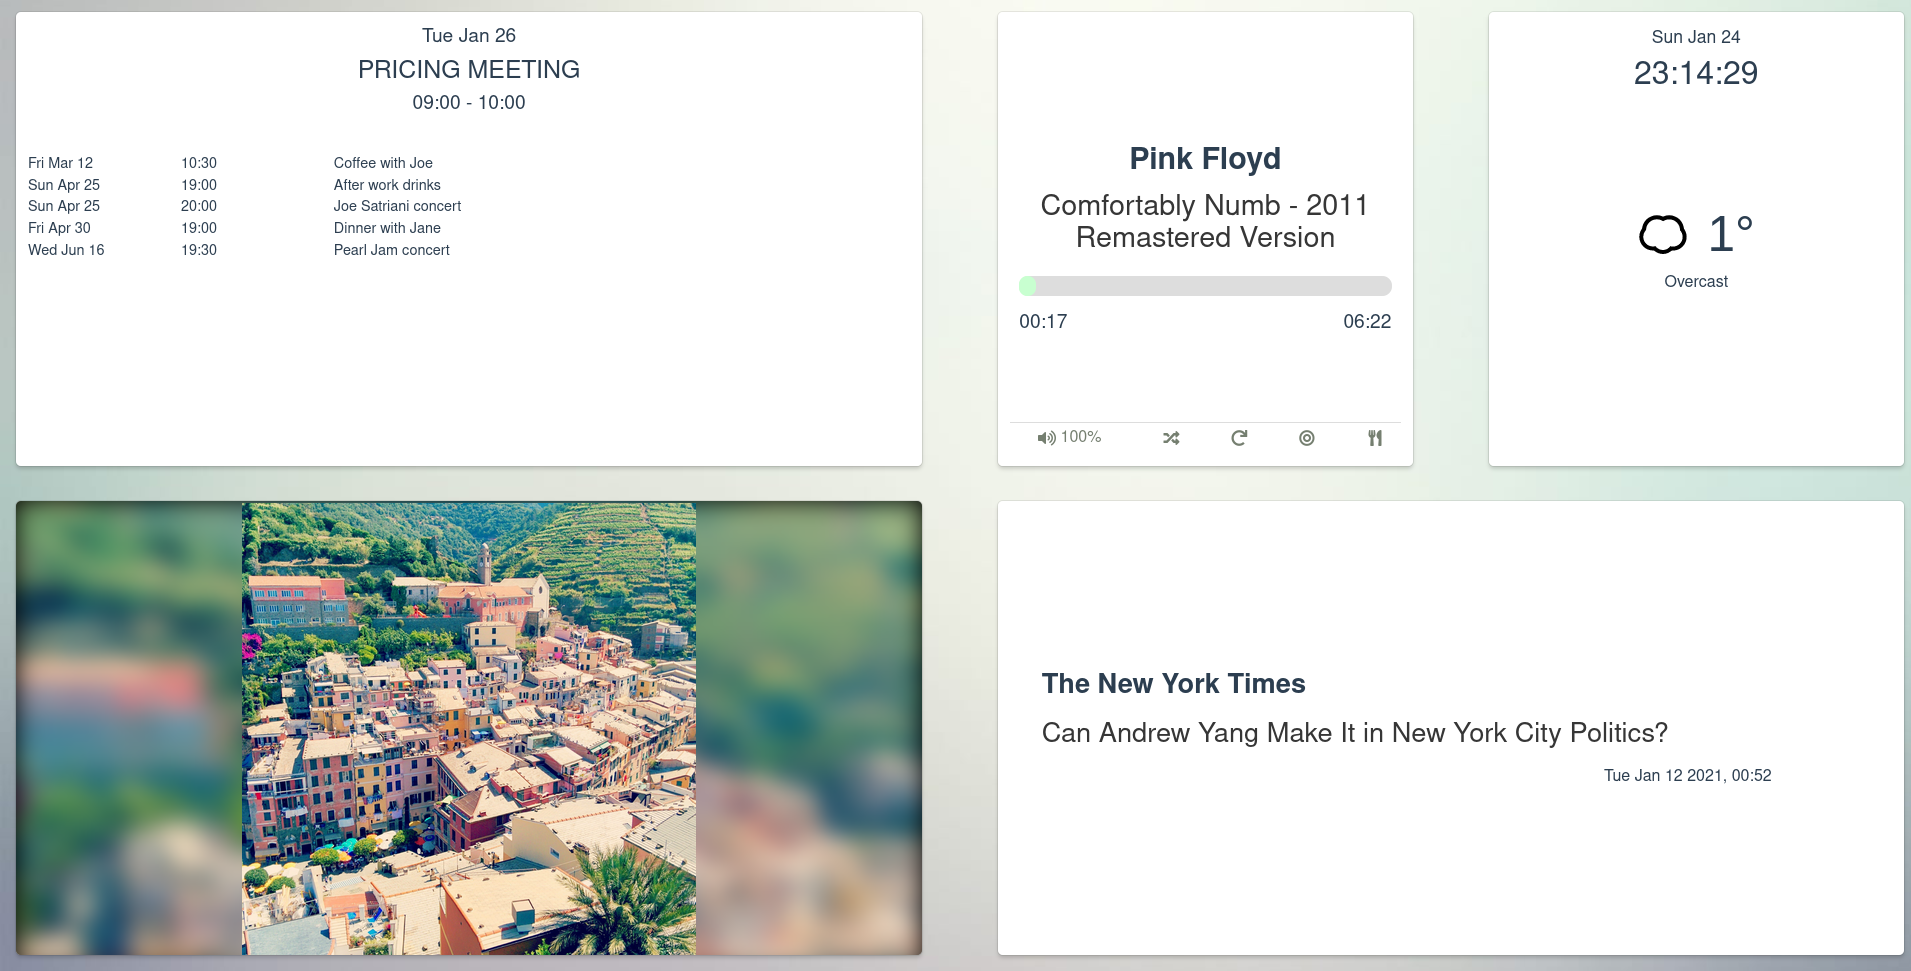
该 Web 服务还提供了用户创建 自定义 仪表板 的机制,可用于在大屏幕上显示来自多个来源的信息。
PWA 支持
请注意,通过 SSL 提供 Web 应用程序是 PWA(渐进式 Web 应用程序)运行的必要条件。Platypush PWA 允许您在移动设备上安装一个类似原生的 Platypush 客户端,如果您不想使用完整的 Android 应用程序的话。
双因素认证
通过 OTP 代码进行 2FA 支持需要启用
otp 和
qrcode 插件。
安装依赖项后,您可以通过从 Web 面板导航到 设置 -> 用户 来启用它。然后选择您的用户,选择 设置 2FA,并按照屏幕上的步骤设置您的身份验证器。
移动应用
官方 Android 应用 在 F-Droid 商店提供。它允许通过 Web 界面轻松发现和管理网络上的多个 Platypush 服务,并轻松将 Platypush 的强大功能带到您的指尖。
浏览器扩展
浏览器扩展允许您直接从浏览器运行 Platypush 操作和过程, 并将键盘快捷键与它们关联,这样您可以在浏览器的任何地方通过几个按键运行 您最喜欢的例程,并提供一个高级 API 来与您访问的 Web 页面进行交互 - 例如, 您可以构建一个操作,获取您正在访问的页面的内容,并使用 Platypush 将其提炼为 可读格式,或将 URL 发送到另一个服务。
测试
要运行测试,只需从项目根目录或
tests/ 文件夹中运行 pytest。